pete
Super Member
  Registered: Jun 29, 2021 13:48:10 GMT -7
Posts: 409
|
Post by pete on Oct 3, 2021 16:32:14 GMT -7
|
|
pete
Super Member
  Registered: Jun 29, 2021 13:48:10 GMT -7
Posts: 409
|
Post by pete on Oct 4, 2021 16:08:49 GMT -7
|
|
malcox477
Loyal Member
   Registered: May 21, 2019 16:19:37 GMT -7
Posts: 1,039
|
Post by malcox477 on Oct 4, 2021 21:19:22 GMT -7
WAW this is serious detail work Pete, love it man, now that i see this i was thinking to do the same thing to my Earnhardt car, but never pull those details like i wanted to, my next NASCAR will do those little thing for sure
|
|
pete
Super Member
  Registered: Jun 29, 2021 13:48:10 GMT -7
Posts: 409
|
Post by pete on Oct 5, 2021 12:46:42 GMT -7
Thanks Marcos! Its one of the reasons I tend to stay away from Nascar builds. They are always labor intensive and suck up a good portion of your detail materials stash... That's partly why I had to stock up on my RB Mo' Money stuff. LOL... 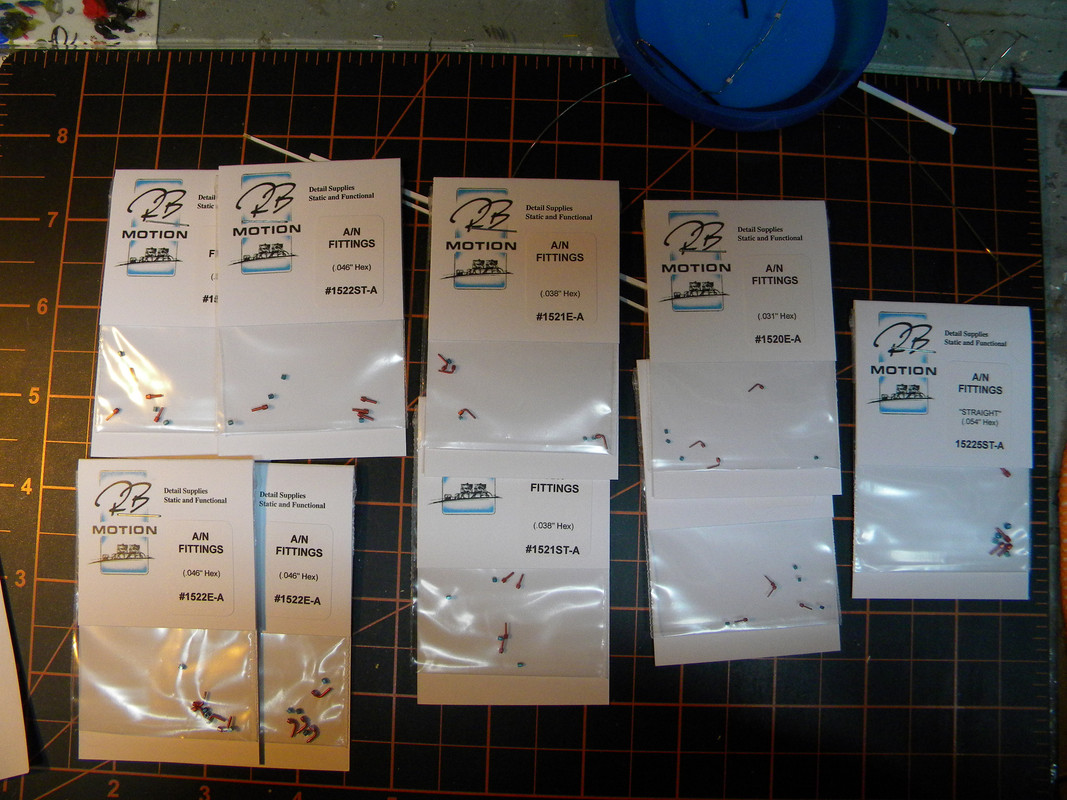 If I let it, most of this could end up on this build...  |
|
malcox477
Loyal Member
   Registered: May 21, 2019 16:19:37 GMT -7
Posts: 1,039
|
Post by malcox477 on Oct 5, 2021 20:22:01 GMT -7
you know now that you mentioned i've been trying to get some of those RB motion parts and every morning when i get home the only thing i think of is go to sleep  deficiently going to make an order really soon, they have to many thing that i want to get |
|
pete
Super Member
  Registered: Jun 29, 2021 13:48:10 GMT -7
Posts: 409
|
Post by pete on Oct 7, 2021 17:16:49 GMT -7
Go shopping when your wide awake Marcos!! Lots to see on the RB Motion site. Oh and just to warn you...The stuff I stocked up on in the above pic....$98.00  |
|
pete
Super Member
  Registered: Jun 29, 2021 13:48:10 GMT -7
Posts: 409
|
Post by pete on Oct 7, 2021 17:28:26 GMT -7
|
|
malcox477
Loyal Member
   Registered: May 21, 2019 16:19:37 GMT -7
Posts: 1,039
|
Post by malcox477 on Oct 9, 2021 1:28:54 GMT -7
Looking real good Pete
|
|
|
|
Post by mustang1989 on Oct 9, 2021 5:56:46 GMT -7
Oh man....this just keeps getting better and better Pete. I've got alot of RB "Mo-Money" items in my stash as well and yup....I know what you're saying about the cost......BUT....to me it's all worth it in the final product. The detailing you're putting into this ride is just amazing. I did this kind of detailing on a '56 F-100 I built 7 or so years ago with the brake lines and all. Very tedious work.  |
|
pete
Super Member
  Registered: Jun 29, 2021 13:48:10 GMT -7
Posts: 409
|
Post by pete on Oct 9, 2021 7:31:20 GMT -7
Yeah, its gotta have stuff if your gonna go the distance and then put it in a show setting. It is tedious but Definitely soo worth it.
I would like to see more of that F100. Looks pretty sweet from the bottom...
|
|
pete
Super Member
  Registered: Jun 29, 2021 13:48:10 GMT -7
Posts: 409
|
Post by pete on Oct 10, 2021 8:32:49 GMT -7
|
|
malcox477
Loyal Member
   Registered: May 21, 2019 16:19:37 GMT -7
Posts: 1,039
|
Post by malcox477 on Oct 11, 2021 0:15:29 GMT -7
I love how you are detailing this interior and engine bay, normally i don't work that organize, i need to do it like you are doing to get better results
|
|
pete
Super Member
  Registered: Jun 29, 2021 13:48:10 GMT -7
Posts: 409
|
Post by pete on Oct 16, 2021 17:37:54 GMT -7
Its important to have a plan Marcos. Especially when you are deviating from the normal configuration of the parts that came in the box (Pretty much any of my builds) Have to plan it out, so you know what works/fits before you go and cut something up or otherwise alter it permanently. Saves ALOT of build headaches down the road. I think your well on your way...Just have to develop a routine that you can apply to all your builds. Just like paint. We all go with what we know, with processes that we have figured out/developed over the years and products we know are fool proof for our build styles. You my friend have arrived... You have the skills, just have to fit em into a routine/plan that works for you. I have been doing this since I was 5 yrs old...I am 56 now, AND...I am still learning and developing new Ideas/skills and learning new products. It never ends man! We either get better or we get left behind!!!
|
|
|
|
Post by mustang1989 on Oct 17, 2021 8:47:58 GMT -7
Its important to have a plan Marcos. Especially when you are deviating from the normal configuration of the parts that came in the box (Pretty much any of my builds) Have to plan it out, so you know what works/fits before you go and cut something up or otherwise alter it permanently. Saves ALOT of build headaches down the road. I think your well on your way...Just have to develop a routine that you can apply to all your builds. Just like paint. We all go with what we know, with processes that we have figured out/developed over the years and products we know are fool proof for our build styles. You my friend have arrived... You have the skills, just have to fit em into a routine/plan that works for you. I have been doing this since I was 5 yrs old...I am 56 now, AND...I am still learning and developing new Ideas/skills and learning new products. It never ends man! We either get better or we get left behind!!! First off. My hat goes off to you Pete for a job so well done so far ol' buddy. Good stuff my brother. Marcos: It took me a couple of super detailed models to come to the conclusion that I needed a plan. This is particularly true of my aircraft builds which , if I let 'em, can roll into a runaway train effect. Then, it's the build at that point, which determines the course of the direction rather than me. Like Pete's sayin, I plan out what I want to do with a build well in advance and then try to stick to that plan as much as possible. Sure there'll be some "ad libbing" done here and there but as long as it doesn't turn into a runaway build then you'll be alright. I had to learn the hard way that the detail has to end somewhere for the build to turn out great and for it to be fun in the meantime. |
|
malcox477
Loyal Member
   Registered: May 21, 2019 16:19:37 GMT -7
Posts: 1,039
|
Post by malcox477 on Oct 18, 2021 22:14:59 GMT -7
Thanks Guys for all those amazing comments, definitely i'm working on how to do an organize project from start to end, but in the past few years i've been jumping in the projects what to do and how to a long as i go with it, my most organize project so far is my Dodge promod and so far is turning exactly how i had it on my mind, even doing stuff that i normally do not do at all, first time doing the two tune the way i'm doing this one, engine details and interior details, and one thing is a lot of people helped me all the way so far, including you guys whish and i only talk to you guys at night when i'm at work, and i really do appreciate that...
Definitely working on how my new projects are going to be and thinking on every single detail way before i do something
|
|
pete
Super Member
  Registered: Jun 29, 2021 13:48:10 GMT -7
Posts: 409
|
Post by pete on Oct 22, 2021 17:58:13 GMT -7
Got a few things done on this monster over the weekend! Corrected the wheel color. Don't know how I got it wrong the first time!  Started adding the wire harness and other plumbing too... LOL... Gonna have to pull one of the side panels I fabbed, If I want to get the roll cage installed. Hey! no good plan survives implementation!!  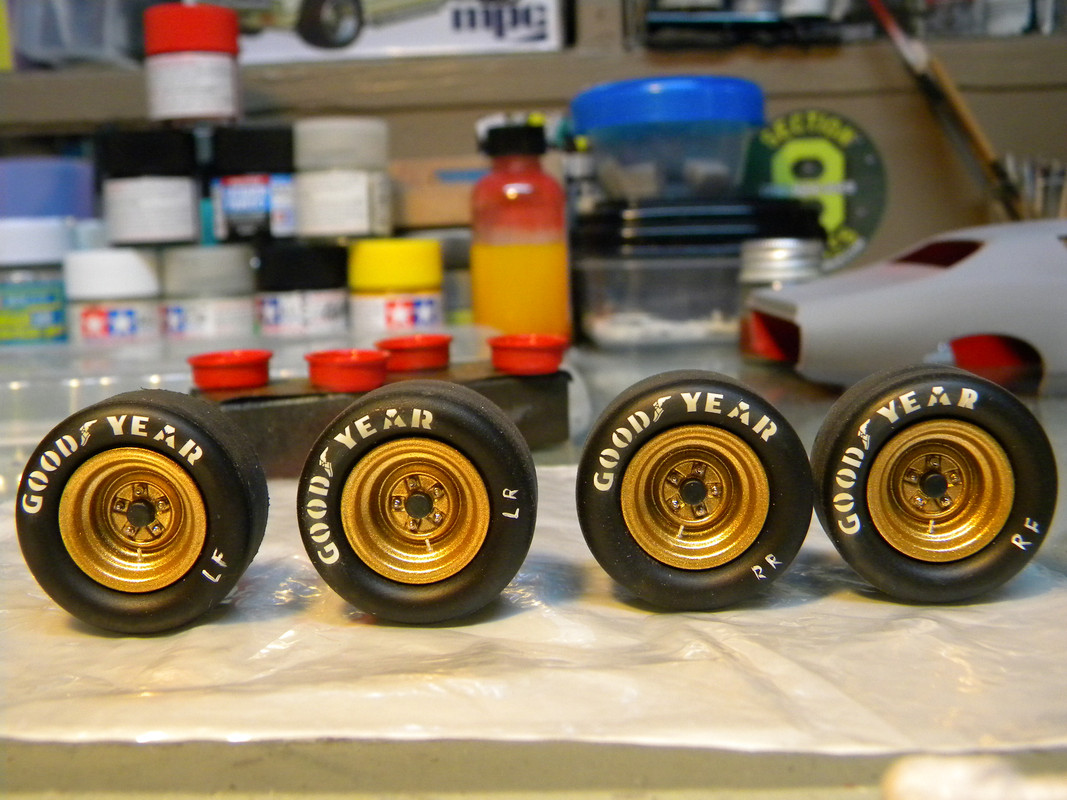 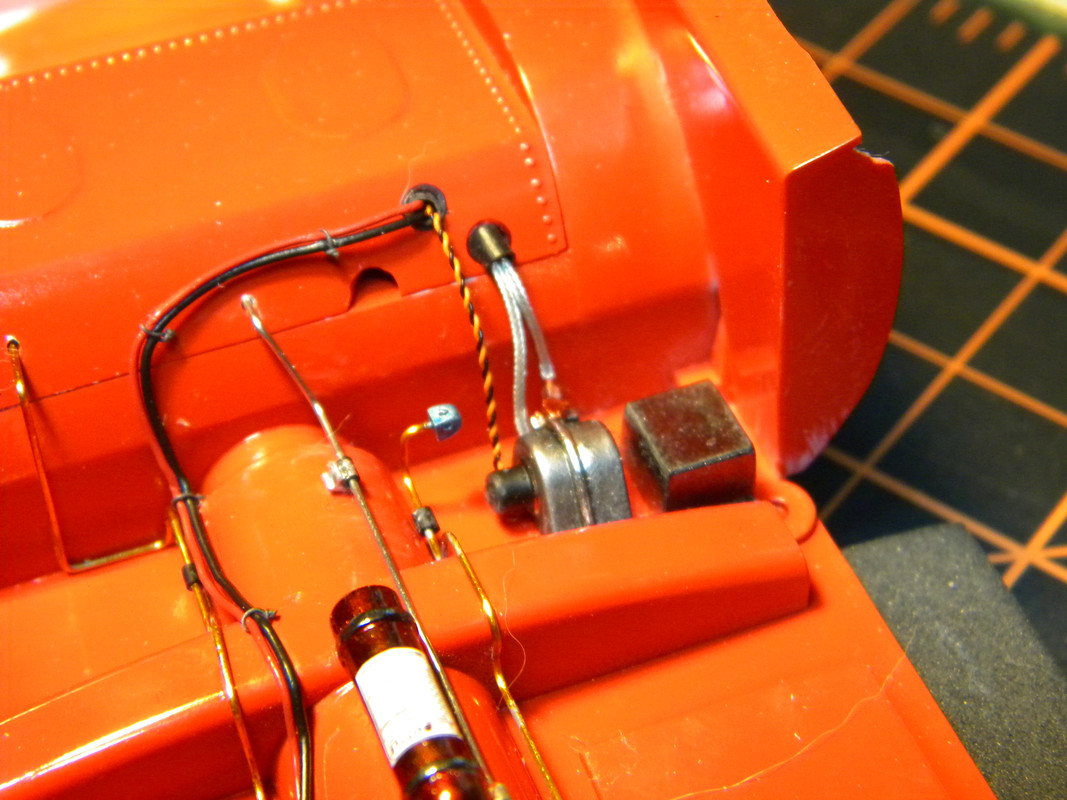 Next installment: We shall see what else I can screw up on this build! LOL.. |
|
41chevy
Senior Member
   Registered: Jul 1, 2021 9:46:43 GMT -7
Posts: 705
|
Post by 41chevy on Oct 22, 2021 18:16:46 GMT -7
Real eye candy! I've got all the Polarlights NASCAR kits but never started one. Did the GM Good Wrench Pickup. Did these cars run a differential cooler? I seem to recall seeing a unit belt driven off the rear some where. Paul
|
|
pete
Super Member
  Registered: Jun 29, 2021 13:48:10 GMT -7
Posts: 409
|
Post by pete on Oct 22, 2021 19:36:35 GMT -7
Yes, this one has a diff cooler Paul. Plumbing it is a P.I.T.A. Cant seem to find much info on this particular car either, soo...Artistic license prevails! Most teams were running diff coolers by the late 60's. The fire suppression system I put in here though...  |
|
malcox477
Loyal Member
   Registered: May 21, 2019 16:19:37 GMT -7
Posts: 1,039
|
Post by malcox477 on Oct 22, 2021 20:54:14 GMT -7
Amazing detail Pete, but i do have a question, how to tide those black and red wire together, i've been trying to do that but haven't make a good job on it
|
|
pete
Super Member
  Registered: Jun 29, 2021 13:48:10 GMT -7
Posts: 409
|
Post by pete on Oct 23, 2021 8:37:56 GMT -7
Thank you sir! I'll try and post up a tutorial on it for you here Marcos. Its not hard, just tedious...
|
|
41chevy
Senior Member
   Registered: Jul 1, 2021 9:46:43 GMT -7
Posts: 705
|
Post by 41chevy on Oct 23, 2021 12:19:44 GMT -7
Now I see. I knew that on his 71 Monte Carlo they has issues with the drive shaft belt drive shredding belts from track debris and cooked all the bearings
|
|
malcox477
Loyal Member
   Registered: May 21, 2019 16:19:37 GMT -7
Posts: 1,039
|
Post by malcox477 on Oct 23, 2021 21:04:10 GMT -7
Thank you sir! I'll try and post up a tutorial on it for you here Marcos. Its not hard, just tedious... That will be very helpful Pete, thanks, looking forward to that |
|
pete
Super Member
  Registered: Jun 29, 2021 13:48:10 GMT -7
Posts: 409
|
Post by pete on Oct 24, 2021 17:06:10 GMT -7
|
|
pete
Super Member
  Registered: Jun 29, 2021 13:48:10 GMT -7
Posts: 409
|
Post by pete on Oct 24, 2021 17:18:19 GMT -7
I did manage to get some work done on the Charger too...A bit more wiring work and some paint... 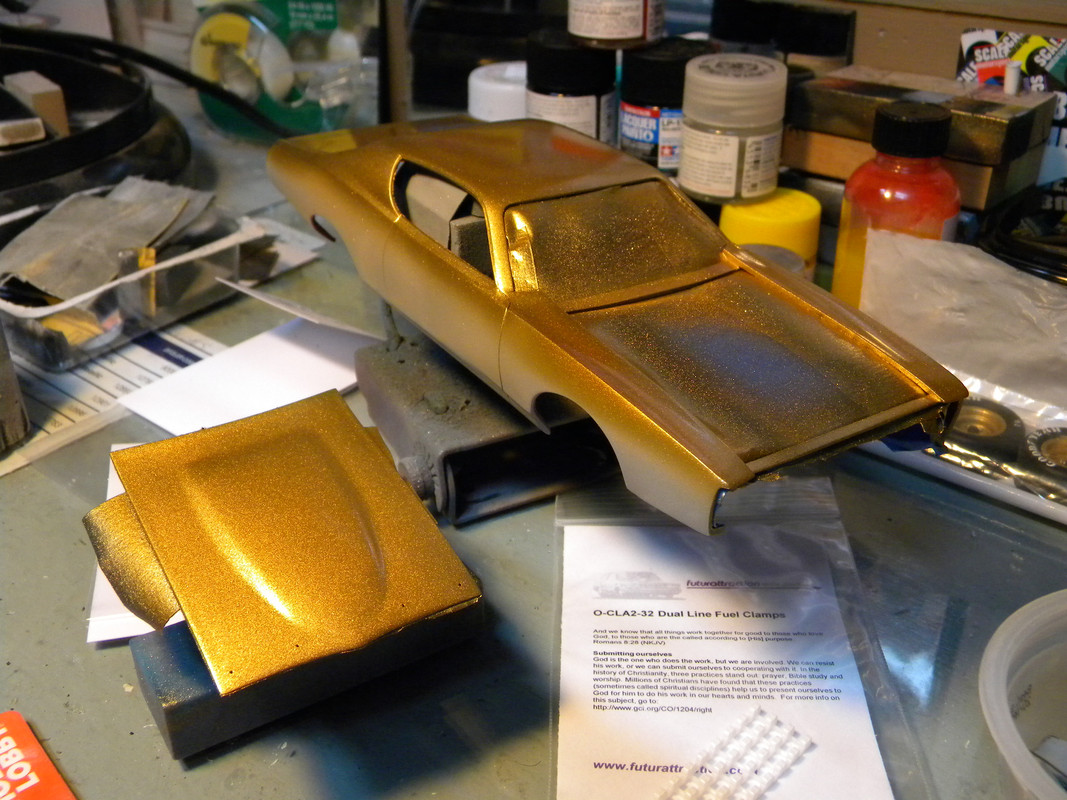 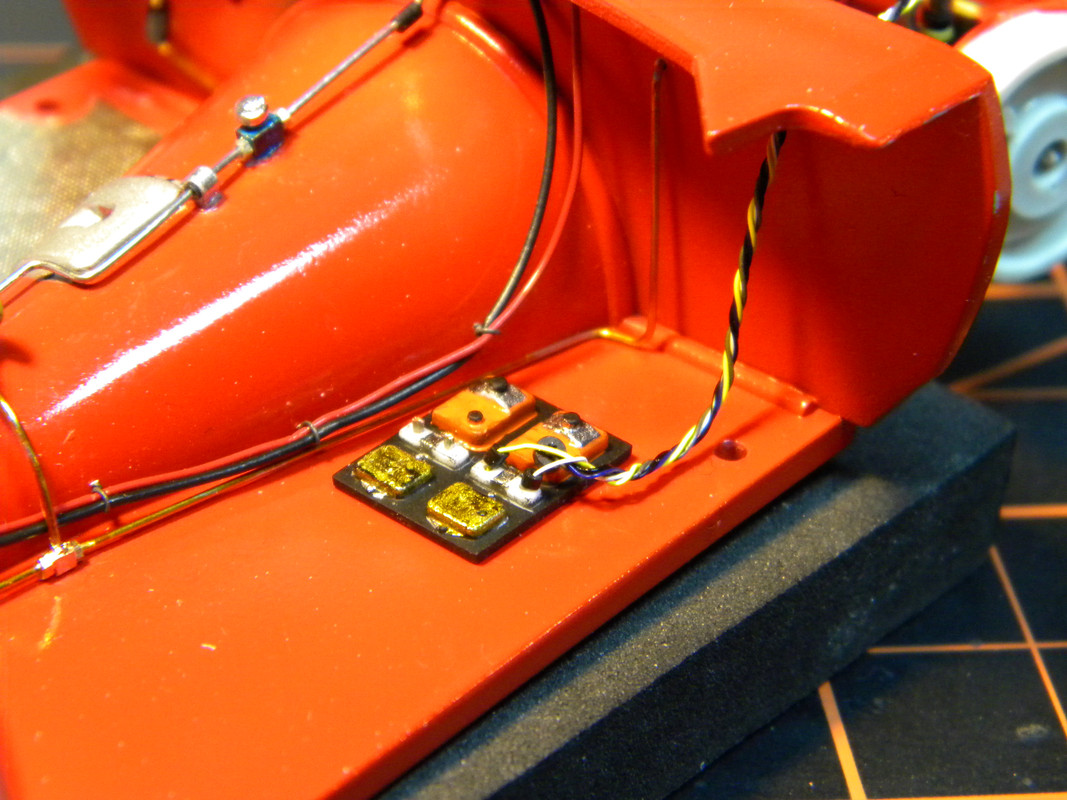 Next up should be the plumbing for the diff cooler and some more suspension work...Stay tuned gang and as always! Thanks for tuning in and commenting!!! |
|
malcox477
Loyal Member
   Registered: May 21, 2019 16:19:37 GMT -7
Posts: 1,039
|
Post by malcox477 on Oct 24, 2021 20:30:21 GMT -7
Here you go Marcos: Its pretty simple. Start with a small gage wire. I have this very old roll of 34 gage, its crusty looking too. Its jewelry wire. You can get it at Hobby lobby, Michaels, or any other arts & crafts supply store. You don't need these tools but it just makes it easier for me. Lower set are jewelers pliers, the jaws are round and graduate in diameter. The others are smooth jawed duck bill pliers. Start by making a small loop in the wire (You want it to be a bit larger than your wire bundle but not much) Now that you have a loop,this one is large so its easy to see. Twist the loose end around until you have a small pig tail. Slip your wire bundle in place, pinch the whole assembly with your finger nail to keep it from moving and...Twist some more with the duck bills until the loop has closed around your bundle and holds it securely. Once that's done...Snip the pigtail off leaving a few twists to keep it together and your done!! just be sure to start your twist at the base of the loop so you don't have to twist for days to get it tightened up. I do also use some fine copper wire I have from an old defunct ABS wheel speed sensor. This stuff is fine as a human hair! I usually just make a loop and tie the bundle to framework or what ever and just tie a knot. If I'm worried about it coming loose, I'll put a tiny drop of CA glue on it to keep it solid. I hope that does it for you Marcos! If you have any other questions, please don't hesitate to ask. That's more then helpful Pete, i'll be trying this in the morning to practice, very simple steps and for the way they look make a huge impact on those little cables for sure, thanks for the tutorial man, really going to help me improve a little bit more, about the other thin wire i'll see if i can find something similar to that, i really appreciate it... |
|
|
|
Post by mustang1989 on Oct 25, 2021 3:38:38 GMT -7
This one's gonna be a showstopper when you're all done with it Pete. Really putting alot of work into this one bud.
|
|
pete
Super Member
  Registered: Jun 29, 2021 13:48:10 GMT -7
Posts: 409
|
Post by pete on Oct 25, 2021 15:39:59 GMT -7
Glad I could help you out Marcos!!!
Thanks Joe, This one needed the work. Besides, if I'm going to compete against the NASCAR crowd. I better bring my "A" game. With what I'm taking this year...I hope to floor em at the Fulton show!!!
|
|
pete
Super Member
  Registered: Jun 29, 2021 13:48:10 GMT -7
Posts: 409
|
Post by pete on Oct 25, 2021 15:47:15 GMT -7
Got a bit more paint work done today...The red base coat is on now. Just have to cut the tape lines sharp edge with some 3600 grit and put a coat of clear on it so the decals lay down properly.   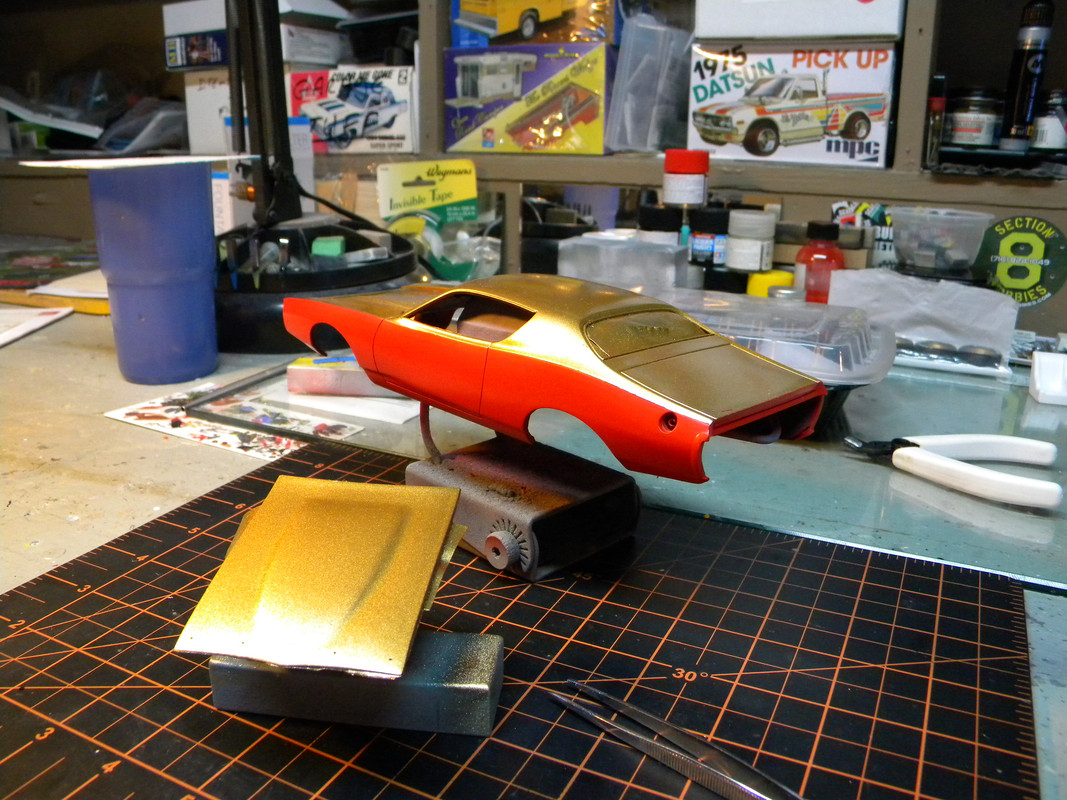 Ok, next up will be the Diff cooler and rear suspension install. Ran out of time today... |
|
|
|
Post by mustang1989 on Oct 26, 2021 3:01:57 GMT -7
I've seen the cleared method on tape for edges when it comes to two tone paint jobs. Can you elaborate on using clear with the tape as I'd really like to understand that and try it when I'm ready.
|
|
pete
Super Member
  Registered: Jun 29, 2021 13:48:10 GMT -7
Posts: 409
|
Post by pete on Oct 26, 2021 12:45:52 GMT -7
I don't use a clear over the tape Joe...I use a fine line tape like tamiyas for my sharp edge tape lines. If I understand it correctly. The clear over the tape method applies mostly to acrylics since the water in em likes to lift tape. The clear used (specific to acrylics) is meant to seal the edge of the tape so paint wont bleed under it. You also then immediately after painting, have to remove the tape so it doesn't all blend and bond together. In this case, I painted the area that is gold, black first. Gold covers nicely over black. No tape edge, I just fog the black beyond the body line where the tape will go eventually. Once dry...I paint the gold, fogging it beyond the line where my tape will go to separate the two colors as well. (See the post previous to my last one) Once dry, I now wet sand the sides of the body to cut the primer for finish paint like I did the top of the car prior to painting it. This allows me to cut the gold where its fogged on, to feather it in with the primer. This is necessary to keep from getting a rough paint texture where the colors will overlap as well as to prevent any chance of bleed through under the tape. Paint will bleed under the tape on an orange peel like surface. Once prepped I lay my fine line tape down where it needs to go. Mask everything I don't want painted (Red in this case) I then shoot the red. Since red covers poorly, it takes a bit more paint than say...Blue or purple to get uniform coverage and achieve proper hiding ( of the underlying color/s) This will leave as you know, a sharp heavy edge at the tape line in the paint once the tape is removed. Gotta cut that sharp edge off with some careful wet sanding, or the clear coat paint will load up on that edge or pull away from it. Then its time for a coat of clear (So my decals lay down well) a few more coats of clear to level out the surface. Followed by a cut and buff. Generally, the whole seal the tape with clear is necessary in some instances but, is sometimes used as a crutch. Proper prep prior to taping and not using cheap tape, negates the whole bleed under issue where solvent based paint is concerned. Acrylics though...Well you can buy tape that is water resistant. The surface its applied to is the problem more often than not with either type of tape / paint. Proper prep and proper materials for the job is key. Sorry Joe! Probably not what you were expecting. Hope it gave you some clarity though. If not, well then just tell me to put the soap box back in the closet...LOL...Or ask me to clarify what I confused you with. More than happy to help!!!
|
|