|
|
Post by jbailey on Mar 23, 2015 16:01:49 GMT -7
First off rat rods/hot rods are by far my favorite subject, second AD stands for advanced design not sure why but that's what everyone call's these trucks lol. My plan is to put the old body on the newer s10 chassis, much like everyone is doing with the 1:1s. First pic of the kits 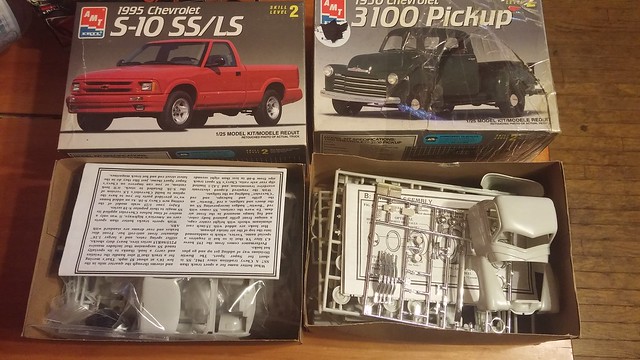 20150323_175302 20150323_175302 by ratrodfanbobcat, on Flickr Thanks again Paul for the s10! I'm gonna try my hand at some rust and weathering on this, not sure how it'll turn out but we'll see lol. Thanks for looking and any and all comments welcome! |
|
|
|
Post by stitchdup on Mar 23, 2015 16:15:49 GMT -7
this should be cool
|
|
|
|
Post by jbailey on Mar 23, 2015 16:20:30 GMT -7
We'll see lol. I have to try and get myself going again somehow and nothing better than a fresh project.
|
|
Deleted
Registered: May 6, 2024 10:27:04 GMT -7
Posts: 0
|
Post by Deleted on Mar 23, 2015 17:13:59 GMT -7
Looks like a great project mate, and good to see you back into it too.
Now, head down, bum up and get stuck into it, look forward to seeing some progress. two-thumbs-up-smiley-emoticon
|
|
|
|
Post by jbailey on Mar 23, 2015 18:00:34 GMT -7
Thanks Dale. I need out of my funk lol. I can't compete with your builds but I'll be happy if it turns out close to what's in my head lol.
|
|
Deleted
Registered: May 6, 2024 10:27:04 GMT -7
Posts: 0
|
Post by Deleted on Mar 23, 2015 18:00:47 GMT -7
Rust sounds like fun. Looking forward to it, bud. I know you can do it! two-thumbs-up-smiley-emoticon
|
|
|
|
Post by jbailey on Mar 23, 2015 18:03:04 GMT -7
Thanks Joel! I wish I still had some sophisticated finishes rust left, but I'm gonna try some stuff I haven't before one being the "salt method".
|
|
Deleted
Registered: May 6, 2024 10:27:04 GMT -7
Posts: 0
|
Post by Deleted on Mar 23, 2015 18:39:29 GMT -7
I've read great things about Sophisticated Finished. Looked for it both at Hobby Lobby and Michaels and they said they don't carry it anymore. Not sure that I want to pay what it costs on ebay. Seems expensive but might not have a choice. Got the stuff from MicroMark. A 4 step method. Didn't like it. Makes the cars look dirt. Not rusty. Take lots of pics when you do the salt piece. Seen the video on the VW but want to see the technique by. Different builder to see how it works.
|
|
|
|
Post by jbailey on Mar 23, 2015 19:21:14 GMT -7
I've read great things about Sophisticated Finished. Looked for it both at Hobby Lobby and Michaels and they said they don't carry it anymore. Not sure that I want to pay what it costs on ebay. Seems expensive but might not have a choice. Got the stuff from MicroMark. A 4 step method. Didn't like it. Makes the cars look dirt. Not rusty. Take lots of pics when you do the salt piece. Seen the video on the VW but want to see the technique by. Different builder to see how it works. Joel, it's been about 6 years since I bought the stuff I had but I remember it costing around $25, which I've found it for that on eBay. Here's a couple pics of what it looks like applied, the engine on the left doesn't have the rusting solution applied and the right one does. These were both painted when I first got the SF rust. 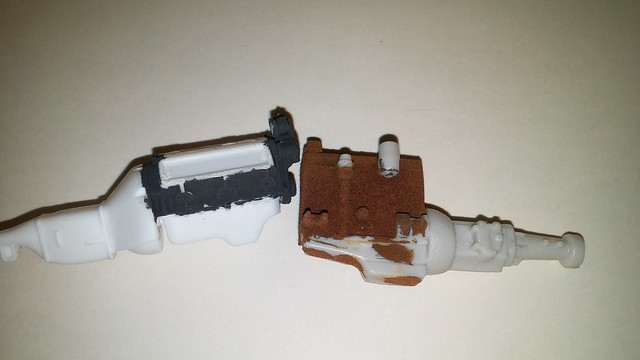 20150323_211136 20150323_211136 by ratrodfanbobcat, on Flickr 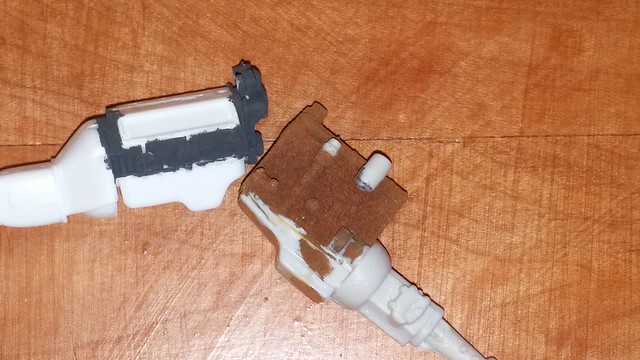 20150323_211205 20150323_211205 by ratrodfanbobcat, on Flickr They don't show it the best, but should give you a good idea what it looks like. If I remember correctly I did one coat of the base and 2 or 3 of the rusting solution. Hope that helps you and I think I'll pony up the dough and get me some more lol. |
|
|
|
Post by stitchdup on Mar 23, 2015 19:29:24 GMT -7
If it's any help there's loads of rusting tips on youtube.
|
|
|
|
Post by jbailey on Mar 23, 2015 19:51:29 GMT -7
I watched about 4 videos on YouTube earlier and wasn't really impressed with any of them lol. I did watch one awhile back by Dr Cranky that was pretty good.
|
|
Deleted
Registered: May 6, 2024 10:27:04 GMT -7
Posts: 0
|
Post by Deleted on Mar 23, 2015 22:03:11 GMT -7
thanks Jesse. I guess I might as well order it. impatient-smiley-emoticon
|
|
|
|
Post by jbailey on Mar 24, 2015 7:16:45 GMT -7
|
|
Deleted
Registered: May 6, 2024 10:27:04 GMT -7
Posts: 0
|
Post by Deleted on Mar 25, 2015 8:29:46 GMT -7
This is gonna be sick!!! I cant wait to see it finished popcorn-and-drink-smiley-emoticon
|
|
Deleted
Registered: May 6, 2024 10:27:04 GMT -7
Posts: 0
|
Post by Deleted on Mar 25, 2015 8:43:52 GMT -7
Let me know how that stuff works, jesse. I ordered the other set on ebay too.
|
|
|
|
Post by Big D on Mar 25, 2015 8:53:04 GMT -7
Somebody on here, I can't remember who or what build it was, made filings by grinding a nail, I think, and put glue on the model body and sprinkled the filings liberally in the glue, let it dry and put it out in the rain, you could put it under the faucet too, and it made the best rust job I've seen. Rust running down the sides, the whole bit. Very realistic IMO.
|
|
Deleted
Registered: May 6, 2024 10:27:04 GMT -7
Posts: 0
|
Post by Deleted on Mar 25, 2015 9:08:06 GMT -7
I think it was Frank.....
|
|
|
|
Post by jbailey on Mar 25, 2015 9:17:00 GMT -7
This is gonna be sick!!! I cant wait to see it finished popcorn-and-drink-smiley-emoticon Me either, hopefully it makes it lol. Let me know how that stuff works, jesse. I ordered the other set on ebay too. I will take some pics when I experiment with it when it comes in. Somebody on here, I can't remember who or what build it was, made filings by grinding a nail, I think, and put glue on the model body and sprinkled the filings liberally in the glue, let it dry and put it out in the rain, you could put it under the faucet too, and it made the best rust job I've seen. Rust running down the sides, the whole bit. Very realistic IMO. I've also heard of people using steel wool and soaking it in water. |
|
Deleted
Registered: May 6, 2024 10:27:04 GMT -7
Posts: 0
|
Post by Deleted on Mar 25, 2015 16:45:20 GMT -7
I myself have actually used steel "chips" off my lathe, for doing the same thing.....SPECIALLY really fine grit type "chips", left in water. On the trains it works GREAT.....
I've also use grinder "dust" that has had a lot of steel grinding done, that works best for following lines and such on cars, and getting into those places as a real cars rusts.....I have actually added the grinder steel "dust" once rusted up, and dried out, applied directly to wet paint....ONCE the paint is dry, add lettering (if needed, on the trains) and then add some clear coat "sealant to the paint and decals and while thats still wet, add the rusty dust, and then seal it a second time..... Always turned out well, I'll have to see if i got any pictures of this that I did
|
|
|
|
Post by AK on Mar 25, 2015 17:12:31 GMT -7
Sounds like a great tip John! I'll have to try that myself high-five-smiley-emoticon Jesse, I'm following this build with great interest! I have a S10 kit that I bought just for a kit bash project such as yours! popcorn-and-drink-smiley-emoticon
|
|
|
|
Post by jbailey on Mar 25, 2015 17:38:46 GMT -7
Good tips John! But I'm kinda lazy and don't have a lot of spare time, so I opted for the easy rust lol.
Thanks Alan! I can't think of a better use for a S10, well maybe Frank's supercharged 4 banger work truck lol.
|
|
|
|
Post by jbailey on Mar 25, 2015 19:37:49 GMT -7
Well I threw together an engine tonight, the stock 327 from the '66 nova I bought to finish my eBay challenge build. I'm not sure how we'll I like it, maybe it will fit my vision better when it's a little grimy? I'm also not sure why I put the exhaust manifolds on and painted them the same as the engine lol but they'll get the rust treatment when it arrives anyhow. I also detailed it up a little. 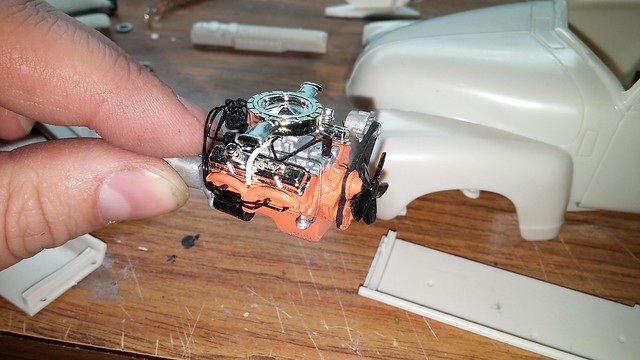 20150325_212637 20150325_212637 by ratrodfanbobcat, on Flickr And here's just an overall shot of the important bits played out. 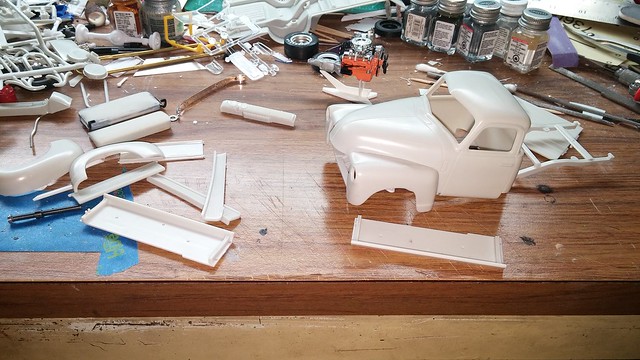 20150325_212756 20150325_212756 by ratrodfanbobcat, on Flickr If you look closely at the engine you'll see some finger prints and smudges, that's cause I was rushing and getting ahead of myself lol. I'm not sure about the engine choice yet, but it kinda fits into my backyard builder kinda thing I have envisioned. Let me know what ya think! |
|
Deleted
Registered: May 6, 2024 10:27:04 GMT -7
Posts: 0
|
Post by Deleted on Mar 26, 2015 1:01:39 GMT -7
Engine looks good from down here J, very nicely detailed too i might add.
|
|
|
|
Post by jbailey on Mar 26, 2015 3:16:08 GMT -7
Thanks Dale! Now to make it look like an old used sbc, which means greasy like a diesel lol.
|
|
|
|
Post by Big D on Mar 26, 2015 14:01:55 GMT -7
I think the engine looks great. Don't see a thing wrong with it. Very nice detailing too.
|
|
|
|
Post by jbailey on Mar 26, 2015 15:36:43 GMT -7
Thanks Dennis! I should be able to get some done tonight as I took tomorrow off work lol.
|
|
|
|
Post by gardnerpag44 on Mar 26, 2015 21:15:29 GMT -7
Great looking engine Jesse you know I've seen lots of rat rods that have spotless motors and not so much every thing else so I guess that choice is up to you !  |
|
|
|
Post by jbailey on Mar 26, 2015 21:20:23 GMT -7
Thanks Paul! The only spotless small block chevys I've ever seen were freshly built, the one's that were/are used look like diesels there's so much grease and oil on them lol. I'm going to try and make it look like someone pulled the motor/trans out of one car and dropped it in this rat rod.
|
|
|
|
Post by jbailey on Mar 26, 2015 22:02:40 GMT -7
Got something accomplished tonight! I assembled the suspension on the s10 chassis and I decided on some wheels/tires, the tires are from a Revell 41 Chevy truck and the wheels are Revell 37 Ford truck. Here's the first mock up with the cab on.  20150326_230342 20150326_230342 by ratrodfanbobcat, on Flickr I'm not sure whether to shorten the bed or lengthen the frame? I also did some dirty-ing up on the engine. I first gave the whole thing a black wash then after that dried I went over it with dark brown pastel chalk. I think it looks about perfect, I will be rusting the manifolds and trans case when it gets here. 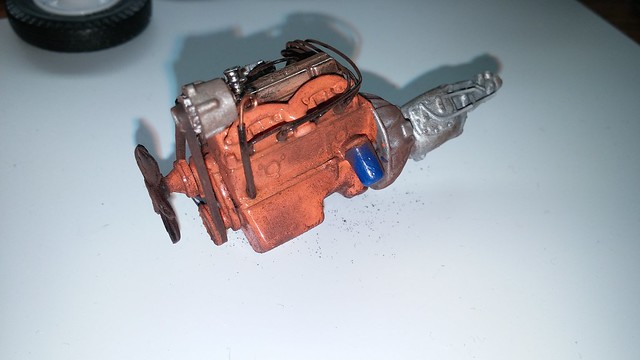 20150326_234606 20150326_234606 by ratrodfanbobcat, on Flickr 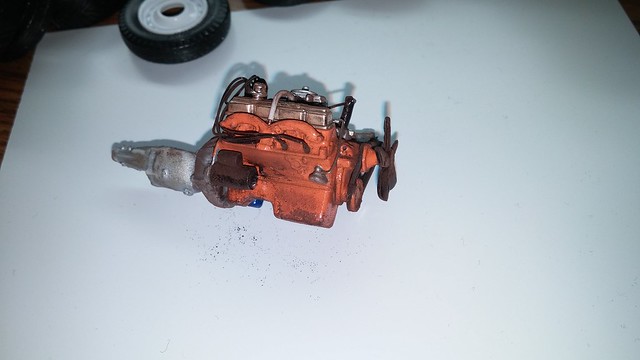 20150326_234546 20150326_234546 by ratrodfanbobcat, on Flickr 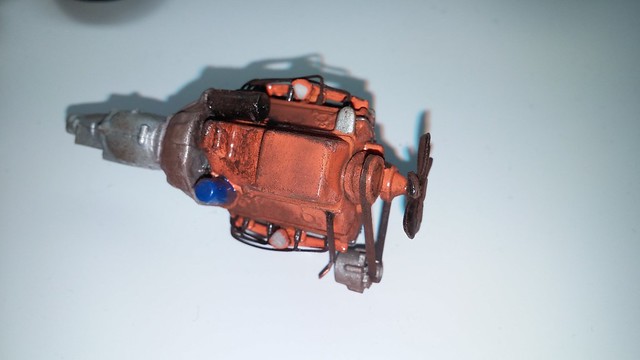 20150326_234556 20150326_234556 by ratrodfanbobcat, on Flickr 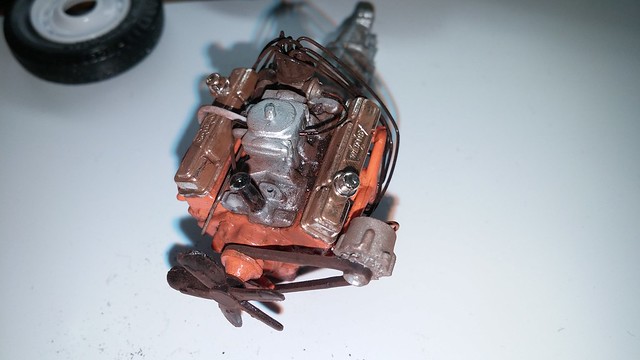 20150326_234757 20150326_234757 by ratrodfanbobcat, on Flickr I think it turned out well for my first time using chalk. The chalk I used is just regular artist chalk that I crushed up myself, much cheaper that way. I'm already having a blast with this build! Thanks for looking and comments welcomed! |
|
Deleted
Registered: May 6, 2024 10:27:04 GMT -7
Posts: 0
|
Post by Deleted on Mar 28, 2015 10:14:51 GMT -7
Chalk weathering, did ya sneeze at all Jesse? I have done and do my share of that when working on the railroad buildings..... It SUCKS depending on the size of project and amount of chalk needed for the project......
NICE work tho! What ya use for the crushing of the chalk? I myself used 320 sand paper, or higher grit whatever is "junk" as it really is no good after your done!
The engine looks GREAT!
|
|