Deleted
Registered: Dec 4, 2024 12:50:42 GMT -7
Posts: 0
|
Decals?
Jan 12, 2016 16:47:08 GMT -7
Post by Deleted on Jan 12, 2016 16:47:08 GMT -7
So got another wacky crazy idea floating around in my skull. I read somewhere that you can print your own decals. So i thought i would dive into that a little bit and see what i come up with. I have the sheet that came with my 08 charger, but the decals id like to use have yellow in them, Id like them to be clear.  I know i need to get some decal paper? I dont believe i need a special printer? I guess my biggest question is how do i go about changing the yellow color to clear and if i have to second source the image how do i ensure the decal is the correct size? I feel like im the only noob asking for help on this forum lol, hopefully new people that come here will find this info useful though! Thanks for the help again guys! |
|
Deleted
Registered: Dec 4, 2024 12:50:42 GMT -7
Posts: 0
|
Decals?
Jan 13, 2016 3:52:41 GMT -7
Post by Deleted on Jan 13, 2016 3:52:41 GMT -7
Ask all you need mate, it is how we all learnt different things, unfortunately, i can not help you with decals , that's why i paint.
i am not real bright on a computer, but please do NOT feel guilty for asking for help.
There are not a lot of people i know of doing their own decals, so there might be quite a bit involved in it..... thinking-hard-smiley-emoticon
If it was easy, we would all be doing them..
|
|
|
|
Decals?
Jan 13, 2016 8:41:54 GMT -7
Post by CoyoteCrunch on Jan 13, 2016 8:41:54 GMT -7
Those would be a trick to make. If you are like me, and do NOT want to invest thousands into an ALPS printer, the best suggestions I could give, would be to scan the image, (the original decals). Then see if you can pull up this image using paint, and erase the yellow areas. Then do some "draft" prints, on regular paper, to make sure they are sized correctly. Using the "draft" option prints really lightly, thus you do not go through ink cartridges like they are gum! I use Testors decal sheets, they are about the size of regular decal sheets you get in kits, but there are other brands on eBay, that are a full 8.5 x 11 size. I tried some once awhile back, results were so-so. But I am thinking to try it again. One thing I can tell you, is to load up the sheet of decal paper with lots of stuff. I try not to waste any space. Once printed, let the ink dry a couple hours, then spray with decal bonder spray, again from Testors. You also have 2 types of decal paper, white backing, and clear backing. The white backing is nice as far as the decal being able to lay on any paint color, and it does not bleed through the image. BUT - you will need to trim right to the image, this can be tricky of course. I try to use the clear backing paper, but it limits me to applying these to white / yellow paint jobs. Sometimes, you may need to apply a second set of decals on the first as well, to make sure the colors are crisp and clean.
If this seems like a huge undertaking - you could always check to see if someone with an ALPS printer can make you a set. But I can say, once you do it a few times, and start to get down a system of printing your own decals, it does open up tons of possibilities. If you have any other questions, just drop me a PM, and maybe I can go more in detail for ya. I am about to print some decals for a build, so I might try and remember to take some pictures of the steps I have been doing and post them here for everyone in a tutorial thread. |
|
Deleted
Registered: Dec 4, 2024 12:50:42 GMT -7
Posts: 0
|
Post by Deleted on Jan 13, 2016 10:21:13 GMT -7
I think Tom got it right. There is plenty of work to print out your decals especially if you want the, to hug the body lines like kit decals are meant to do so. The ones you picked seem to be more challenging than beginners worse printed a few using the same products that were mentioned above and they can out great but noting like those you have there. You. Isn't want to invest the time, but if you don't, check the link below. You might be able to trim them to fit your build. The other thing is, if you check out our Mall here in the forum, Firebird designs make superb decal sheets. Lots of folks including myself have bought decals. AK and Beast are a couple of guys that I can remember. Reach out to him and he might be able to put something together for you for a small cost. www.ebay.com/itm/Dodge-Charger-RT-Daytona-STR8-Super-Bee-300C-Special-Stripes-1-25th-Decals-/400989017691?hash=item5d5cced65b:m:m_UegMzhulDQFBCc8szpHMQ |
|
|
|
Decals?
Jan 13, 2016 10:27:52 GMT -7
Post by CoyoteCrunch on Jan 13, 2016 10:27:52 GMT -7
Yep - I have bought many decals from Jimheller on eBay. He is a good source for decals for sure! The link Ice put on there look real close to what you are needing, I would agree, you could probably trim these to fit.
And save a whole lot of hair from being pulled out - trust me - been there..... 
running-around-smiley-emoticon
|
|
Deleted
Registered: Dec 4, 2024 12:50:42 GMT -7
Posts: 0
|
Decals?
Jan 13, 2016 13:02:46 GMT -7
Post by Deleted on Jan 13, 2016 13:02:46 GMT -7
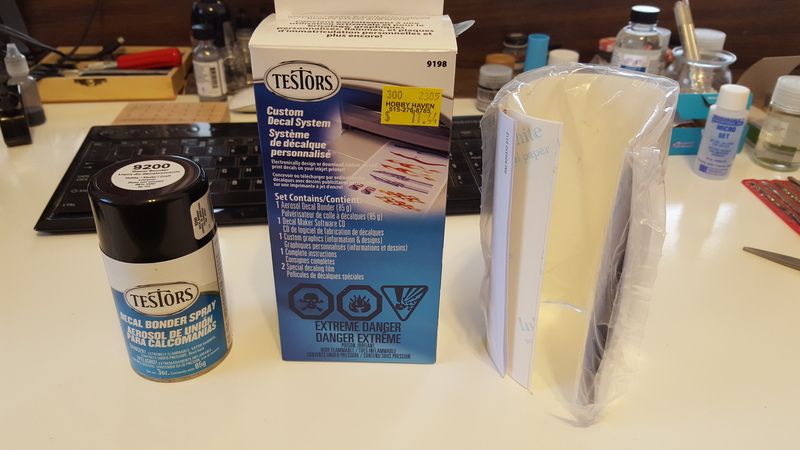
I went by the hobby shop and picked up this kit. It comes with software, and a sheet of clear and white paper and the spray. It was 11$, at least im not out much if it doesnt work.  All im interested in in using are the side hockey sticks and the hood piece. I had considered your idea of scanning the original decal in to the computer and playing around with it in photoshop. I didnt even think about looking online for premade sheets. That link is pretty much what im looking for. I might be returning this kit after all, lol. |
|
Deleted
Registered: Dec 4, 2024 12:50:42 GMT -7
Posts: 0
|
Decals?
Jan 13, 2016 13:05:42 GMT -7
Post by Deleted on Jan 13, 2016 13:05:42 GMT -7
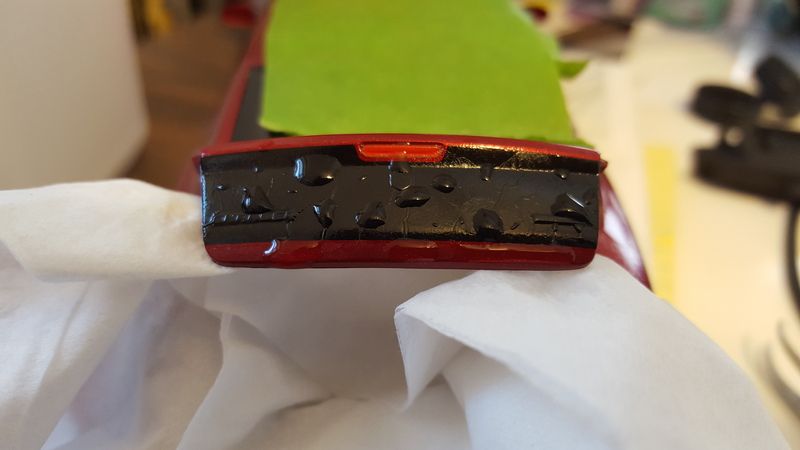
on a side note, anyone have any suggestions to keep the solvaset im using more spread out? it keeps beading up and running.  |
|
Deleted
Registered: Dec 4, 2024 12:50:42 GMT -7
Posts: 0
|
Decals?
Jan 13, 2016 14:13:25 GMT -7
Post by Deleted on Jan 13, 2016 14:13:25 GMT -7
I figured it out!  I just angled the trunk lid until it was flat, water tension did the rest!, now hopefully it will finally get the wrinkles out. |
|
Deleted
Registered: Dec 4, 2024 12:50:42 GMT -7
Posts: 0
|
Decals?
Jan 13, 2016 18:44:50 GMT -7
Post by Deleted on Jan 13, 2016 18:44:50 GMT -7
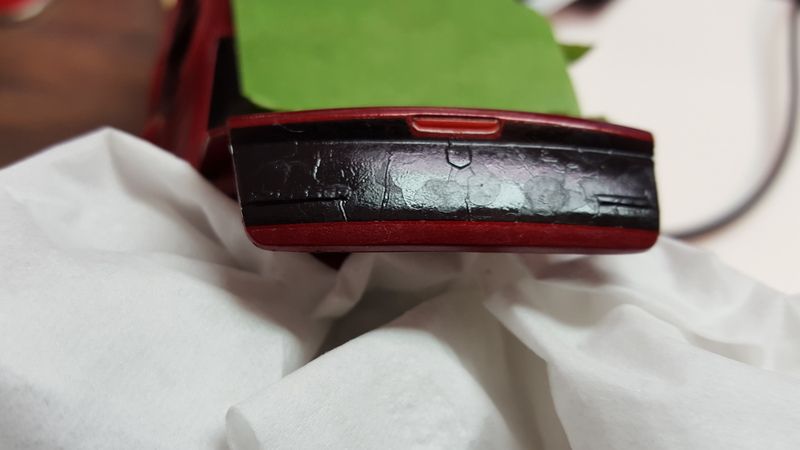
So i've pretty much kept this decal soaked in Solvaset most of the day and the wrinkles dont seem to be coming out. The decal went on nice and smooth. It had a little bubbling over the nameplates but they seem to have come out ok. Anyone have any ideas to smooth this out? Maybe i screwed something up? I did order a set of those decals so im not to worried about having to remove this one if i have to.  |
|
Deleted
Registered: Dec 4, 2024 12:50:42 GMT -7
Posts: 0
|
Post by Deleted on Jan 13, 2016 19:37:41 GMT -7
That looks bad. I had a bottle of Solvaset and I had trouble with it often. I threw it out the minute I tried Microsol/set solutions. A two step process that hasn't failed me yet. I brush Microsol on the body while I soak the decal in warm water. I take the decal and place it on a paper towel to pull the majority of the water off. Slide the decal on to the. Odd and move it around until it's in the right place. I press it with a flat with a paper towel to get the rest of the water off. Mother apply micro set and let it all dry.
|
|
Deleted
Registered: Dec 4, 2024 12:50:42 GMT -7
Posts: 0
|
Decals?
Jan 13, 2016 19:55:42 GMT -7
Post by Deleted on Jan 13, 2016 19:55:42 GMT -7
Is there a trick to removing the decal? I have to go back to the hobby store tomorrow anyway, I remember seeing some decal removing solution there. I'll prolly pick up th micro sol while I'm there, I already have micro set.
|
|
|
|
Decals?
Jan 13, 2016 21:00:56 GMT -7
via mobile
Post by jbailey on Jan 13, 2016 21:00:56 GMT -7
Won't micro sol soften the decal enough to remove it if you just brush on a couple applications?
|
|
Deleted
Registered: Dec 4, 2024 12:50:42 GMT -7
Posts: 0
|
Post by Deleted on Jan 13, 2016 21:10:10 GMT -7
I'm not aware of anything you can use that will remove the decal and allow you to use it again. Microsol goes on before you lay the decal.
|
|
|
|
Decals?
Jan 13, 2016 21:15:53 GMT -7
via mobile
Post by jbailey on Jan 13, 2016 21:15:53 GMT -7
|
|
Deleted
Registered: Dec 4, 2024 12:50:42 GMT -7
Posts: 0
|
Decals?
Jan 13, 2016 22:32:18 GMT -7
Post by Deleted on Jan 13, 2016 22:32:18 GMT -7
Should have got me to put the decal on for you,... it would have fallen off by it's self by now.  |
|
Deleted
Registered: Dec 4, 2024 12:50:42 GMT -7
Posts: 0
|
Decals?
Jan 14, 2016 5:37:35 GMT -7
Post by Deleted on Jan 14, 2016 5:37:35 GMT -7
Weird, I have one of the micro set, the blue bottle you were holding . I think it is micro set. I could have sworn that it was used to apply the decal and then micro sol was to make it sink. Maybe that is where I went wrong. I'm not worried about saving the decal, I have that other set on order. I'll have to pick up the red bottle when I hit the store. In hindsight, I should have shaved off those emblems. Oh well, that's why I did it on the firebird this time.
|
|
Deleted
Registered: Dec 4, 2024 12:50:42 GMT -7
Posts: 0
|
Decals?
Jan 14, 2016 12:47:48 GMT -7
Post by Deleted on Jan 14, 2016 12:47:48 GMT -7
I tried using some Micro sol, but it doesnt look like its working. Im gonna have to strip it off, but nothing i have seems to be getting it soft enough for me to get rid of it. I even tried the masking tape method i read about somewhere else. Anyone have any ideas? Im pretty sure im gonna have to do a complete strip and repaint.....sigh  |
|
Deleted
Registered: Dec 4, 2024 12:50:42 GMT -7
Posts: 0
|
Decals?
Jan 14, 2016 17:10:55 GMT -7
Post by Deleted on Jan 14, 2016 17:10:55 GMT -7
By the look of the wrinkle I would take a small needle and make a few holes to let the air out and put a lot of Micro-sol on and take a Q-tip and work the decal smooth. Micro-sol will take decals off but it takes a while to make the decal soft and lot of it just as long as they have not been clear coated cause then their sealed. smiley-greet016
|
|
Deleted
Registered: Dec 4, 2024 12:50:42 GMT -7
Posts: 0
|
Decals?
Jan 14, 2016 17:16:44 GMT -7
Post by Deleted on Jan 14, 2016 17:16:44 GMT -7
if you can see in that pic, the decal was already ruined, bits of paint were showing through, I tried a little bit of rubbing with my finger and i ended up taking the paint off, so for the time being the trunk was removed and thrown into the super clean and I have another set of decals coming. Since its getting stripped, Im gonna shave off the emblems, this should help me out quite a bit, hopefully it will turn out better next time around.
|
|
|
|
Decals?
Jan 25, 2016 9:08:49 GMT -7
via mobile
Post by wheaton79chris on Jan 25, 2016 9:08:49 GMT -7
An easy way to remove decals. Lay down scotch tape and rub it down real good. Pull it up and the decal will come with it. You may have to repeat a few times though.
|
|
Deleted
Registered: Dec 4, 2024 12:50:42 GMT -7
Posts: 0
|
Decals?
Jan 25, 2016 15:15:51 GMT -7
Post by Deleted on Jan 25, 2016 15:15:51 GMT -7
I did try that, but i did it with masking tape, didnt even budge. It was on there really good. Ended up having to strip it anyway. I sanded off all the emblems and Im in the process of priming it atm, once i get it ready for decals ill continue the progress.
|
|
Deleted
Registered: Dec 4, 2024 12:50:42 GMT -7
Posts: 0
|
Decals?
Feb 12, 2016 17:50:38 GMT -7
Post by Deleted on Feb 12, 2016 17:50:38 GMT -7
Here is the finished product with ebay decals, they were quite thick and I had to do some trimming to getting to lay out without folding the edge over. I didnt cut one side very straight =( I also posted pics of the complete car here 2008 Dodge Charger SRT8 Super Bee |
|