|
|
Post by Big D on Aug 14, 2015 7:21:46 GMT -7
|
|
|
|
Post by CoyoteCrunch on Aug 14, 2015 11:17:00 GMT -7
Holy crap Dennis - that would be an absolute nightmare for me! But you, my man, are simply Rockin this!! Looking OUTSTANDING!!!!!!
two-thumbs-up-smiley-emoticon |
|
Deleted
Registered: Nov 23, 2024 21:46:41 GMT -7
Posts: 0
|
Post by Deleted on Aug 14, 2015 21:36:42 GMT -7
That is some SUPERB detail building mate, i'll pass on that stuff, Great job mate... praising-the-lord-smiley-emoticon
|
|
|
|
Post by sharp on Aug 15, 2015 13:42:29 GMT -7
Looking great so far Den.
|
|
|
|
Post by gardnerpag44 on Aug 15, 2015 14:08:22 GMT -7
This is looking really nice Big D some nice detailing you have done here , very cool  |
|
|
|
Post by Big D on Aug 15, 2015 17:52:07 GMT -7
Thanks All, it is truly appreciated. I put this thread in the wrong place but it will have to do if it doesn't get moved. Progress is a little slow on this one as I can only work on it a little at a time but I'll get it.
|
|
Deleted
Registered: Nov 23, 2024 21:46:41 GMT -7
Posts: 0
|
Post by Deleted on Aug 16, 2015 8:49:12 GMT -7
that engine looks like a jewel Dennis! i always admire that quality in your builds smileyCASHS601_zps1c54a9c5
|
|
|
|
Post by Big D on Aug 16, 2015 17:03:04 GMT -7
Thank you Frank. I have always enjoyed detailing the engines the most and I try to do a decent job of it. I'm very glad you admire my efforts.
|
|
|
|
Post by Big D on Aug 20, 2015 23:34:50 GMT -7
|
|
Deleted
Registered: Nov 23, 2024 21:46:41 GMT -7
Posts: 0
|
Post by Deleted on Aug 21, 2015 3:46:00 GMT -7
progress may be slow but it looks GREAT  |
|
Deleted
Registered: Nov 23, 2024 21:46:41 GMT -7
Posts: 0
|
Post by Deleted on Aug 21, 2015 3:58:30 GMT -7
Some serious detail there mate, very nice.....
And yes, it is fun, that's why we do it.... egyptian
|
|
|
|
Post by CoyoteCrunch on Aug 21, 2015 14:56:32 GMT -7
So awesome Dennis - sure hope you get to feeling better bud. If you need anything from Iowa? Just say the word! Anybody like some good homemade beer bratwurst?? |
|
|
|
Post by Big D on Aug 21, 2015 19:37:31 GMT -7
Thanks Frank,Dale and Tom. I appreciate your interest in this build. Tom I wish I could take you up on the beer and bratwurst.
|
|
|
|
Post by Big D on Aug 29, 2015 23:13:40 GMT -7
I do believe this model is the most complicated build I have done in my modeling career. The model is very well made and once you figure out what goes where it goes together well, it's just a high level build. Even though it is a hard build for me it's still fun because I can tell that I am doing things with it I couldn't have done a year ago. I like that. When you can see your own growth in the hobby it is a nice feeling. Finished detailing the coolant hoses, they are rubber not plastic, and got them attached to the engine. Also wired the fuel pump and oil pump on the other side but forgot to take the pictures. You can see the radiator bottom hose a little and the brake line hoses to each wheel hub. You can just barely see the copper wire lines I ran down the frame. 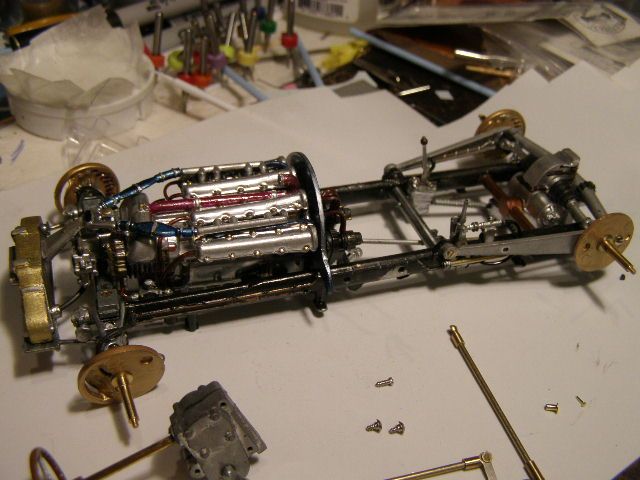 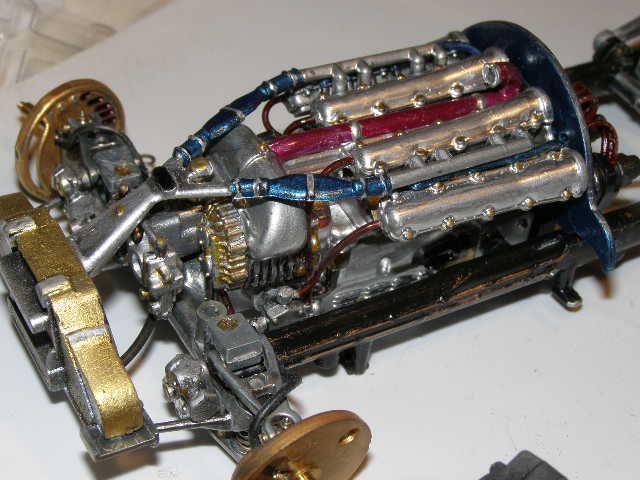 This is the rear end assembly with all hoses attached and the underneath with the drive shafts in place. Note the spring in the housing in the rear end that gives the working suspension in the rear. Serious fun to get installed! Also note the steering arms connected to the hubs on the front end.    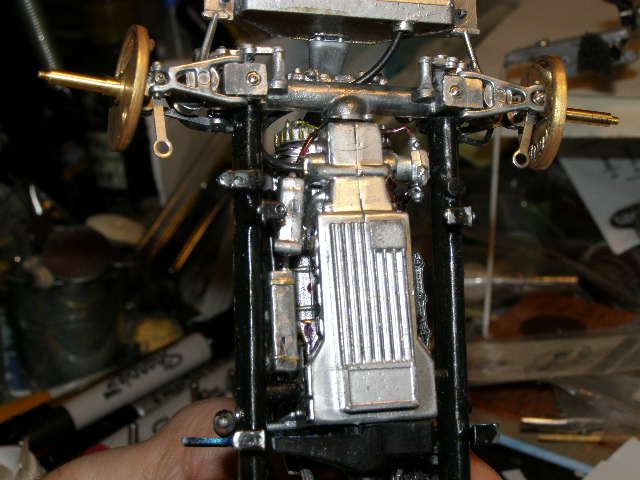 I saved the best for last. This model has working steering and this is how it works. The steering box has actual gears in side it I had to install. The top gear has a brass pin holding it in and the arm coming out the bottom has a built in rod that goes through the bottom gear then the column with the wheel on it fits inside, it has a gear on the column that meshes with the top gear in the box, then I had to put the thing together with everything installed but free floating. When you turn the steering the rod coming out of the box moves all the other rods and turns the wheels. I thought about getting a case of beer when I finally got it together but I didn't. This will assemble the way it is layed out. The long brass rod by itself is the tie rod that connects to the steering arms on the front hubs I pointed out. The stubby brass rod on on the arm on the steering box is pinned on with a special screw and the other end is threaded inside. The brass rod with the "L" shaped bracket screws into it. The little rods are threaded on the ends. The end with the long slot on the L bracket screws into the tie rod and the middle hole screws into the frame. All of this goes together with special made screws. I should have had five of these screws but I only had three. Knowing me I probably sent two of them into Never Never Land when I dumped them out of the package. I came up with one but had to have something to connect the L bracket to the rod as you see in the picture. the L bracket has to move freely. I couldn't figure out what to do but finally I thought of using the tiny grommet on the right in the pic and the tiny brass nail. I use these when building doll house furniture. I held the grommet in a tiny pair of pliers and ground down the length of the shaft almost to the head and inserted it in the bracket and rod assembly. Then while holding this mess together I stuck the tiny brass nail in some CA glue and put it through the bottom side of the grommet. After it set, while I held it together, I put a drop of glue in the top of the grommet and it works great. I shot six of those grommets into space before I got one ground to length. This is called FUN. 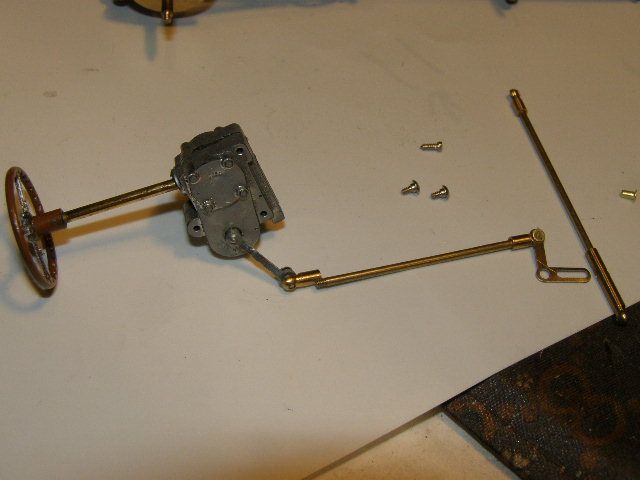 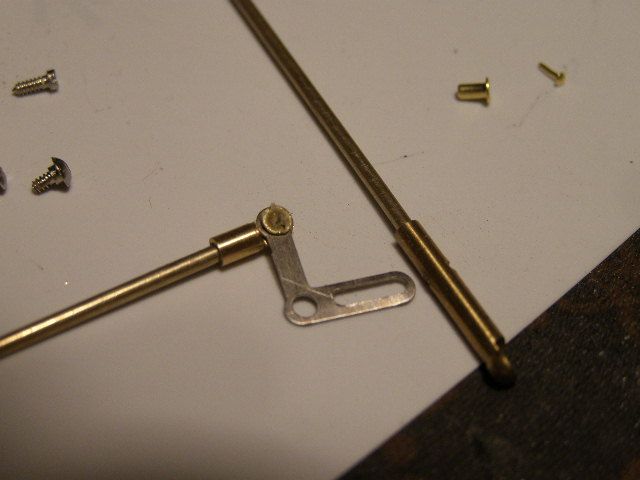 |
|
Deleted
Registered: Nov 23, 2024 21:46:41 GMT -7
Posts: 0
|
Post by Deleted on Aug 30, 2015 0:34:16 GMT -7
That is just outstanding mate, i would have shot the whole thing into space by now with all that tiny detailing going on.
Great work so far Dennis, looking real good.
|
|
|
|
Post by stitchdup on Aug 30, 2015 1:26:33 GMT -7
Nice work Dennis, you must be in your element with all the detailing on this
|
|
Deleted
Registered: Nov 23, 2024 21:46:41 GMT -7
Posts: 0
|
Post by Deleted on Aug 30, 2015 4:39:06 GMT -7
this is lookin amazing Dennis smileyCASHS601_zps1c54a9c5
|
|
|
|
Post by gardnerpag44 on Aug 30, 2015 6:22:47 GMT -7
Outstanding work Dennis , you sir are truly a Craftsman and really great at it !! Excellent work and detail on this build praising-the-lord-smiley-emoticon
|
|
|
|
Post by CoyoteCrunch on Aug 30, 2015 12:35:04 GMT -7
unbelievable man - no way, wicked skills!!!.
You are THE master - I need a watch, and I know just who to order it from now!
WHACK A MOLE
GRAB A POLE
WHEN IT COMES TO WICKED CUSTOMS
BIG D IS SO FREAKIN COOL!!!!!
|
|
|
|
Post by Big D on Aug 30, 2015 13:02:03 GMT -7
Dale,Les,Frank,Paul and good 'ol Tom, I sure appreciate your comments guys it means a lot to me. I'll sure be glad when this one is finished but these are great for learning on. I have some kits like the Tamiya Caterham and even a Pocher Rolls Royce I want to build when my skills get good enough. I've always had good steady hands and even though they hurt everyday now there is no sign of any shaking. Still steady. Thank God.
|
|
|
|
Post by stitchdup on Aug 30, 2015 13:07:04 GMT -7
I would say your skills are good enough
|
|
|
|
Post by Big D on Aug 30, 2015 23:24:12 GMT -7
Thanks Stitch. I think I'm ready for the big Tamiya Caterham. It's a fabulous model and has won contests box stock. Magnificent engine in it. The Pocher is still intimidating. 3,000 pieces to that model. 500 pieces in the engine, hand lace the wire wheels. Not ready for that yet.
|
|
|
|
Post by stitchdup on Aug 31, 2015 0:34:39 GMT -7
3000 pieces? thats more than my sisters mini has
|
|
|
|
Post by Big D on Sept 2, 2015 13:16:21 GMT -7
3000 pieces? thats more than my sisters mini has Les, here's a small view of the inside of a Pocher kit. A lot more inside than you can see and more of those bags on the sides that are filled with screws, pins, springs etc. Over 500 pices in the motor alone. It's a real car with all the components in miniature. Builds to over two feet long. The box is 30 in. long by 20 in. wide and 8 in. deep. Part of a knee shot there too for the kinky folks. It is 90% metal {not the knee, the kit} the engine is all metal and is a complete engine inside and out. You are supposed to be a Master Model Builder to build one. I'll never be a Master but I'll bet I get it built one day. 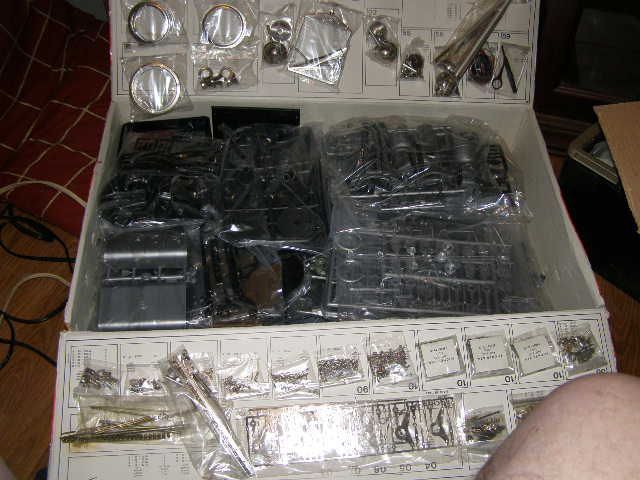 |
|
Deleted
Registered: Nov 23, 2024 21:46:41 GMT -7
Posts: 0
|
Post by Deleted on Sept 2, 2015 14:49:22 GMT -7
cant-believe-my-eyes-smiley-emoticon jaw-dropping-smiley-emoticon
|
|
|
|
Post by CoyoteCrunch on Sept 2, 2015 17:39:30 GMT -7
Holy Crap!
open-mouth-smiley-emoticon
|
|
|
|
Post by Big D on Sept 2, 2015 18:31:05 GMT -7
One other thing, all the metal parts in this kit are machined. No cast parts at all. Extremely well made. That's why it costs around $1500.00 for the 1932 Rolls Royce Phantom Sedanca Coupe I have. I knew a man who lived in Italy and he found this one factory sealed for $500.00 shipping and all. I had to make payments to him but I couldn't pass it up. Only way I could get one.
|
|
|
|
Post by kpnuts on Sept 2, 2015 22:42:15 GMT -7
Amazing stuff never seen one of these kits before, you are doing a great job of it.
|
|
|
|
Post by Big D on Sept 2, 2015 23:36:07 GMT -7
|
|
Deleted
Registered: Nov 23, 2024 21:46:41 GMT -7
Posts: 0
|
Post by Deleted on Sept 3, 2015 6:25:45 GMT -7
Your a brave man indeed, tackling a Pocher !!
My uncle was a machinist, old school 1960's era. Could make anything out of metal. After they came to see me once, and he had admired my car models, my aunt bought him a Pocher kit for his birthday. That was 20yrs ago. He still has it, in the box, unbuilt.
It scares him !
|
|