Deleted
Registered: Nov 24, 2024 8:20:29 GMT -7
Posts: 0
|
Post by Deleted on Jan 3, 2015 18:06:03 GMT -7
OK - so I got a bunch of cool stuff to establish a proper workbench, and decided on using half of my computer desk that was just holding up a bunch of old junk anyway. Went to Hobby Lobby and Michael's for supplies, and wound up scoring a nice desktop Ott Lamp (for half off at Michael's). It really is a lot brighter in the room... but my old 3.2MP HP camera (next thing on the list) did its best:  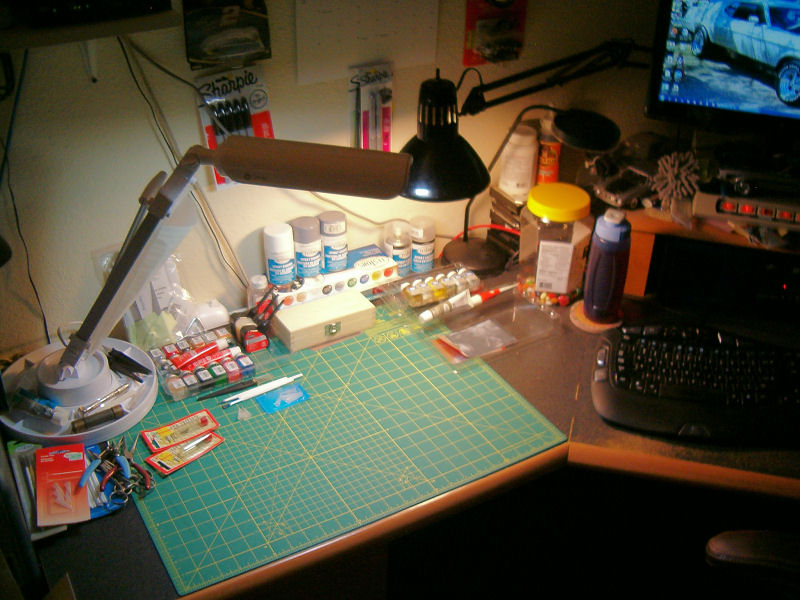 Here's the kit: a Hasegawa 1:24 I scored from ebay several years ago when I had my '95 Civic VX.  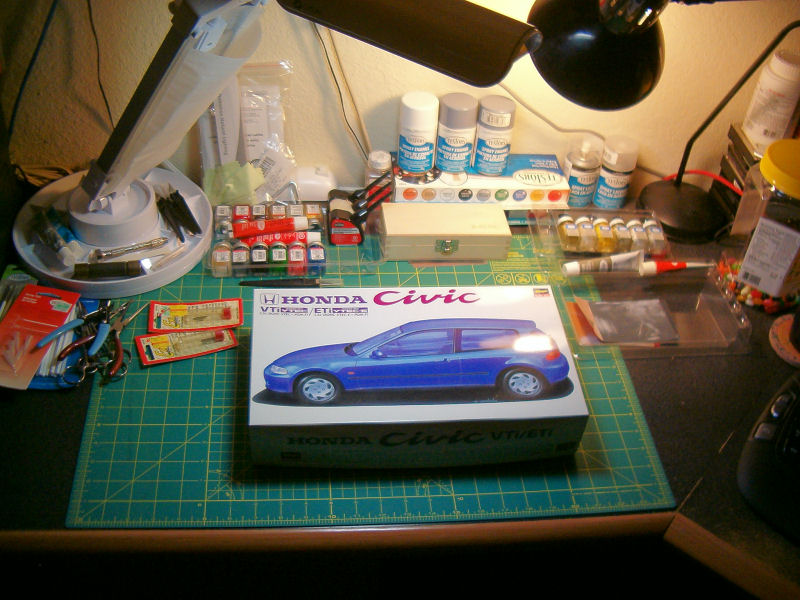 And finally, here's the plan - my old 1995 Honda Civic VX. I picked it up for $800 during the $4.00/gallon days with a blown engine (head gasket and clogged radiator was all that was wrong with it). Rebuilt it and drove it like I stole it for 3.5 years.  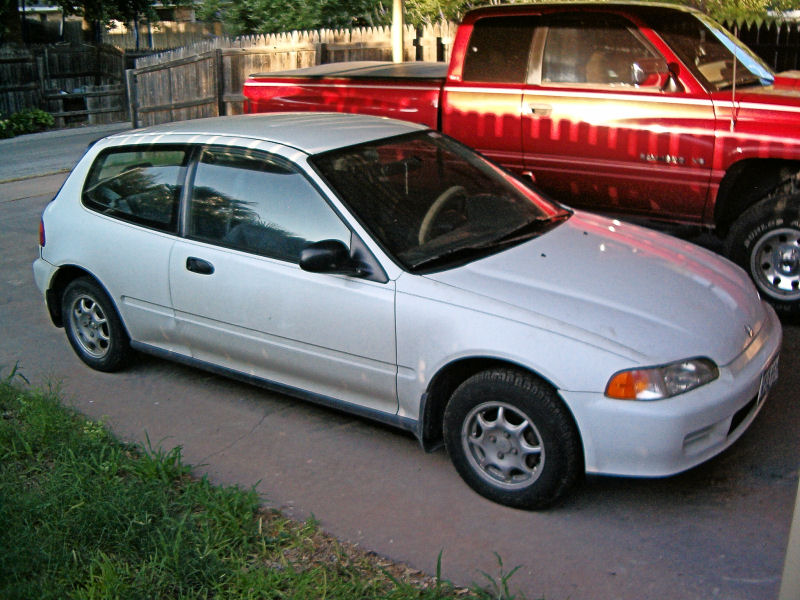 I'm one of those weirdos that can't leave anything alone, so after I got it running, I tossed on some cool wheels, dumped in a 1000 watt stereo system, and tinted the windows. Every Ricer in town wanted to race me... but the weenie little VTEC-E engine only put out 95hp... but got 40mpg all day with the A/C running! A total blast to drive, but I sold it to a buddy when I first bought my '71 Mach 1 over 4 years ago (it just wasn't cool anymore after getting my childhood dream car - even though it was a major pile that didn't even run at the time). Here's the plan: 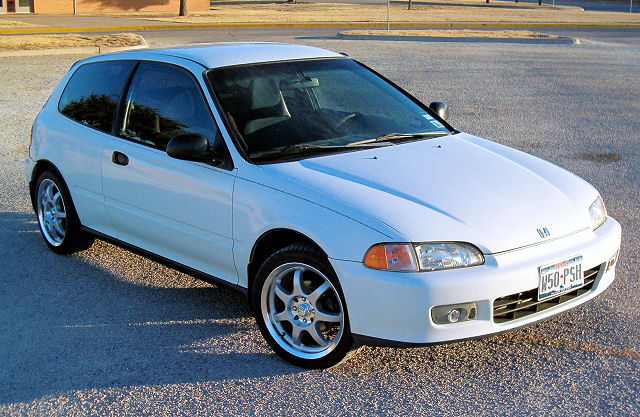 It's just a "curbside" model kit with RH drive, but I figure I can get it "close enough" to my old car once I tint the windows... just to get back into the groove, if nothing else. I swiped some 7-spoke wheels and 30-series tires from another kit that will be "close enough" as well, but if I can score some of these rims, that would be much better. Anybody know if they make 'em (or at least something similar) aftermarket? |
|
Deleted
Registered: Nov 24, 2024 8:20:29 GMT -7
Posts: 0
|
Post by Deleted on Jan 3, 2015 18:09:47 GMT -7
OK - so I left off with this kit several years ago after having painted the chassis flat black and started with the interior. I'm redoing the interior - I'd used glossy Testors water-colors (not knowing any better at the time that they'd worked the non-toxic crappy water-colors into the main-stream), and I'm planning on getting everything "flat-coated" with the colors closer to what came in the car. Since the windows will be tinted with the Tamiya Smoke, I'm not going to get exceedingly crazy trying to flock the floors or get every number on the speedo and tach. [  ] So today, I got the chassis, what there is of the engine, exhaust and suspension pretty much done. Since I'm using wheels from a different kit, I'll need to figure out some axles before I can mount up the wheels with the disc brakes. But, here we are - not too bad from not having seriously built anything since the '80s, eh? [  ] [  ] 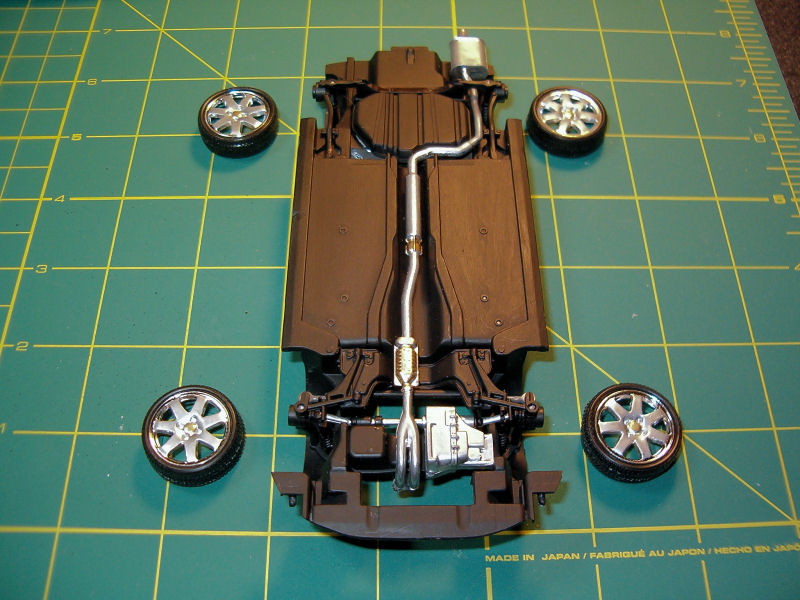 If it stays icy like today, this might get done rather quickly... although, I'll need to find a warm place to paint the body soon. I originally swiped the wheels from a Revell Honda Civic Si Coupe kit, but a friend turned me on to some XS Wheels which are more "correct" in appearance, which should be here by next weekend: ![]()  |
|
Deleted
Registered: Nov 24, 2024 8:20:29 GMT -7
Posts: 0
|
Post by Deleted on Jan 3, 2015 18:19:02 GMT -7
Sorry if I put this in the wrong place - I didn't see a category for 1:1 replicas. impatient-smiley-emoticon
|
|
Deleted
Registered: Nov 24, 2024 8:20:29 GMT -7
Posts: 0
|
Post by Deleted on Jan 3, 2015 18:30:46 GMT -7
Nope. It's in the right place. Nice little kit. Personal 1:1 replicas are a great inspiration for any scale build
|
|
|
|
Post by stitchdup on Jan 3, 2015 18:57:16 GMT -7
Looks like a fun build Mister. I like that it's right hand drive(I'm in scotland) as you don't see too many kits this way but if you really want it left hand drive there's a japanese conversion kit I saw somewhere but for the life of me I can't remember where just now. You might be lucky on ebay would be my best guess
|
|
|
|
Post by Big D on Jan 4, 2015 6:41:56 GMT -7
Looks like a real good build mister and a great way to get the creative juices flowing. Very nice work area you have made also. I have one of those lamps with a magnifier on it and I love it. I have to warn you though the more you get into this your work area is going to get small in a hurry!  |
|
Deleted
Registered: Nov 24, 2024 8:20:29 GMT -7
Posts: 0
|
Post by Deleted on Jan 4, 2015 12:22:44 GMT -7
I'm hoping to keep it small and stick to one project at a time for now, but I totally understand what you're saying. My brother-in-law keeps threatening to send me a bunch of his "leftovers" (kits, pieces, extra stuff, etc.)
|
|
Deleted
Registered: Nov 24, 2024 8:20:29 GMT -7
Posts: 0
|
Post by Deleted on Jan 4, 2015 14:26:30 GMT -7
Never say no to leftovers. They can save you when youre in a pinch for parts. Especially if youre going to continue to build. One of my regrest in this hobby is not learning to keep leftover parts when I first started. Now I throw all leftover parts in a ziplock, label them with a sharpie and into a box they go. You never know when you might be able to use them or help a fellow modeler.
|
|
Deleted
Registered: Nov 24, 2024 8:20:29 GMT -7
Posts: 0
|
Post by Deleted on Jan 4, 2015 15:10:01 GMT -7
Oh, I can't wait, actually. Since I usually don't build 'em box stock, having the leftovers is awesome. Especially, when it's time to jack up a 2WD truck and build a bad-ass 4x4.   |
|
Deleted
Registered: Nov 24, 2024 8:20:29 GMT -7
Posts: 0
|
Post by Deleted on Jan 10, 2015 17:24:26 GMT -7
OK, so the XS wheels showed up earlier this week, and during initial test-fitting, I noticed the post axles are too deep... meaning they would stick out quite far. Can't have that. So, after some trimming of the kit's disc brakes (the ones that came with the wheels were all wrong for a factory build) and drilling some holes through the hubs (which will never be seen), I managed to get 'em on there just right. 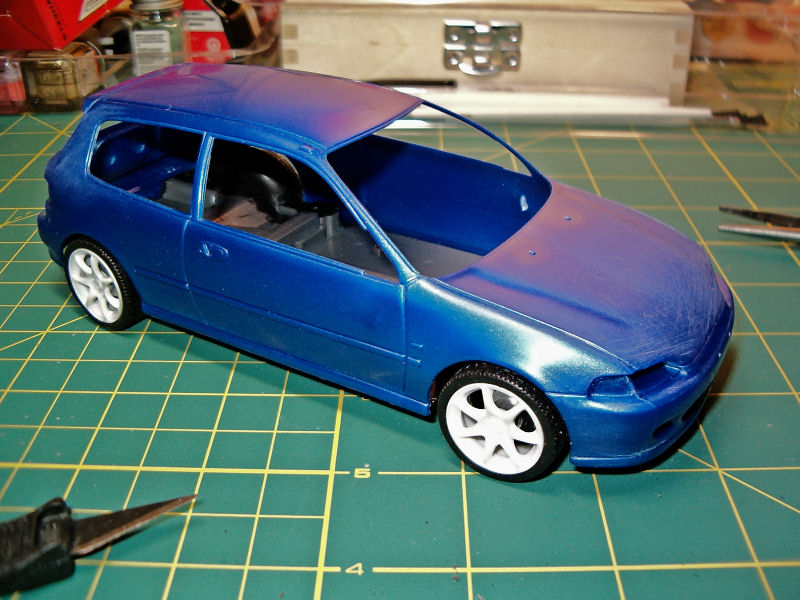 This is the color the kit came as, but we haven't had a day worthy of painting to get the body sprayed, or even primered. Hopefully, tomorrow it'll be in the mid-60s as promised. |
|
Deleted
Registered: Nov 24, 2024 8:20:29 GMT -7
Posts: 0
|
Post by Deleted on Jan 11, 2015 19:02:50 GMT -7
So we finally got a good day to paint, and I was able to prime the body, dull-coat the interior pieces (still drying), and shot some Duplicolor Chrome on the rims. So far, so good. 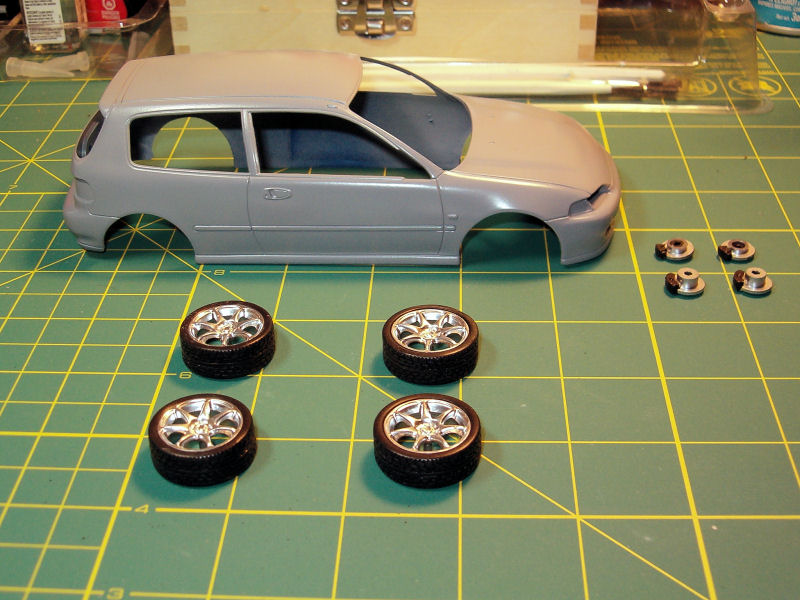 Hopefully, I'll be able to get the primer sanded smooth for paint next weekend (which is supposed to be nice as well) |
|
Deleted
Registered: Nov 24, 2024 8:20:29 GMT -7
Posts: 0
|
Post by Deleted on Jan 12, 2015 2:53:38 GMT -7
Those rims look 300% better with that chrome spray paint on them , nice work mate.
|
|
Deleted
Registered: Nov 24, 2024 8:20:29 GMT -7
Posts: 0
|
Post by Deleted on Jan 18, 2015 19:24:59 GMT -7
OK, had a nice mid-60s day, so I wet-sanded the primer and shot some color (OK, white's not really a color...). I pretty much finished up the interior while the white was drying - I'm not really thrilled with that, since I used the wrong gray (too light), and the seats aren't "exactly" the right colors. That's OK though, since it's RH drive, it's not technically correct anyway - once I tint the windows, probably won't see much of it anyway. I'm really liking how the Duplicolor Chrome worked out, though - I'm thinking I'm going to need to paint the spokes to make the wheels look more like mine. 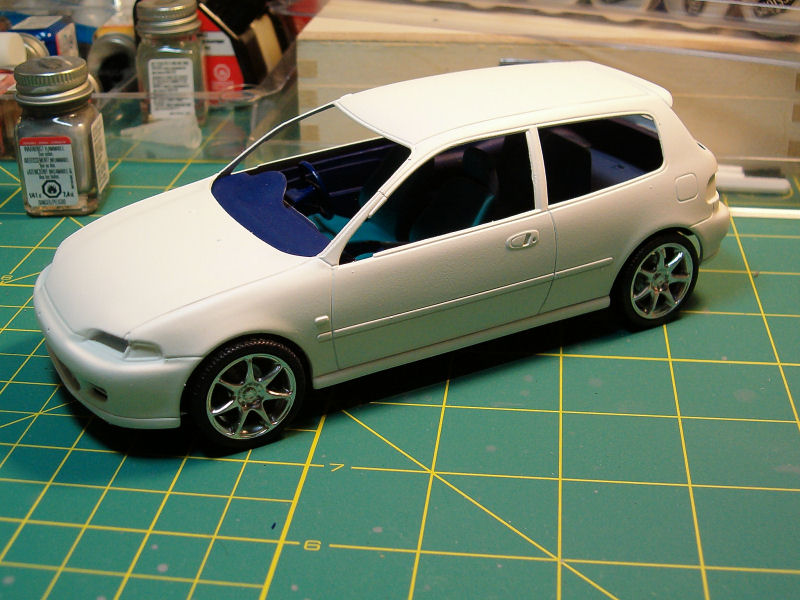 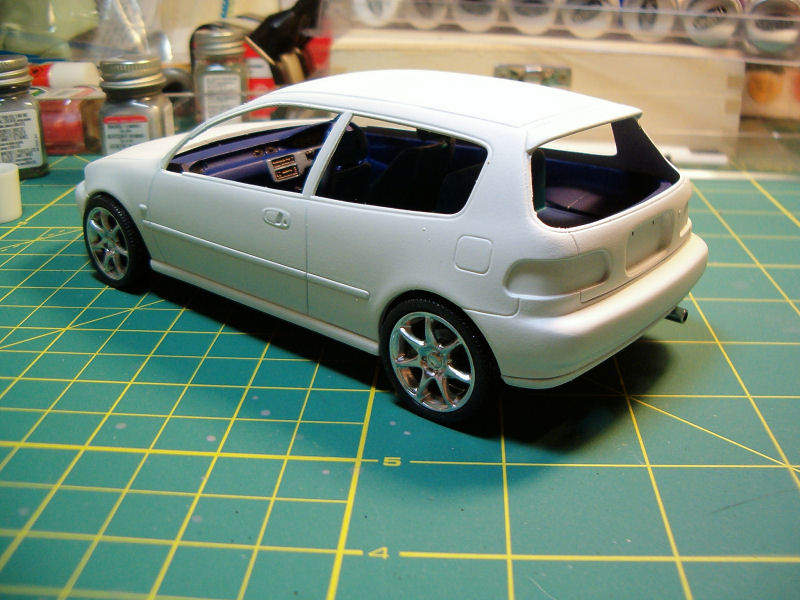 I guess sometime this week, I'll get the body wet-sanded and ready for clear next weekend. Then hit all the trim and buff it out after that - then, put it together for real. |
|
Deleted
Registered: Nov 24, 2024 8:20:29 GMT -7
Posts: 0
|
Post by Deleted on Feb 9, 2015 19:02:18 GMT -7
Well, took a sick day today and figured since it was 80-something outside, it would be nice to get some clear-coat onto the body. Knocked down some high-spots with 1000-grit, then sprayed some Testors Spray Lacquer Glosscote - after 3 light coats and a nice final coat, I kind figured it would've been a bit shinier, but that's nothing final wet-sanding and polishing won't solve. 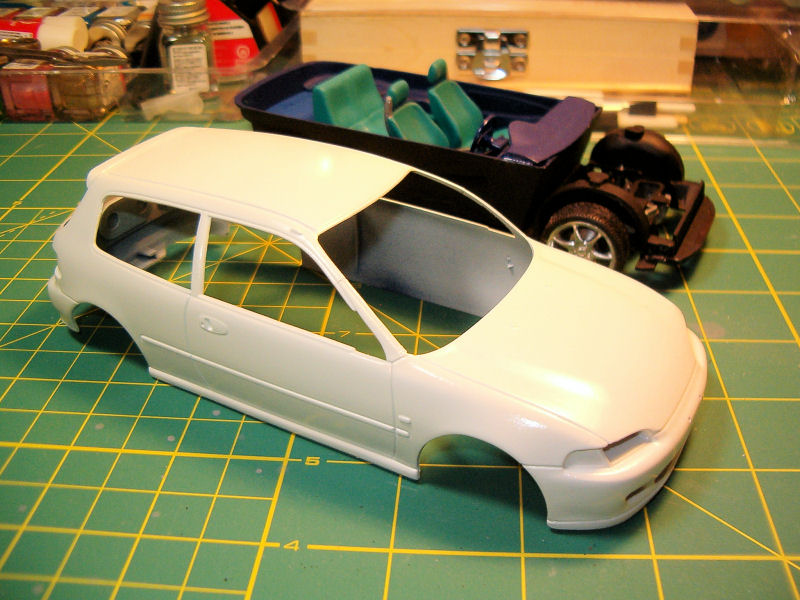 I'm still playing with the setting on my camera (auto flash vs. non-auto flash) and trying to clean-up in PaintShop Pro... sorry it's a bit washed out. I also forgot to post a pic of the interior finished up from a few weekends ago. 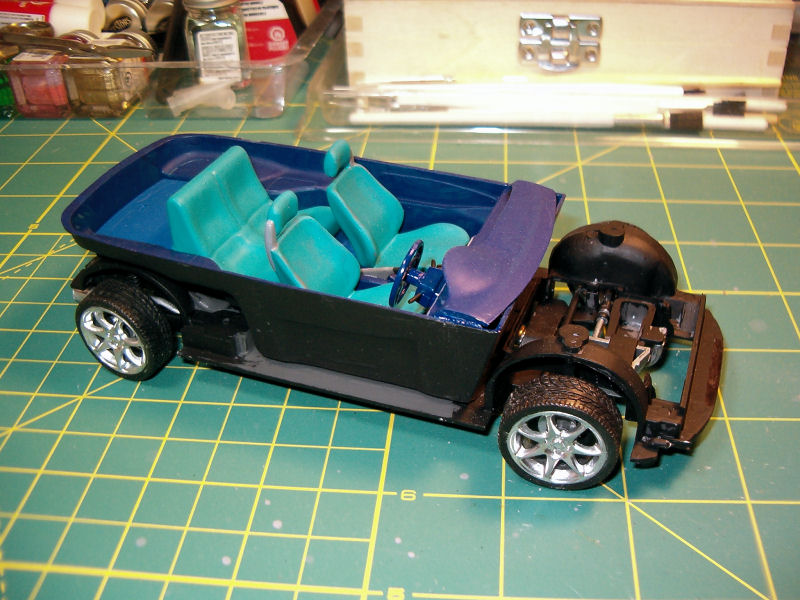 I also learned today that Rustoleum Tail Light Tint (smoke) will not work on polystyrene "glass." I sacrificed the windshield from a Jeep CJ kit (since it's easy enough to just cut a replacement from a clear plastic bottle or something). Bummer - it kind of made it tough to see anything through the piece unless it was within a quarter-inch. That's not gonna work, and too bad because that can would've done a ton of kits. Oh well. |
|
Deleted
Registered: Nov 24, 2024 8:20:29 GMT -7
Posts: 0
|
Post by Deleted on Mar 5, 2015 17:37:24 GMT -7
OK - two steps forward and five steps back. So, I clear-coated something like [geez] almost a month ago with Testors Spray Lacquer over Testors Flat White Spray Enamel and Testors Gray Primer Enamel. I let the enamel primer dry for a week, then the white enamel dry for 2 weeks, wet-sanded with 1000 grit, then sprayed the clear. It's been sitting all this time undisturbed and I finally had a chance to wet-sand and polish today. All I had was 1000 grit, so I knocked the high spots down and got a nice satin sheen. Then (and here's where I believe made my mistake) used some 3M Perfect-It II polishing compound and started on the hood. Well, all it did was soften up the lacquer clear coat and strip it off. The more I rubbed, the more it turned into a mushy sticky substance not unlike that adhesive that's left over after peeling a price tag off of something shiny - it's not touching the enamel though. I've spent the past 3 hours effectively stripping off the lacquer clear coat and by no small grace, haven't totally messed up the body with my rubbing and polishing. Since the clear coat is pretty much ruined anyway, I also grabbed some fairly dried out Eagle One Mag & Wheel polish, which made cleaning up the sticky mess the Perfect-It created... but it softens up the clear coat as well. Some questions: - Can anybody recommend something I can use to quickly remove the rest of the lacquer clear coat without messing up the enamel?
- What kind of rattle can clear coat should I respray once I get this mess cleaned up?
- What should I use as a polishing compound after I wet-sand the clear coat - since I obviously have the wrong stuff?
I admit that in addition to trying to be patient and let the paint cure that I'm kind of losing enthusiasm for this project because just like when I got my Mustang, the Honda's just not that cool to me anymore. But I need to get it finished so I can move on to something more interesting. Thanks in advance! |
|
|
|
Post by stitchdup on Mar 5, 2015 17:47:33 GMT -7
That sucks when it happens. it might be easier to strip off the rest of the paint and respray it as if it softened the laquer it will probably have done the same to the paint.
|
|
Deleted
Registered: Nov 24, 2024 8:20:29 GMT -7
Posts: 0
|
Post by Deleted on Feb 17, 2018 19:49:33 GMT -7
OK - I was a bit discouraged when the clear lacquer went to crap, so I wound up boxing up the car and putting it aside... for WAY too long. My bench piled up with other non-model-related stuff, and I didn't think twice about it until last weekend when my Facebook feed pulled up one of those 'Memories from 2 years ago' thingies, with that last pic of the kit. I felt horrible, knowing it's been 2 years (or more) since I'd worked on it. I decided to clean up the work space, swap the yellow CCFL bulb in the el-cheapo light on the right with a white LED bulb, and rubbed off the remaining clear lacquer with some Isopropyl Alcohol. Worked for the most part. I also had to re-glue the passenger front wheel hub, since it literally popped off as I took the kit out of the box to get started again. I also started scratch-building the JDM driving light bracket/trim panels on the 1:1, using one of those plastic bread-tie thingies my wife's been saving for me (Hey - why wreck a whole sheet of styrene for something so small?). I also ran a fine-point Sharpie down the roof seam trim to simulate the plastic pieces on the real car. Worked pretty well, I think. Oh yeah, I also got a new camera since then as well (still figuring out the settings). 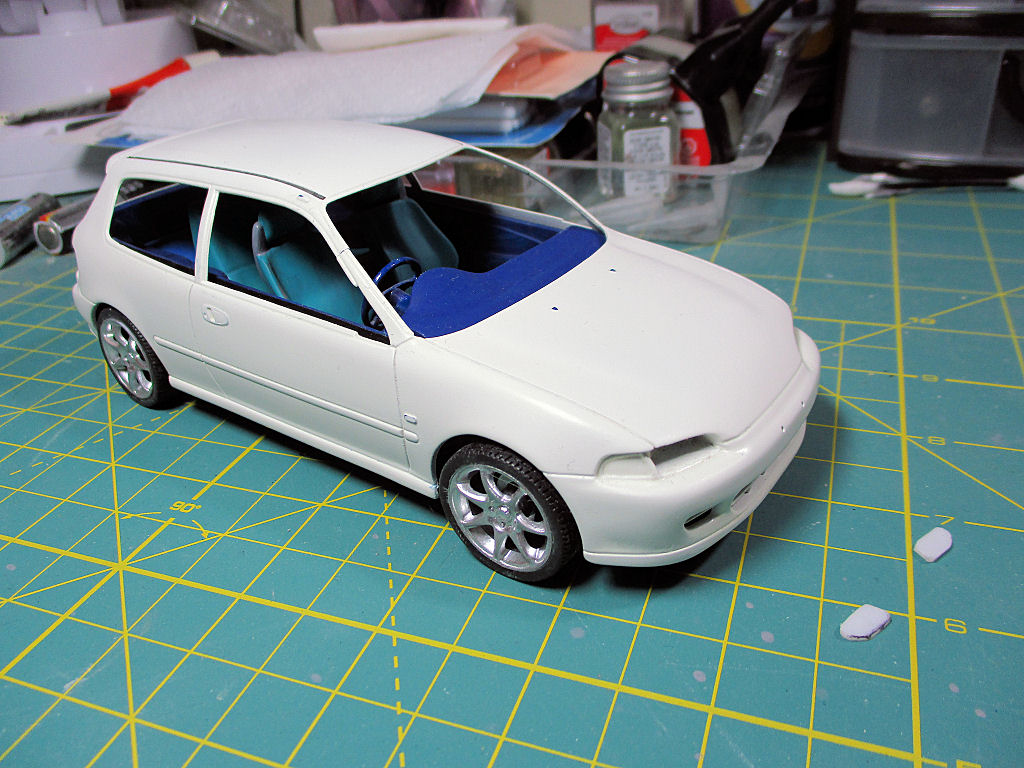 I gotta make dinner here in a few (promised her lasagna for V-Day, but we decided to defer to the weekend instead). But I figured I'd hit this thread for an update, and also fix the broken picture links (from Facebook - now linked to my website page for the build). Tomorrow, I'm planning on working on the black out trim, lights, and all-around just getting it done, hopefully, this weekend. Thanks for your patience and not throwing me away. |
|
Deleted
Registered: Nov 24, 2024 8:20:29 GMT -7
Posts: 0
|
Post by Deleted on Feb 18, 2018 19:24:39 GMT -7
Just finished up some paint work on the Civic. I was pleased to find that most of my paints hadn't dried out (lost a bottle of flat black, but still had another one). So, today I was able to get pretty much all of the black trim and weatherstripping done - I used a fine point Sharpie to outline it all, but had to fill it in with the flat black (Testors "0" fine tip brush) since the standard Sharpies didn't like writing on the flat white enamel. Turned out OK, I guess. Also, got the headlights, taillights, and the mirrors I'd forgotten to paint taken care of. I think the light's too bright or something - those edges look a LOT cleaner in person. 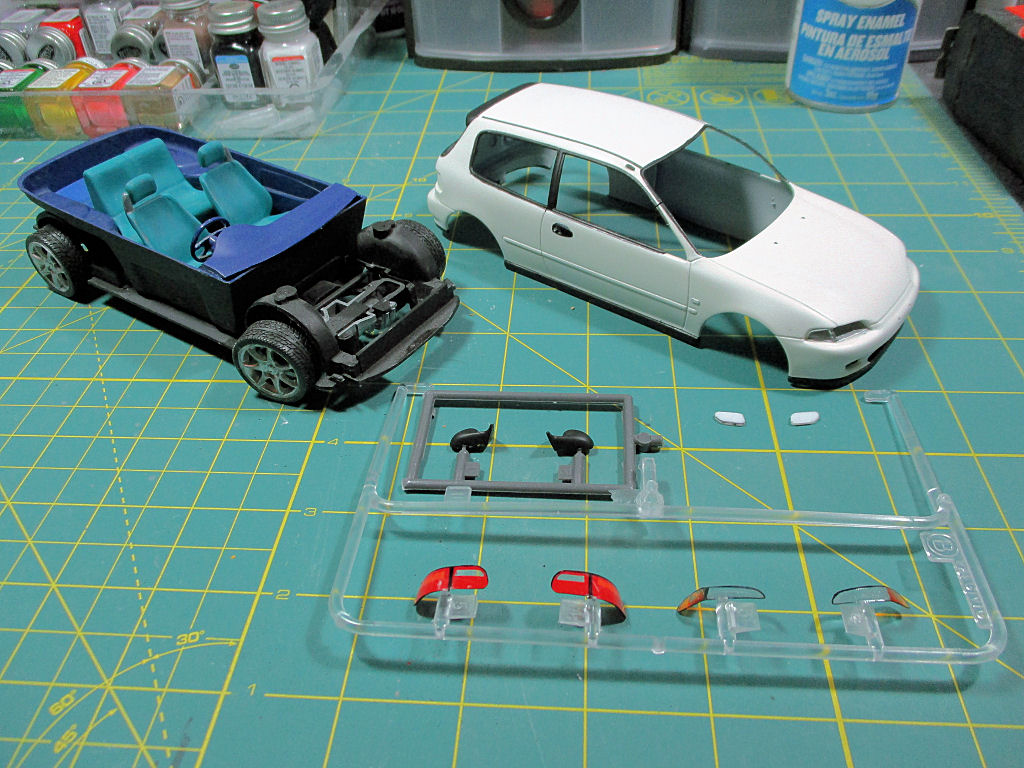 Still gotta figure out what to do with those A-pillars - probably trim about a millimeter out and hope for the best. 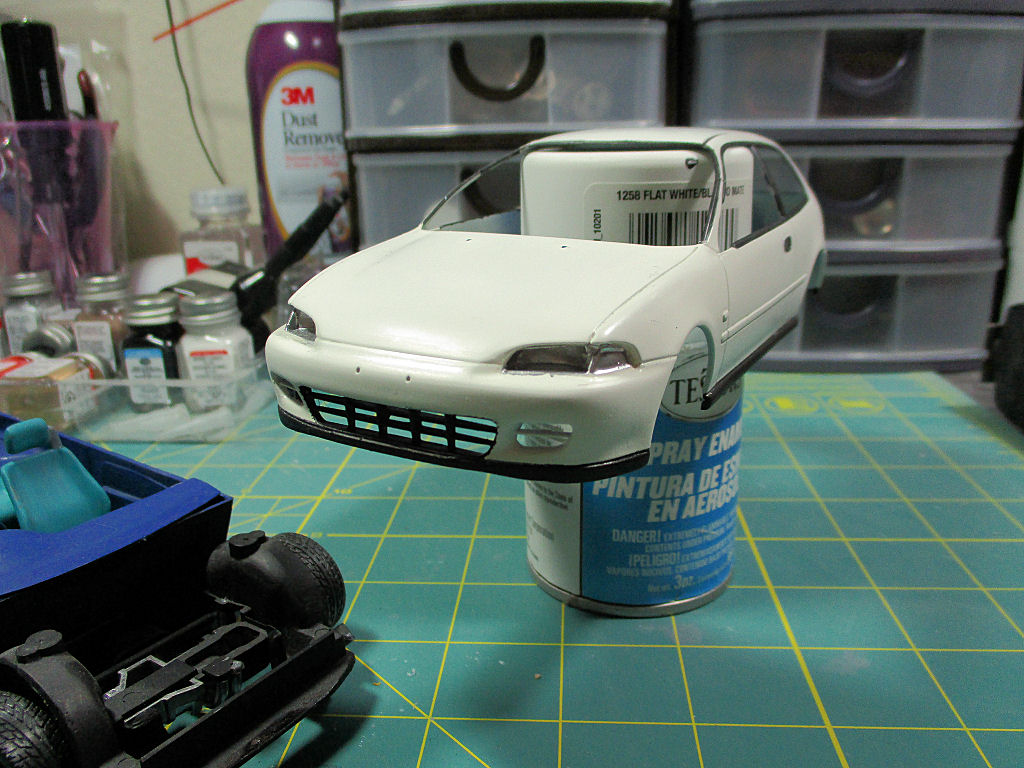 OK, so that edge didn't work out as well. The real car didn't have that trim piece, anyway - I guess I should've left it white. 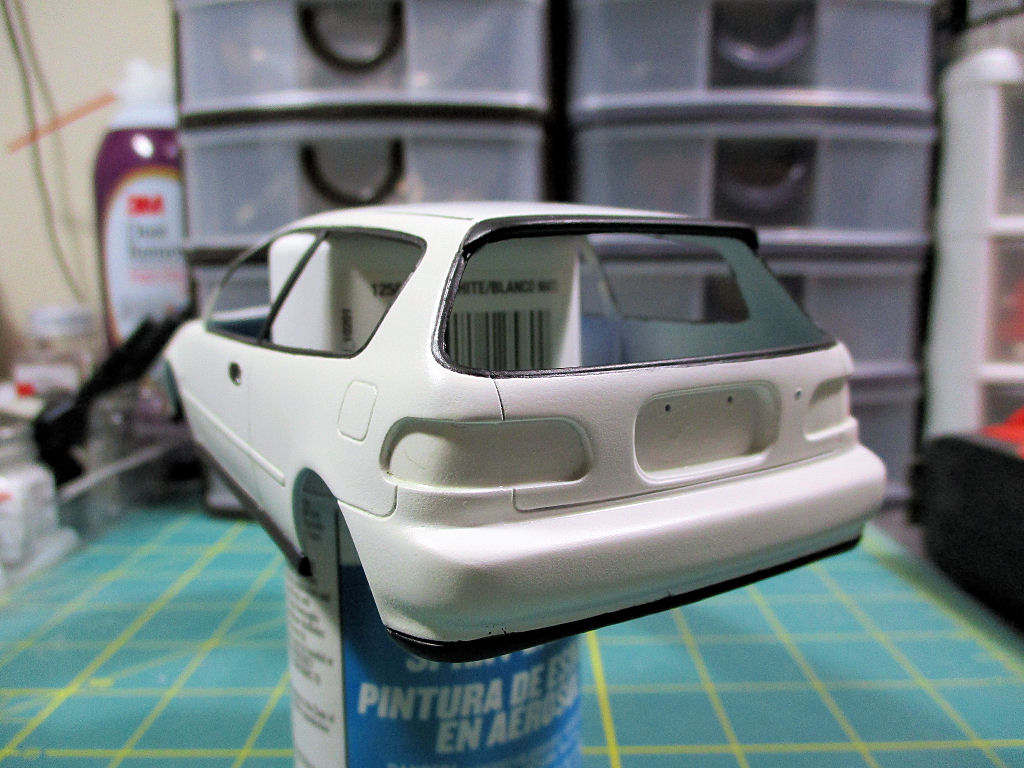 So tomorrow, hopefully, I'll get the JDM driving lights finished and slam it all together. |
|
Deleted
Registered: Nov 24, 2024 8:20:29 GMT -7
Posts: 0
|
Post by Deleted on Feb 19, 2018 18:45:26 GMT -7
Finally got one done! Stick a fork in it (well, at least for today, anyway). I still need to fix the A-pillars - I hit 'em really quick with the Dremel, and the cut-off wheel was too thick, so I need to glue the A-pillars down and stuff some blobs of body putty in to bridge the gaps... later. I'm SO done with this kit. The decals absolutely suck - they disintegrated as I was pulling them from the backing. Doesn't matter though, the only ones I really needed were the emblems anyway (the glass edge black-outs fell apart, along with the wipers. My scratch-built JDM driving lights kinda suck as well, but to be honest, so did the real ones. Oh well, too late now, I guess (LOL). Also need to score some Future for the 'future' kits (see what I did there? Sorry for that.). So, here we are: 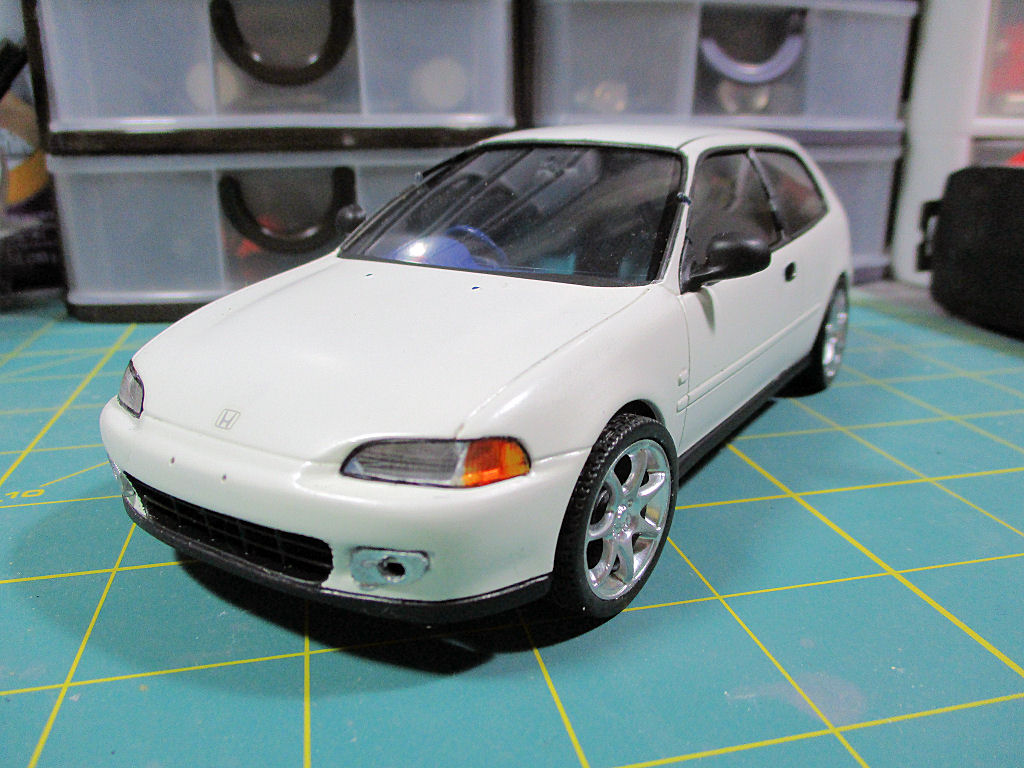 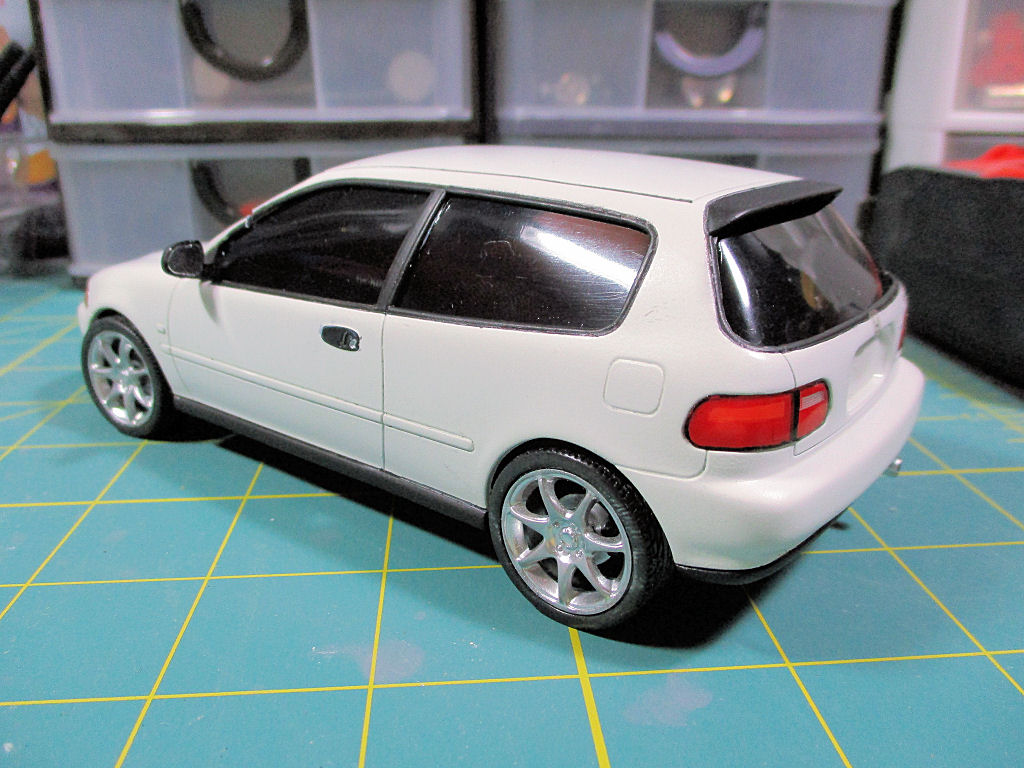 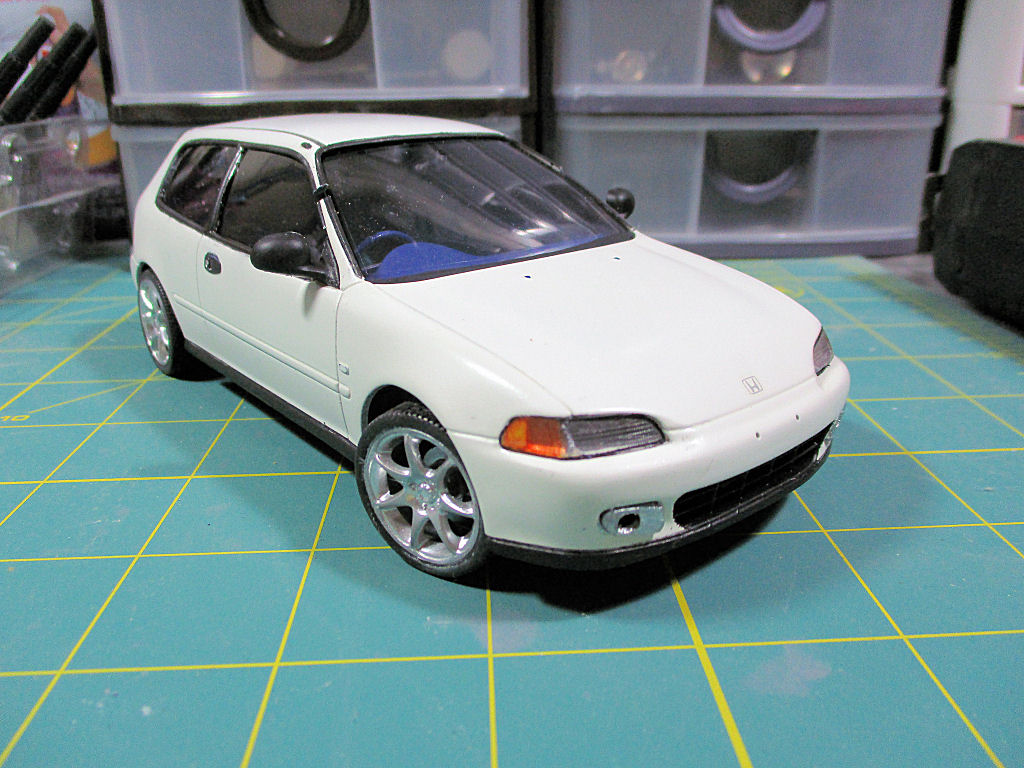 Still to do: license plates (when I feel like wasting a decal sheet in the laser printer) and fix the A-pillars. Next up: my 1980 Jeep CJ-7 (a Monogram 3-n-1 kit with Super Swampers and rims swiped from a Aoshima Toyota 4x4 kit) - I started it back in the last century shortly after I bought the Jeep. Gotta undo a bunch of stuff from back then, so that should be fun. |
|
|
|
Post by jkflash on Feb 20, 2018 10:50:26 GMT -7
Nice work, it does look a lot like the one you drove
|
|
Deleted
Registered: Nov 24, 2024 8:20:29 GMT -7
Posts: 0
|
Post by Deleted on Feb 20, 2018 17:43:46 GMT -7
Still need to fix a few things (the A-pillars, for one), but I think that's for another time when I find some more skills with body putty.  Thanks for the kind words! |
|


 ]
] ]
]


