|
|
Post by mustang1989 on Nov 12, 2019 15:04:20 GMT -7
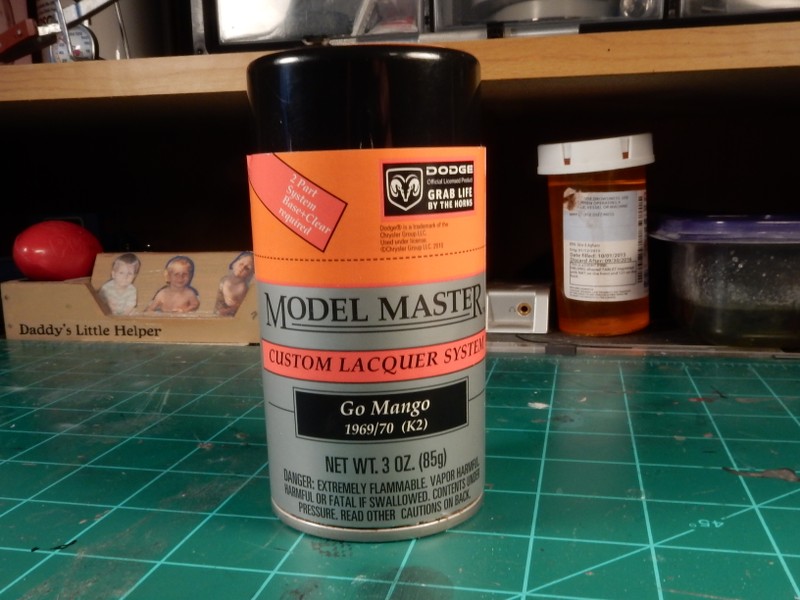
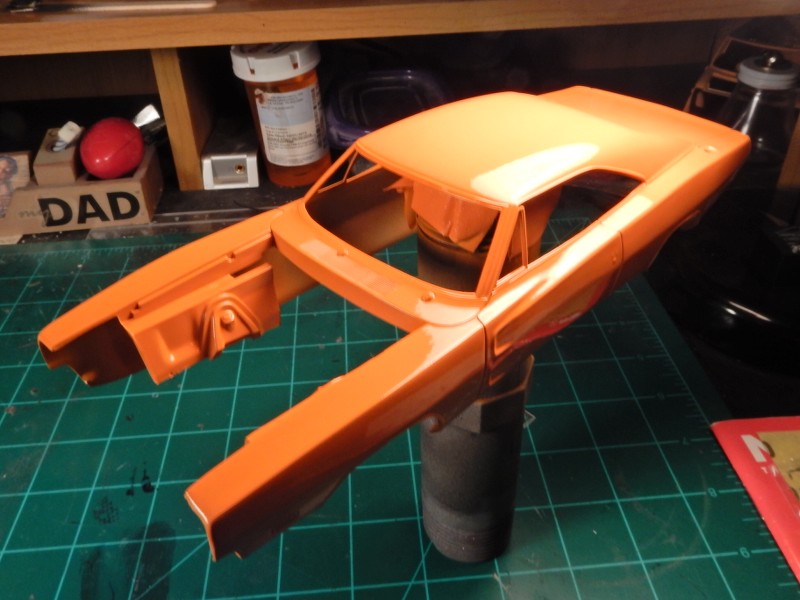
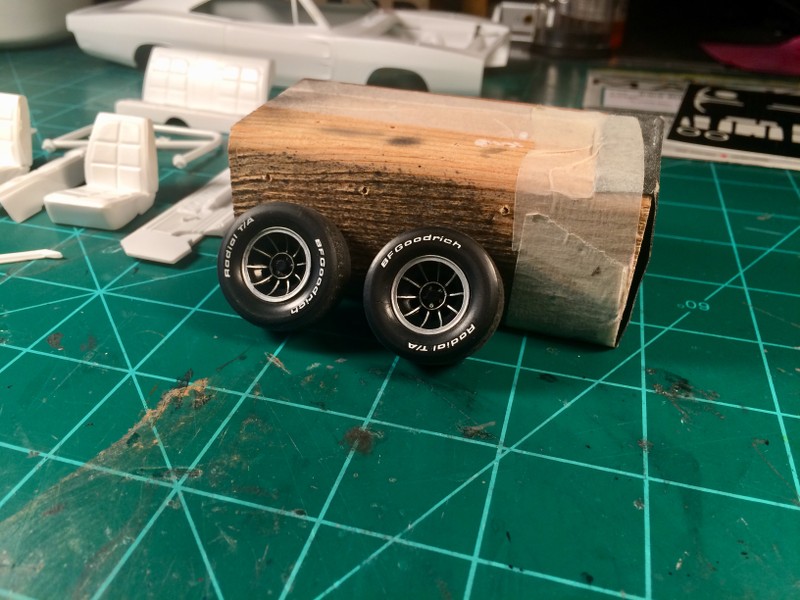
I'll start with an MPC General Lee kit which I'll be using bits and pieces from to include decals and the parts necessary to make this a General Lee. I picked this kit up for $10 at the last show I went to in San Antonio back in February: 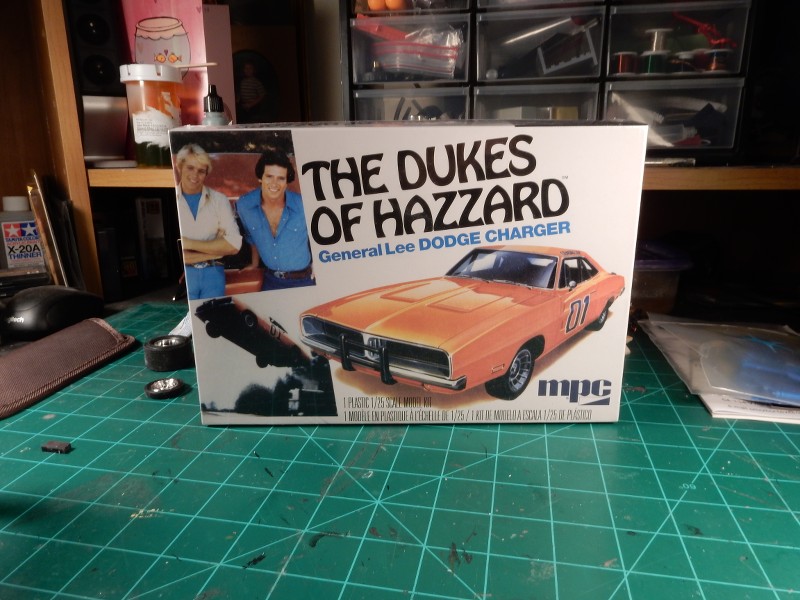 Most of the build will be from this kit which is a far better offering than the MPC version ever thought about being. 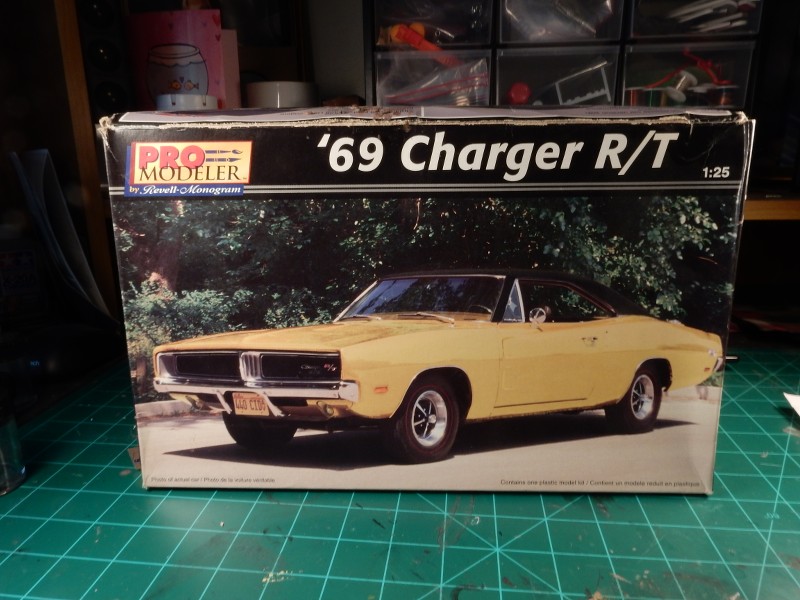 and to put a little bit of a spin on this car to get it to look the way I want it to look I'll be using the wider wheels and tires from the AMT Eckler Corvette kit:  |
|
|
|
Post by mustang1989 on Nov 14, 2019 8:43:06 GMT -7
The Revell Body with Vinyl top removal/ sanding in progress: 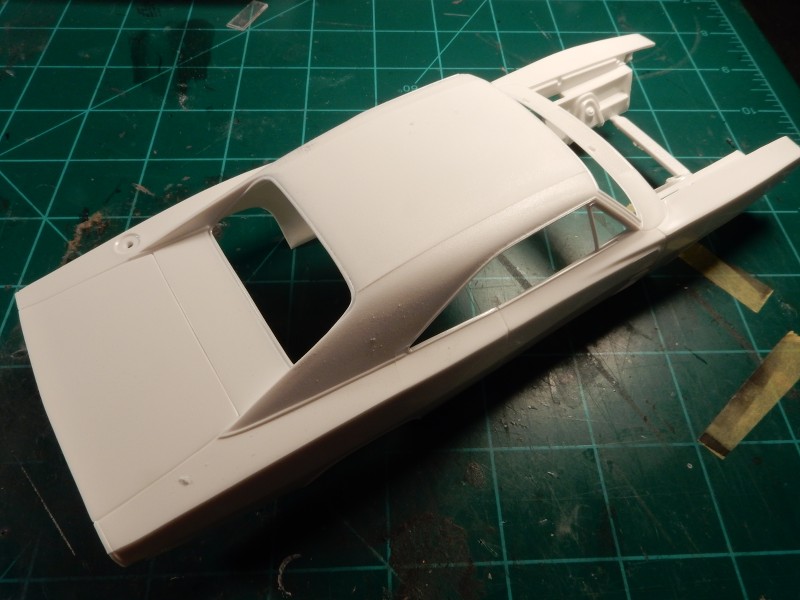 aaaaaaaaand after about a 1/2 hour..... Vinyl Top Now Removed:  |
|
|
|
Post by mustang1989 on Nov 18, 2019 15:07:22 GMT -7
|
|
|
|
Post by Grandpabeast on Nov 20, 2019 15:54:41 GMT -7
Awesome !!!!
|
|
|
|
Post by mustang1989 on Jan 21, 2020 12:55:23 GMT -7
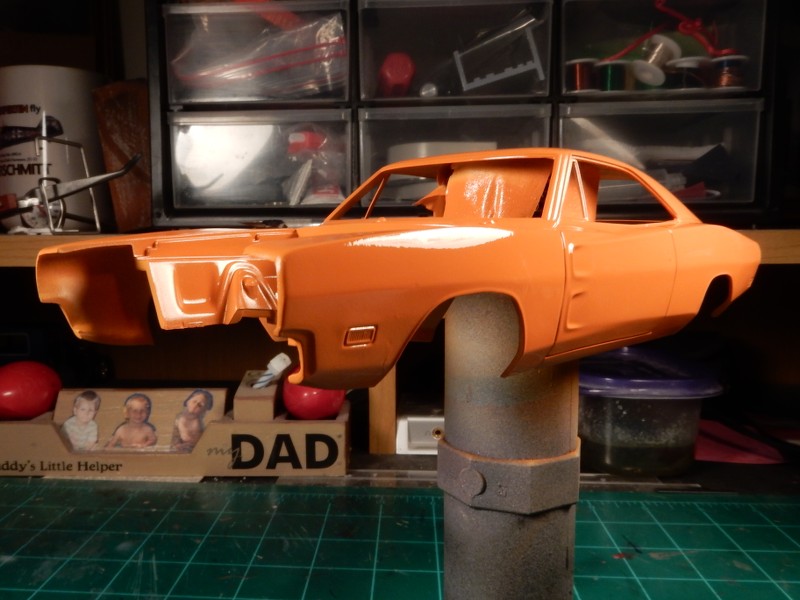
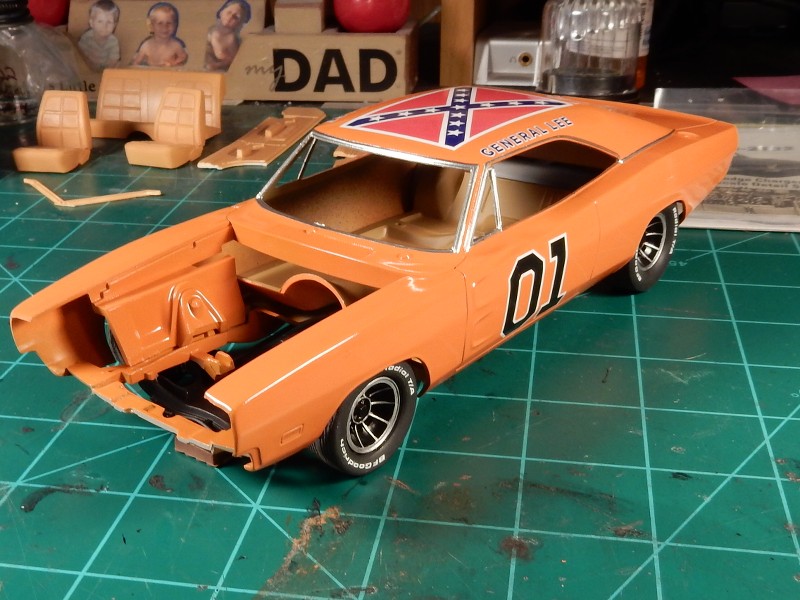
Thanks Dave! Finally able to start posting on this thread again. I spent quite a bit of time wet sanding the imperfections out of the paint and then the rest of the week applying Bare Metal Foil around all the window trim and drip rails and then...the decals. Still got the flag decal coated with Microsol to help it all lay flat onto the roofline. Had a couple of areas on the edges where it didn't want to lay down flush. Now to let the cals dry and then off to the gloss coat....my favorite part. 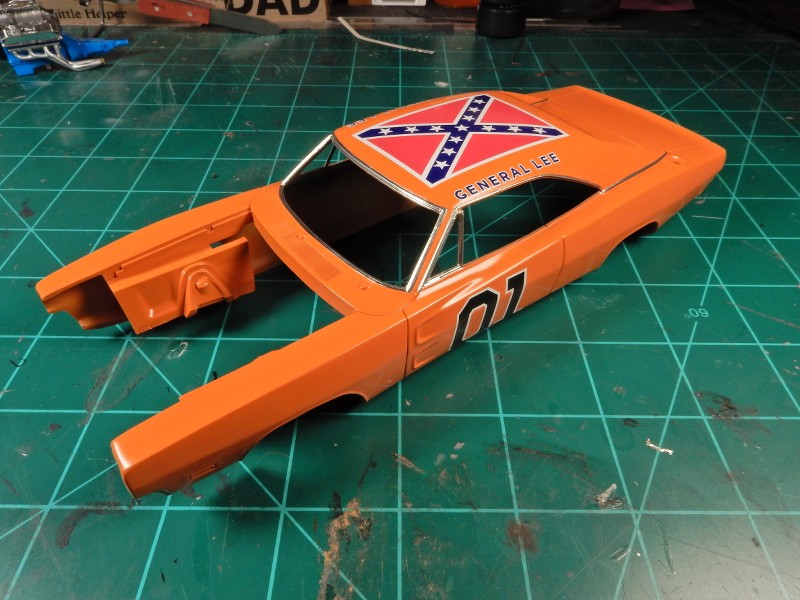 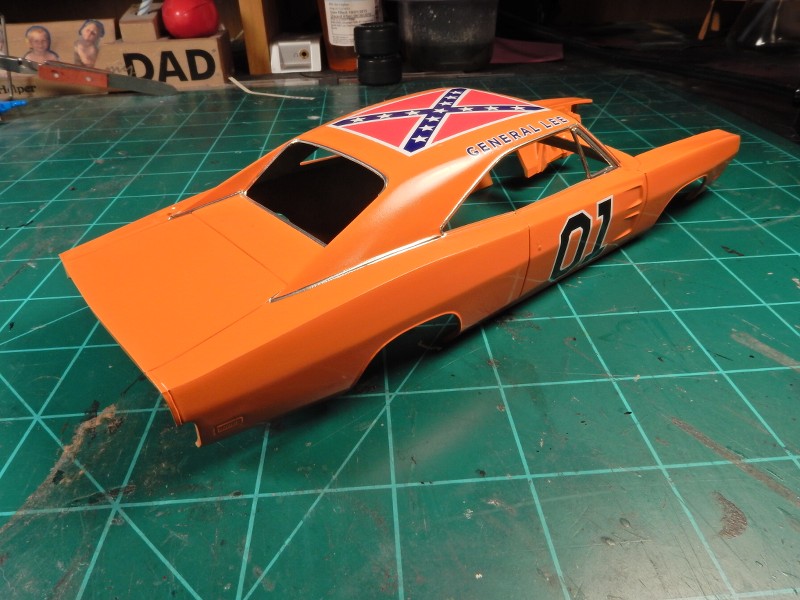 |
|
|
|
Post by sharp on Jan 21, 2020 20:05:12 GMT -7
Looks great Joe!!! Awesome job bud!!!
|
|
|
|
Post by mustang1989 on Jan 22, 2020 7:19:14 GMT -7
Looks great Joe!!! Awesome job bud!!! Thanks Mike!! Here we are after a good Gloss Coat, wet sanding and polishing session:   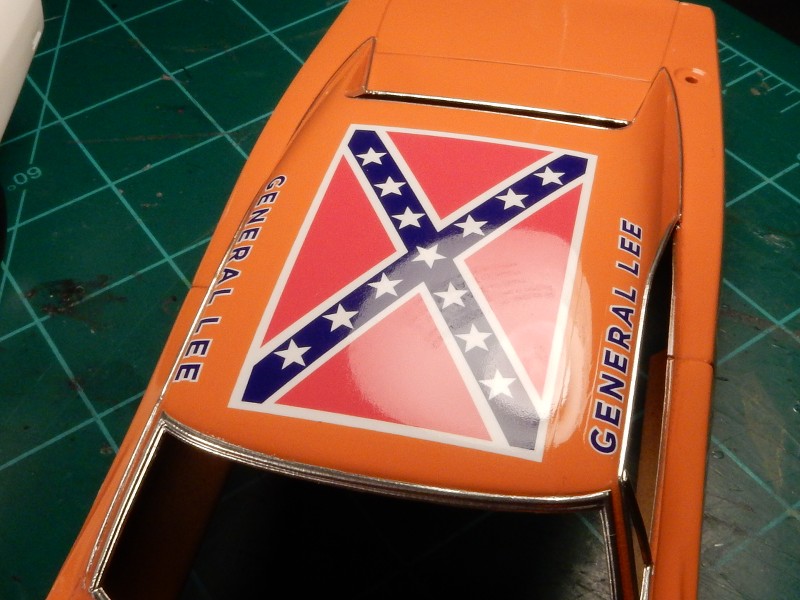 |
|
|
|
Post by Grandpabeast on Jan 22, 2020 13:23:39 GMT -7
very nice !!!!!
|
|
|
|
Post by sharp on Jan 22, 2020 19:14:12 GMT -7
Looks great Joe!!! Awesome job bud!!! Thanks Mike!! Here we are after a good Gloss Coat, wet sanding and polishing session: Very nice shine you have on this. Did you use wet look clear on this Joe? How long did you wait before you sanded and polished? Looks awesome!!! |
|
|
|
Post by mustang1989 on Jan 27, 2020 13:18:28 GMT -7
|
|
|
|
Post by mustang1989 on Jan 27, 2020 13:20:09 GMT -7
Thanks Mike!! Here we are after a good Gloss Coat, wet sanding and polishing session: Very nice shine you have on this. Did you use wet look clear on this Joe? How long did you wait before you sanded and polished? Looks awesome!!! Thanks Mike. I did use Wet Look Clear. It's pretty much what I use on everything these days. I know I shouldn't on stock builds but it the results are so good that I just can't help myself. I usually wait about 4 days anyway even though I don't think it needs that long. |
|
|
|
Post by mustang1989 on Jan 27, 2020 13:22:04 GMT -7
After some work on the chassis: 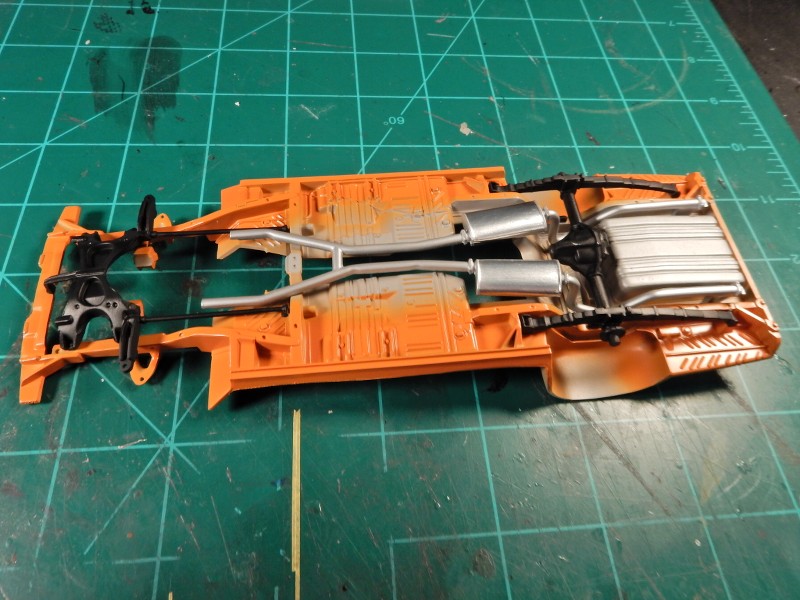 Applied a subtle wash to the undersides to bring out some of the details and add some depth. I also hit up the leaf springs and differential edges lightly with a silver lead pencil: 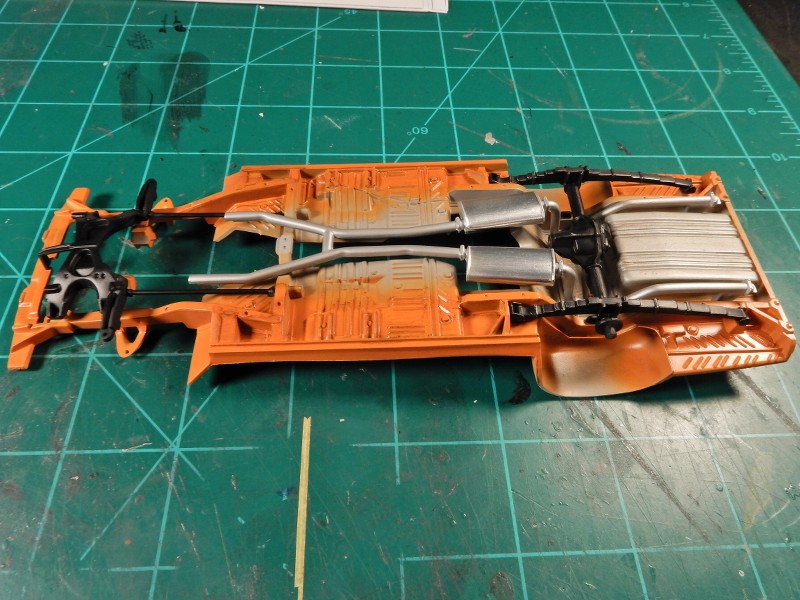 |
|
|
|
Post by mustang1989 on Jan 29, 2020 7:14:14 GMT -7
|
|
|
|
Post by mustang1989 on Jan 31, 2020 11:08:44 GMT -7
|
|
|
|
Post by mustang1989 on Feb 3, 2020 8:46:01 GMT -7
Instrument panel: 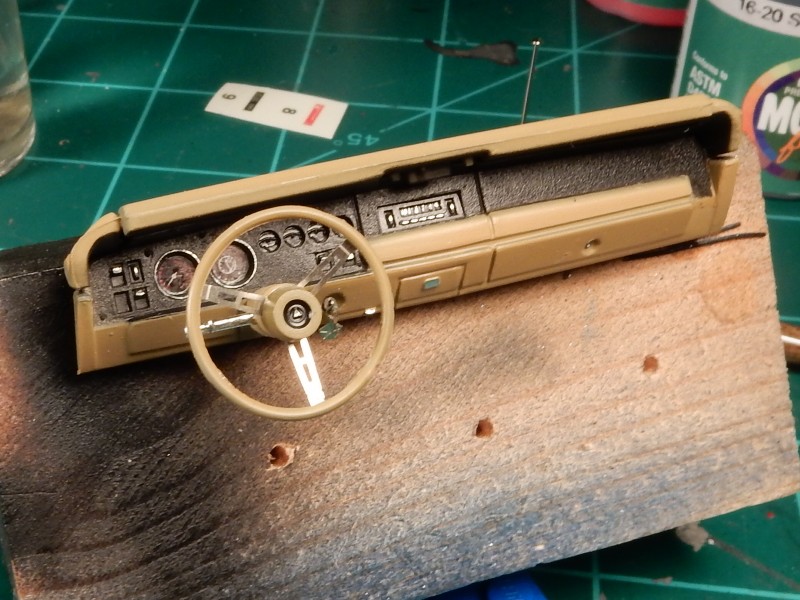  And then the officially completed the interior tub. All that's left is installing the door lock knobs into the holes that I drilled in the top of each door which will happen after I've got everything installed neatly and securely up into the body as to avoid damage to the knobs during the interior install. Revell really did everything right on this kit. If you look up under the dash on the passengers side you'll see the HVAC case. AM items include the seat belts and buckles, PE foot pedals, PE steering wheel spokes, PE keys and key chains and of course the carpet/ flocking. All chrome was applied with a Molotow Chrome pen except for the chrome endcap on the rear of the console. I'm pretty pleased with this. 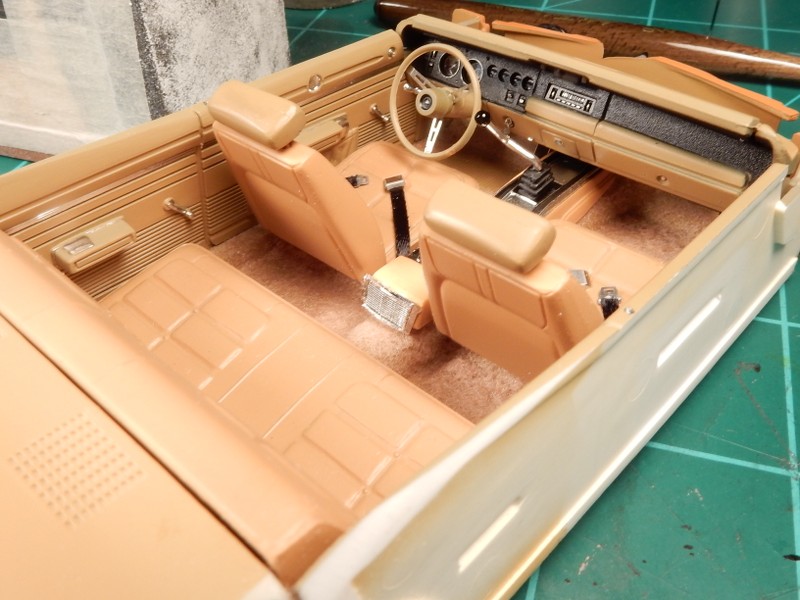 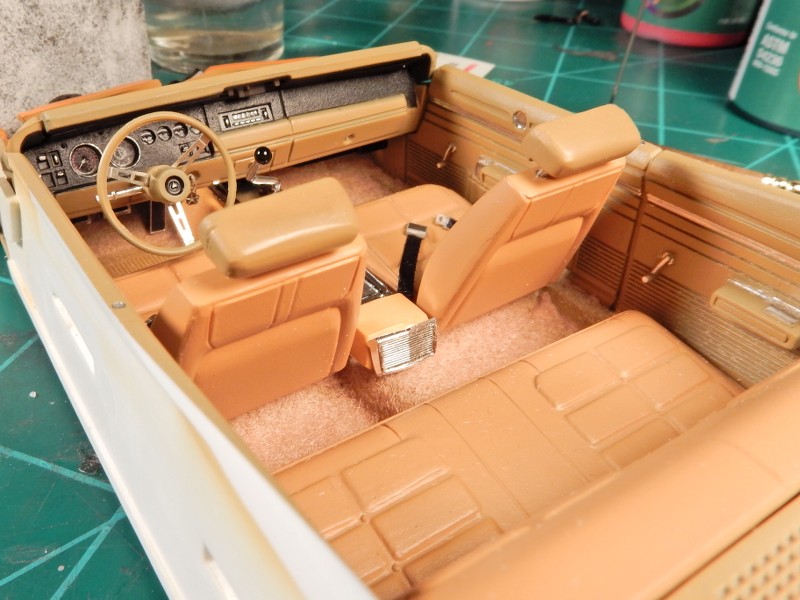 |
|
|
|
Post by mustang1989 on Feb 4, 2020 10:09:17 GMT -7
First off.....I worked on the battery a couple of days back and decided not to go with real cables for this one. Gonna concentrate most of my efforts on the brake lines coming off of the master cylinder and more so on the engine which I still haven't decided which way to go with yet.  Secondly.....If you wanna know about modeling stress...…I can tell you about that. I have never seen an interior that fought the whole way going into a car body before. I just knew one of the windows were gonna pop out or that there was going to be an interior side panel pop out of place or something was gonna break while installing it. I can't really turn the car body upside down to do all of this either due to all the flocking going everywhere during the popping and all from fitting this interior up into the body. I had to do all of this with the body upright which made things really hard to do. But............…I got it. Thank God-I got it.  |
|
|
|
Post by mustang1989 on Feb 5, 2020 7:12:43 GMT -7
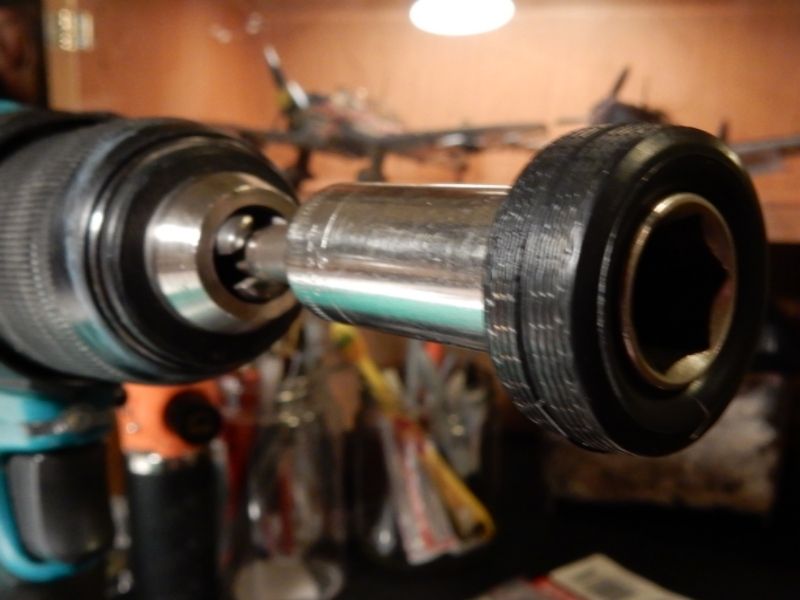
Okay......I managed to get the hair raising task of installing the wheels all done. Sounds simple but I made the wheel mounting holes on the rims an oval so I could get this one just wee tad lower. Had to get all the wheels at just the right height so I wouldn't wind up with a "3 wheeler". The stance is now locked in. I also got the back panel all painted up, detailed up and bumpered up and installed. I hit the body with a little more polish but can tell I need to do it again just to get it just right. 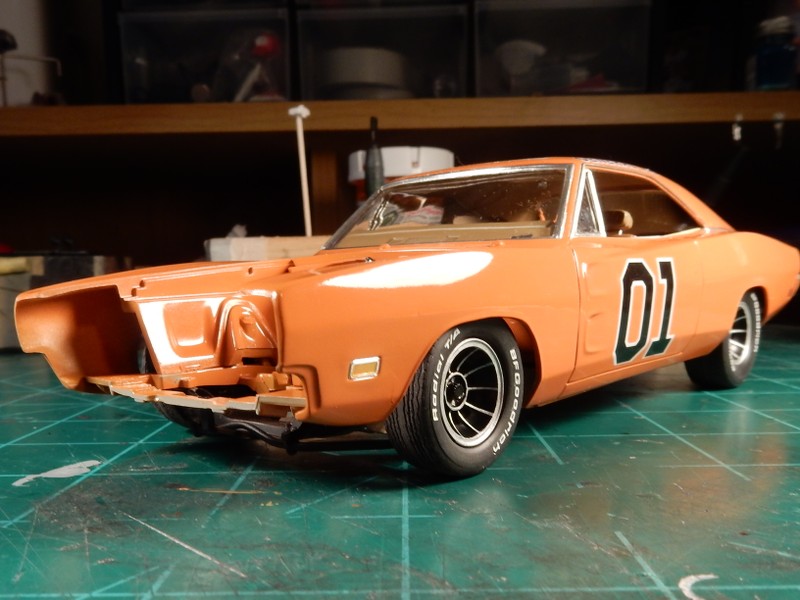 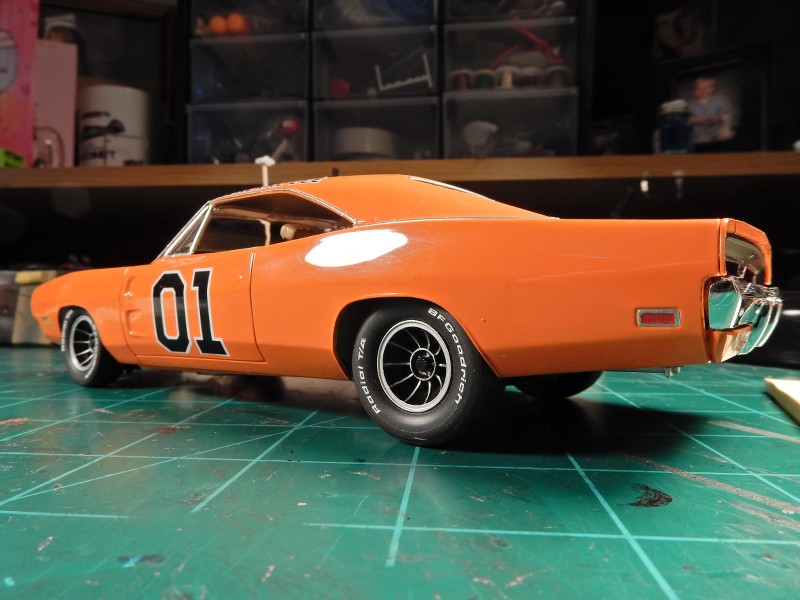 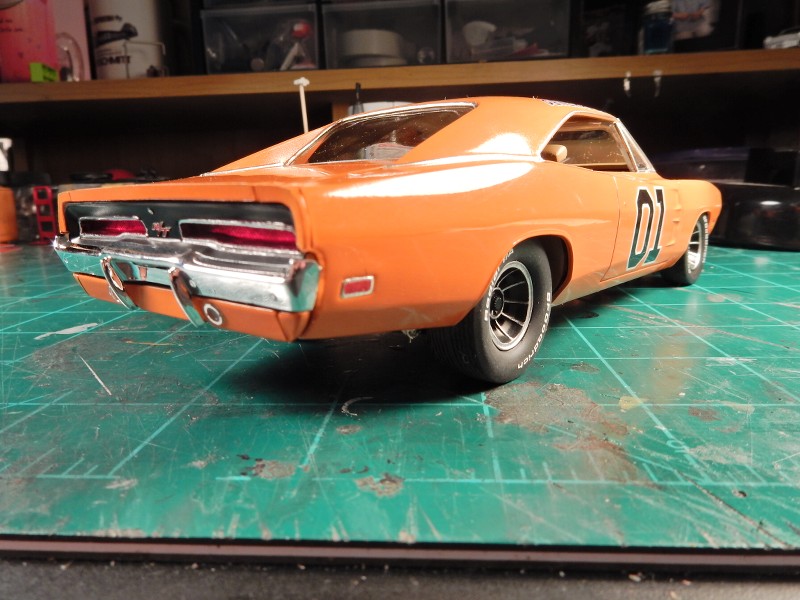 |
|
|
|
Post by mustang1989 on Feb 6, 2020 9:58:16 GMT -7
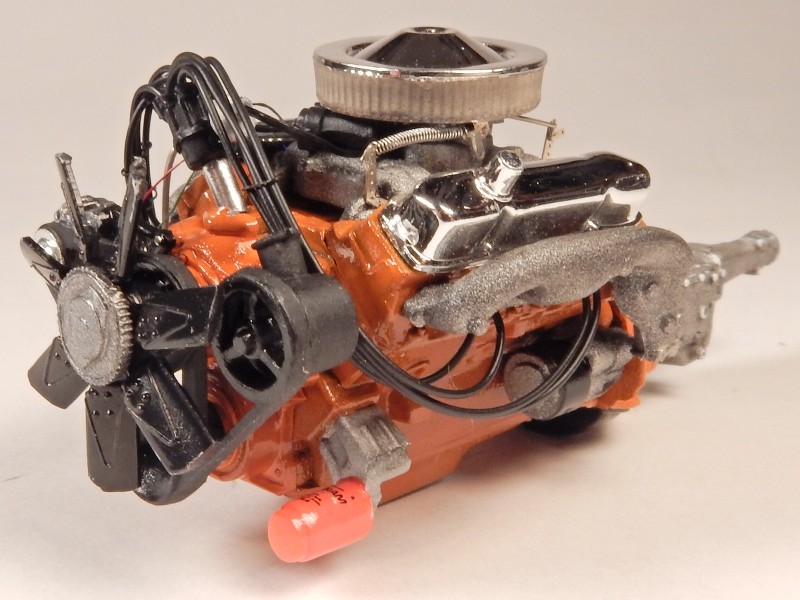
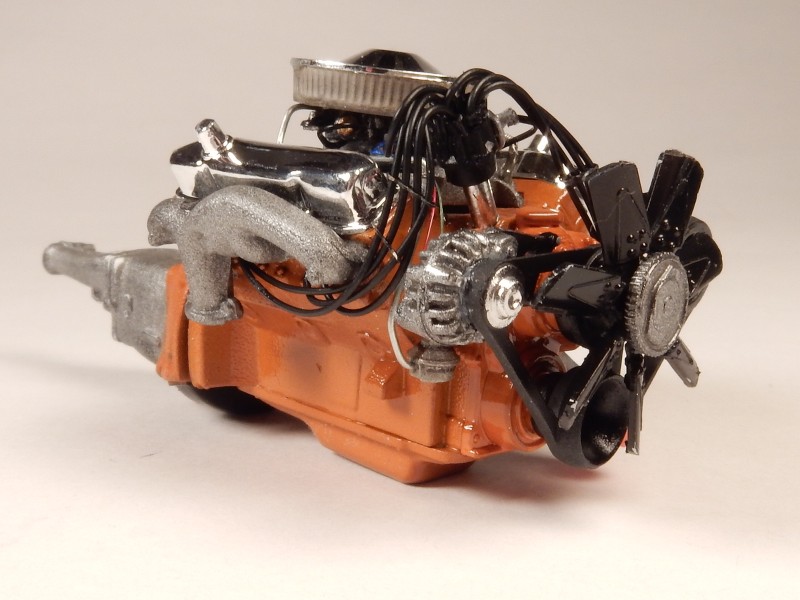
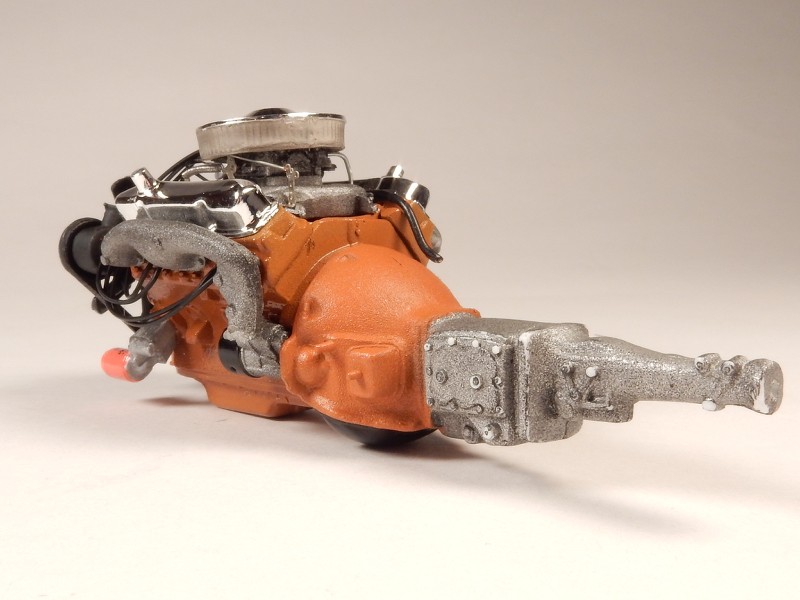
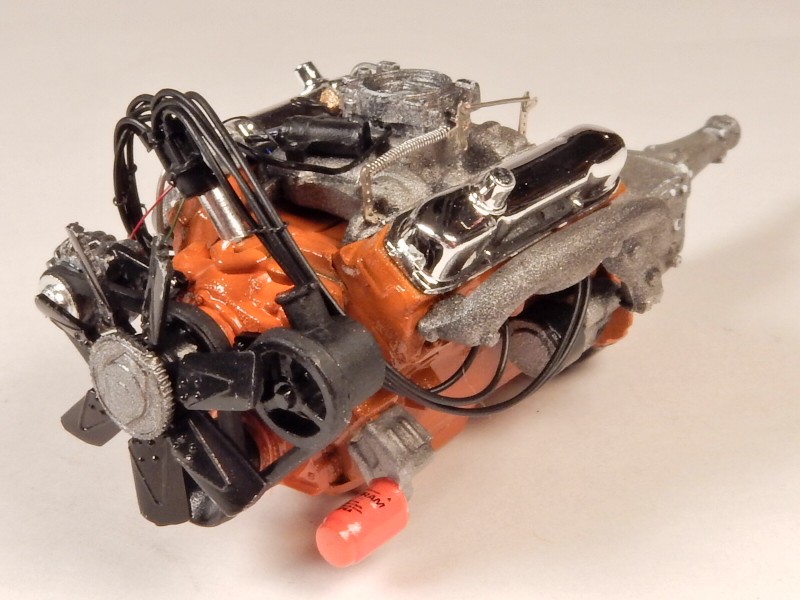
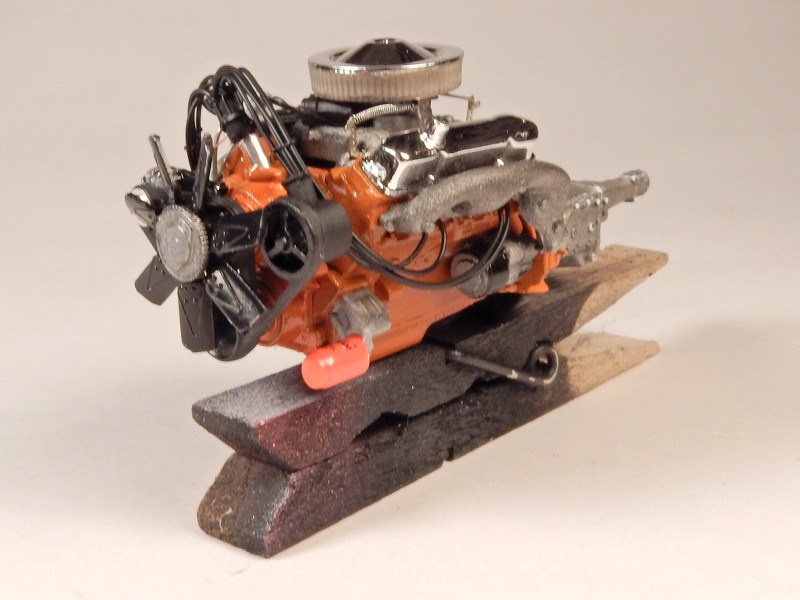
Today saw the completion of the engine bay prep. The one thing I couldn't get over was the clear windshield washer bottle out of the box.  A little weird but I guess they were trying to appeal to the younger or less experienced modeler. I dunno…. 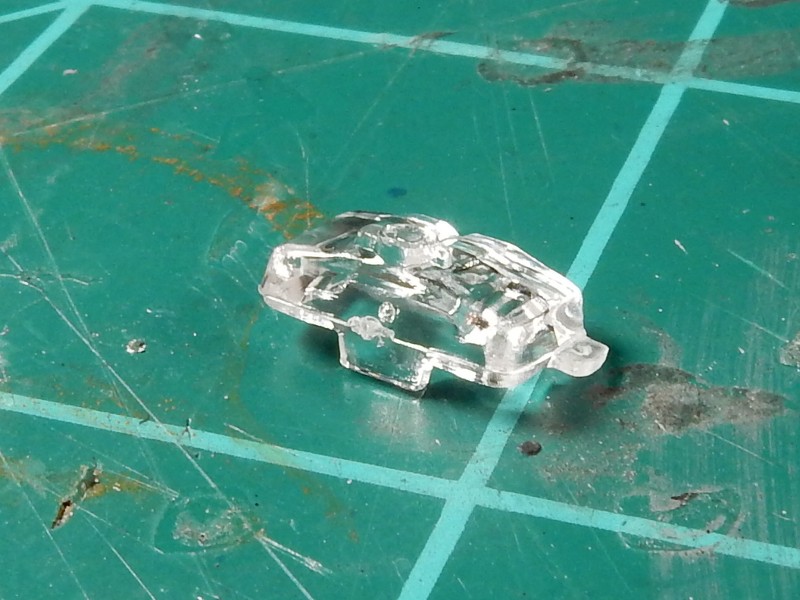 I made the necessary corrections to it and managed to finish up the engine bay today. Shock studs and retaining nuts were added to the shock towers, brake lines were fabricated and added and I brought out the highlights of the steering column with a silver lead pencil. Anyhow ....here's the engine bay all prepped for that 440 engine to be installed hopefully shortly.... 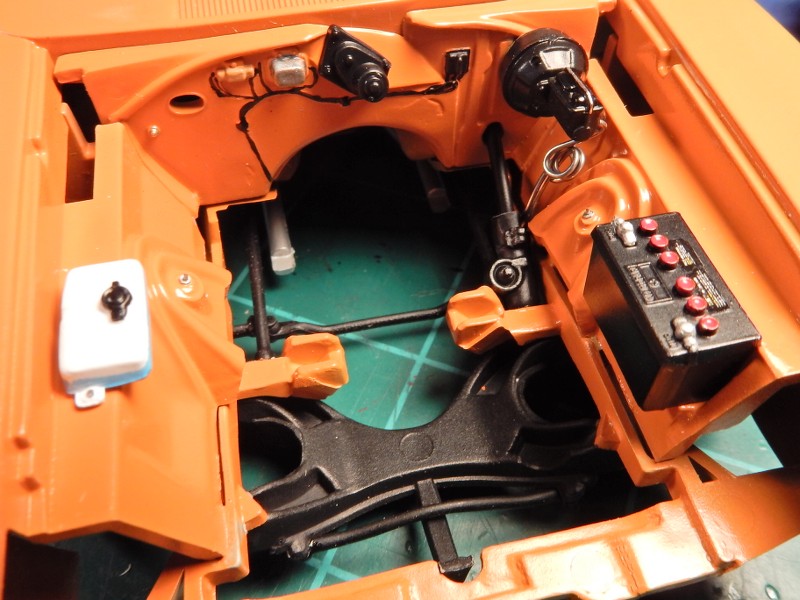  |
|
|
|
Post by mustang1989 on Feb 7, 2020 11:04:38 GMT -7
|
|
|
|
Post by mustang1989 on Feb 8, 2020 17:06:07 GMT -7
Ok folks.....being pretty much unhappy with the air cleaner that I had on the engine I searched high and low and found one more air cleaner in my stash that actually goes on a 440 and shot it with Molotow Chrome through an airbrush. This time the results were pure magic...…… This looks MUCH better to me.... 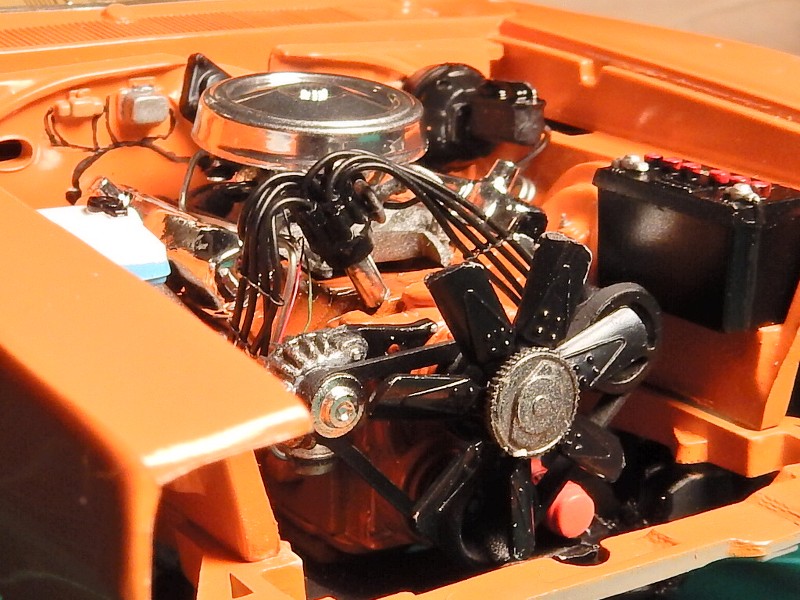 |
|
|
|
Post by mustang1989 on Feb 12, 2020 15:04:22 GMT -7
I'm to the point that I'm now working on the grille/ front end of this bad boy. I can't really fit anything into the engine bay as far as the radiator core support (which has now been extensively modified to fit. Don't ask folks....I really don't know what happened with the fit of everything up front. All parts were test fitted prior to even painting and it all fit perfect. Now ...the front fenders have to be spread in the front some to get the brace and hood to fit. Weird. As far as the grille goes, there's some more mods that I'm doing. Looks like the inserts from the MPC kit turned around backwards fit perfectly in the openings that I cut out of the grille. I've still got some filling and sanding to do to get rid of those nasty ejector pin marks but that's not really a worry of mine. I cut the PE grille inserts out and test fitted. Looks like it's all a "go" at this point. One more side to go...….. 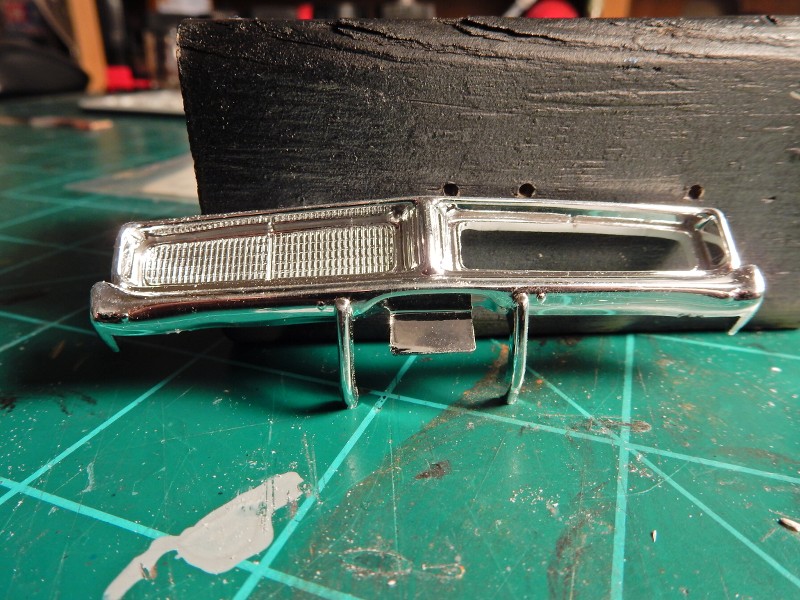 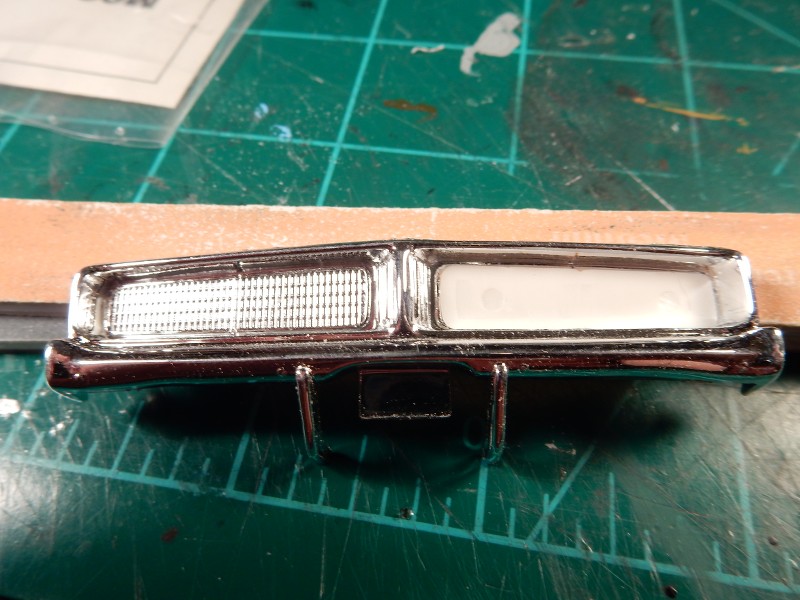 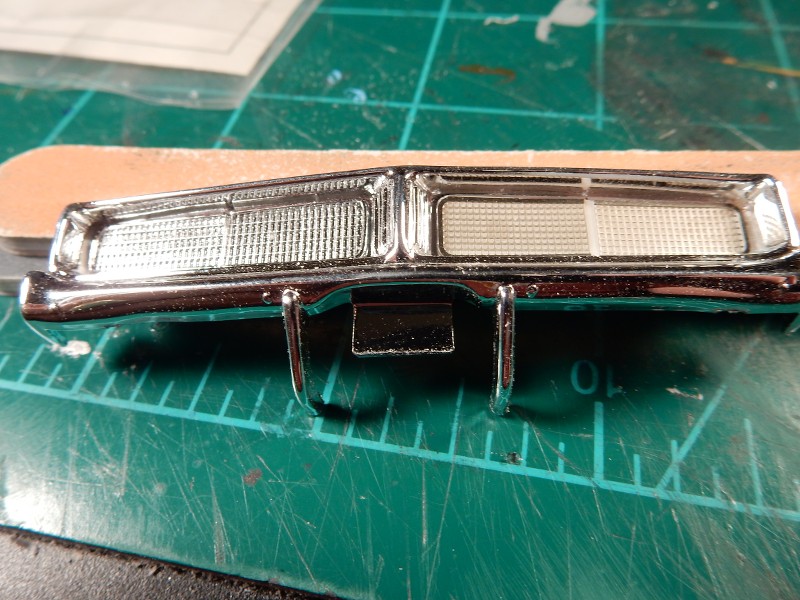 Oh and by the way......the engine bay is now....FINISHED! 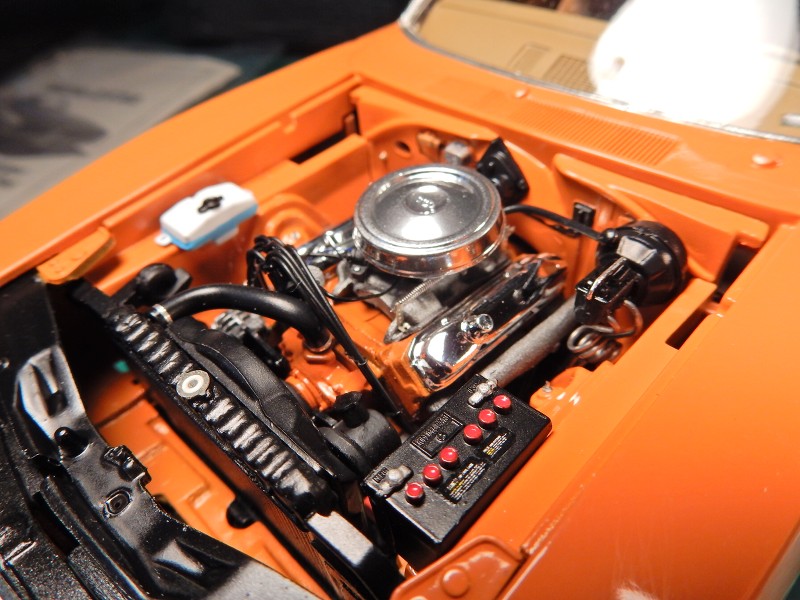 |
|
|
|
Post by mustang1989 on Feb 13, 2020 9:05:35 GMT -7
|
|
|
|
Post by mustang1989 on Feb 14, 2020 15:20:44 GMT -7
I didn't like the kit supplied exhaust tips and decided to fabricate my own out of aluminum tubing. I angle cut a stalk, cleaned both sides up and polished them up. Then cut them to length and installed. Still gotta add the black soot to the insides of the pipes but I'm fairly happy with this result. 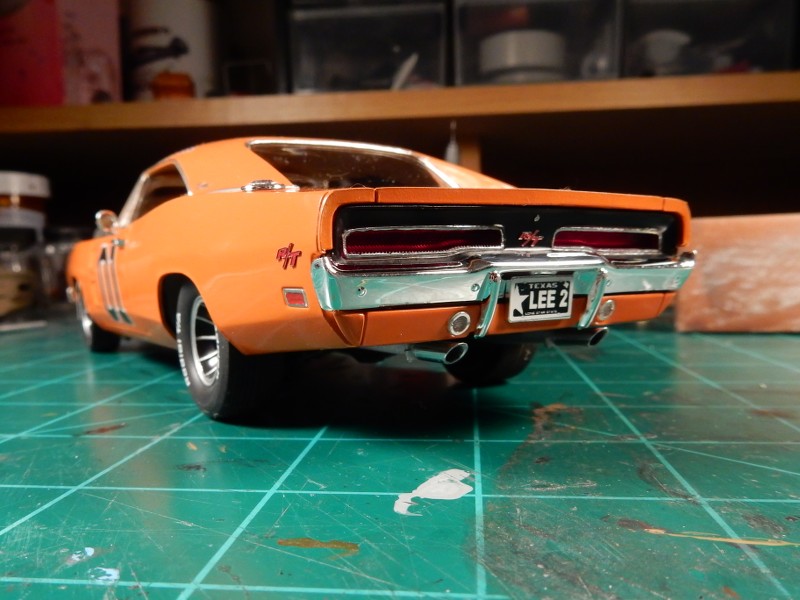 |
|
halfbreed
New Member
 Registered: Aug 19, 2019 8:56:36 GMT -7
Posts: 13 
|
Post by halfbreed on Feb 15, 2020 11:01:28 GMT -7
That is outstanding work and a lot of little detailing.
|
|
|
|
Post by mustang1989 on Feb 15, 2020 19:52:52 GMT -7
|
|
|
|
Post by Grandpabeast on Mar 2, 2020 7:32:07 GMT -7
WOW, blows me away !!!
|
|
|
|
Post by kpnuts on Mar 14, 2020 13:03:00 GMT -7
Beautiful work mate
|
|
|
|
Post by mustang1989 on Mar 16, 2020 8:24:28 GMT -7
Thanks Dave!! Glad you like it man. |
|
|
|
Post by mustang1989 on Mar 16, 2020 8:24:52 GMT -7
'Preciate the good word brutha! |
|


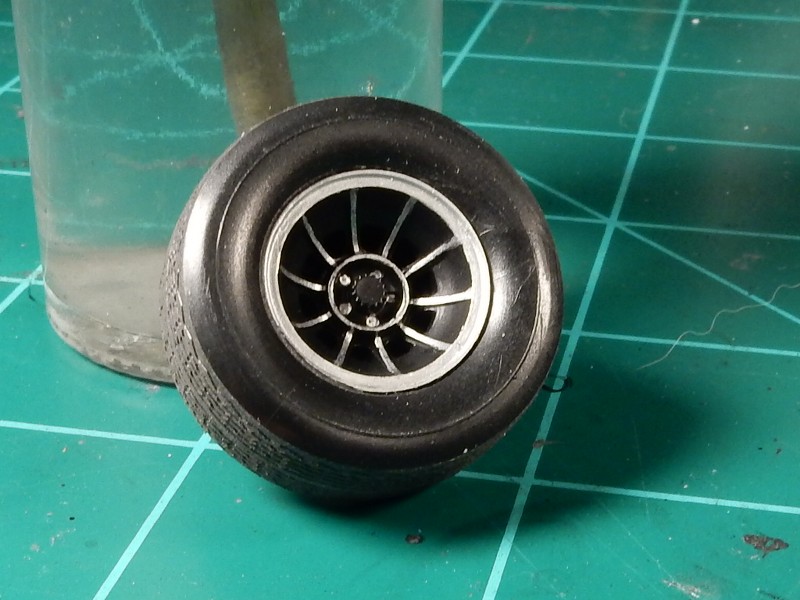
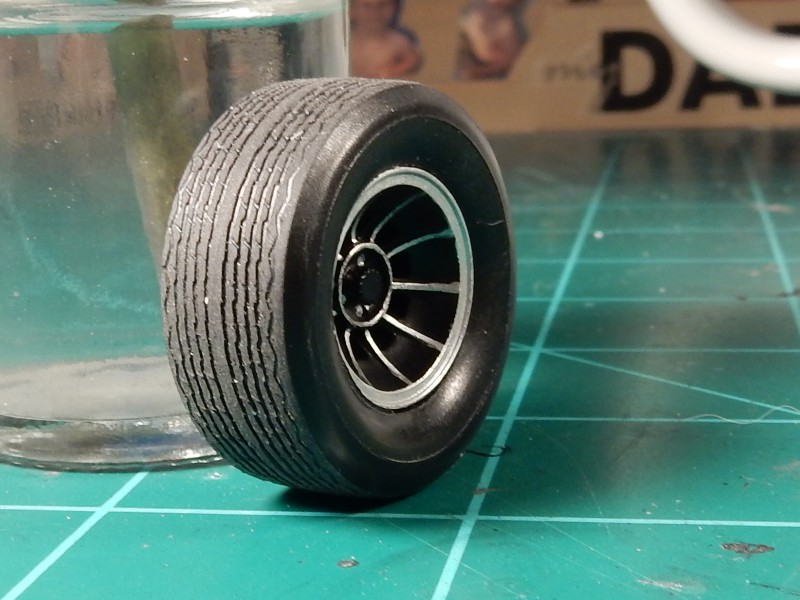
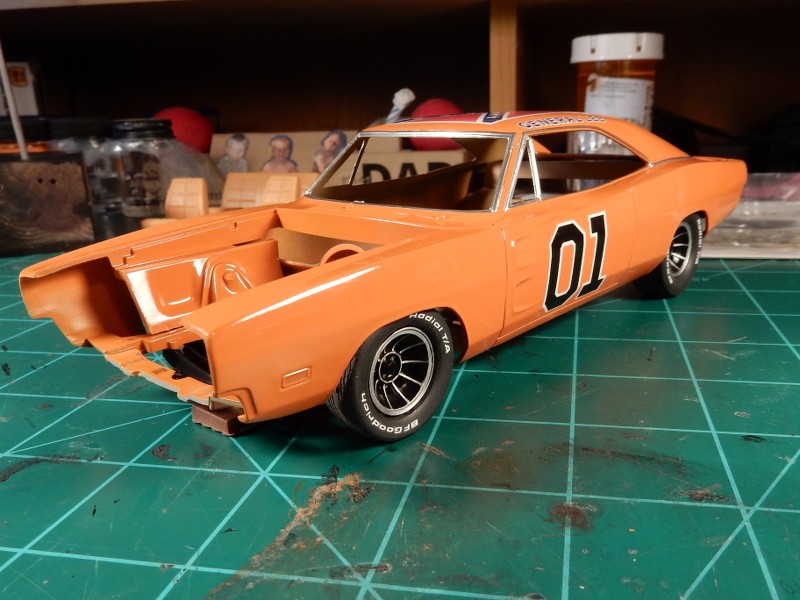


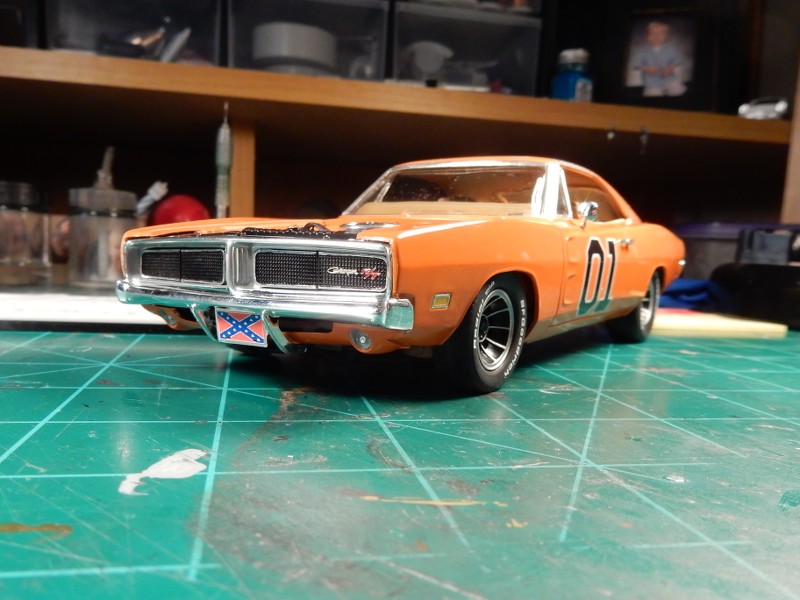
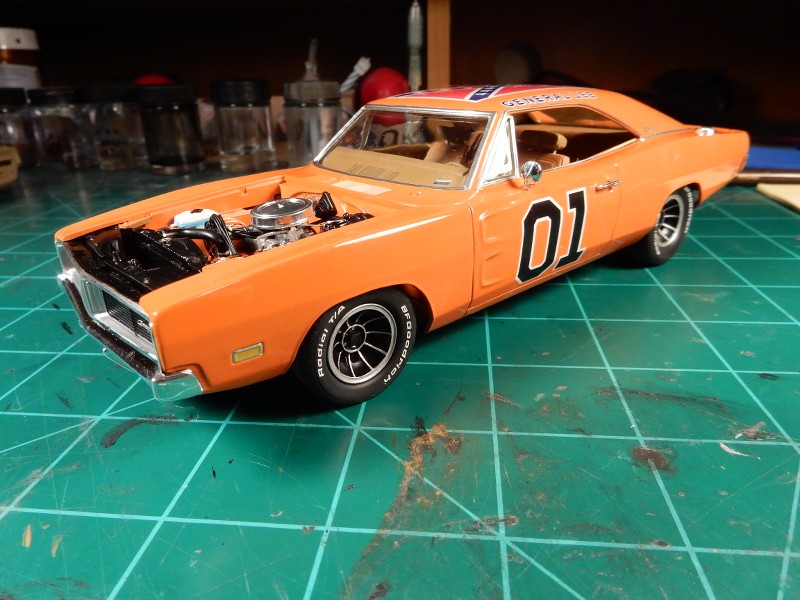
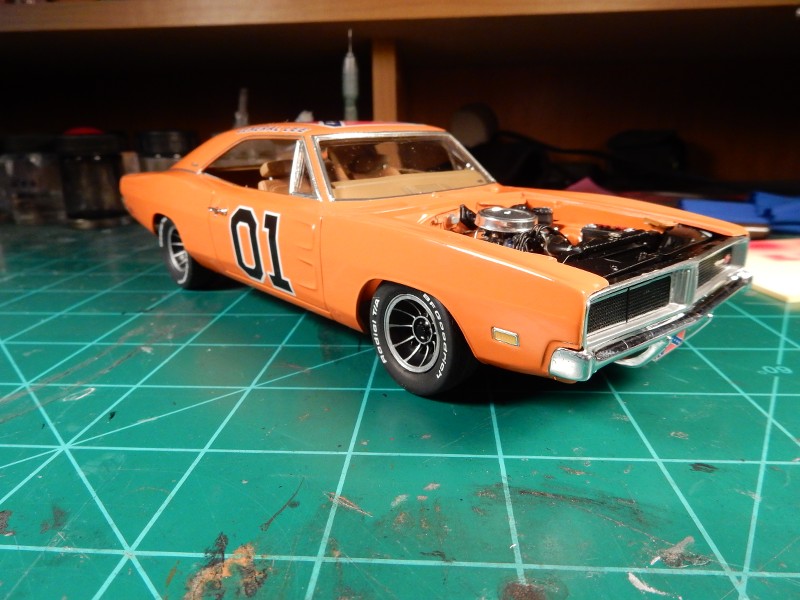

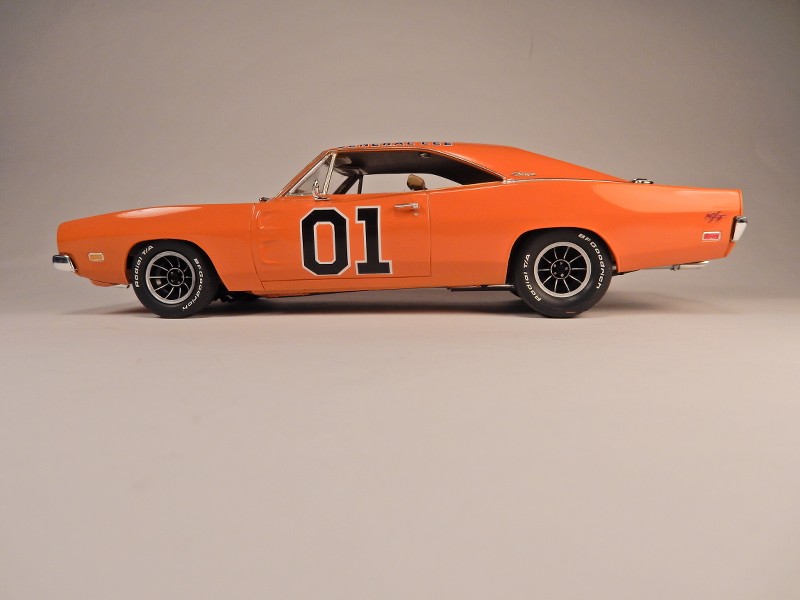
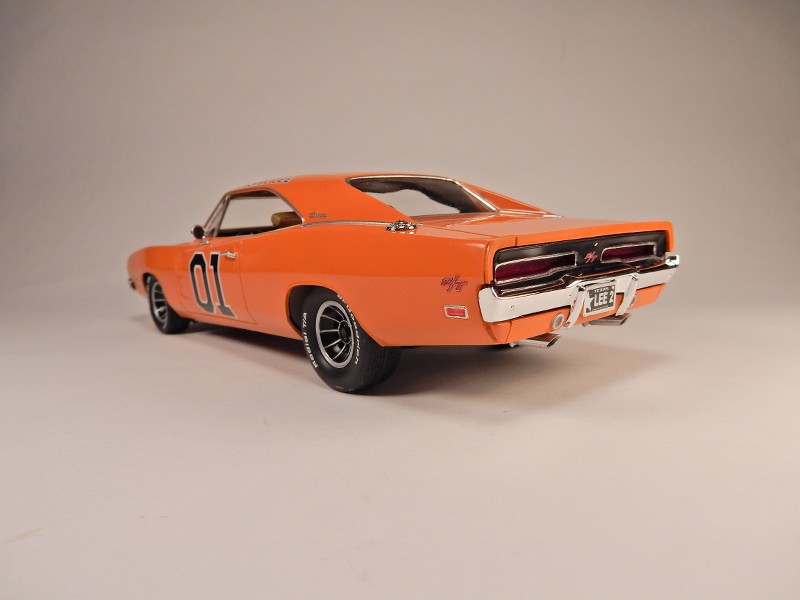
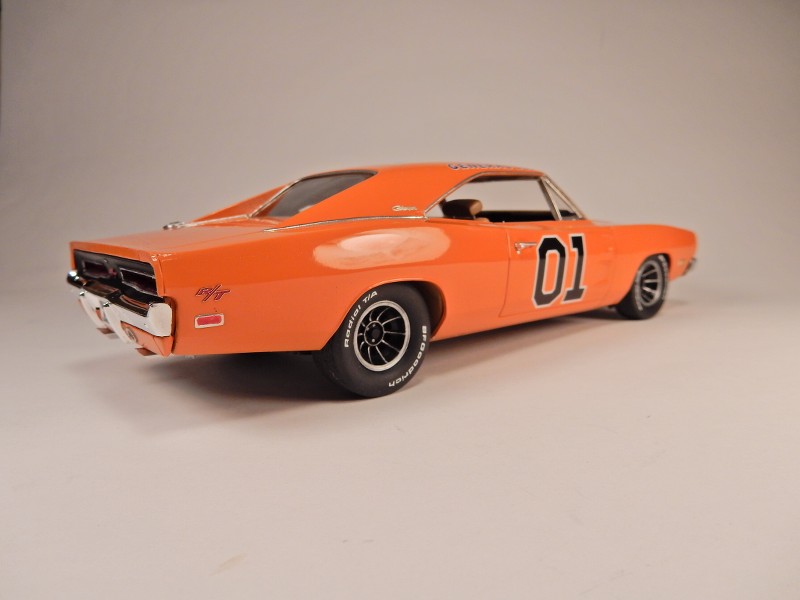
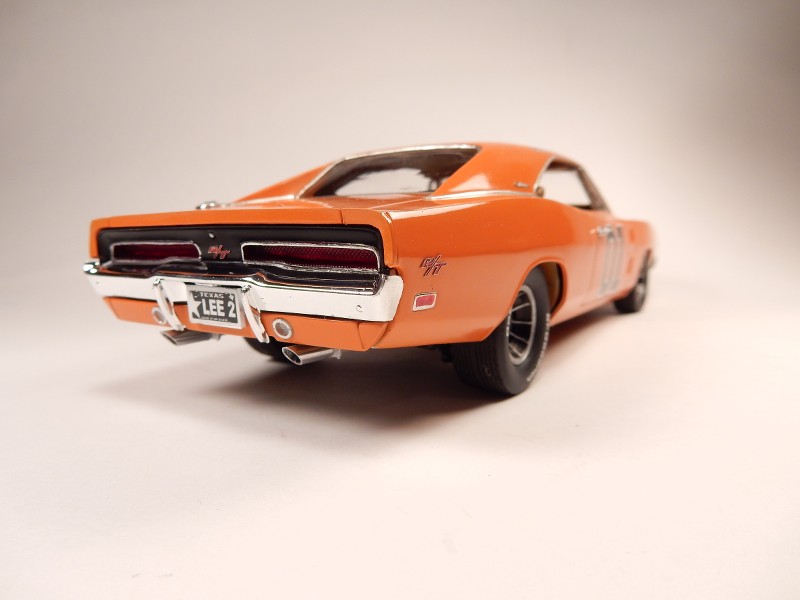
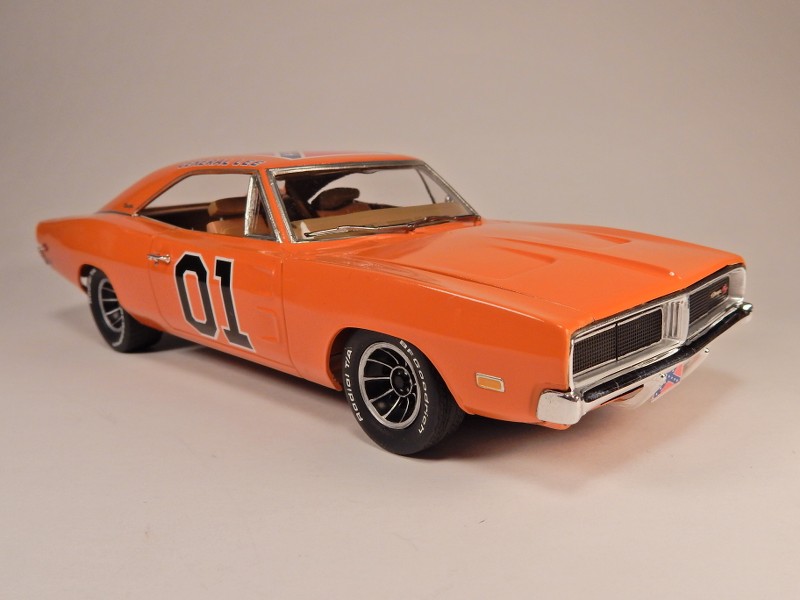
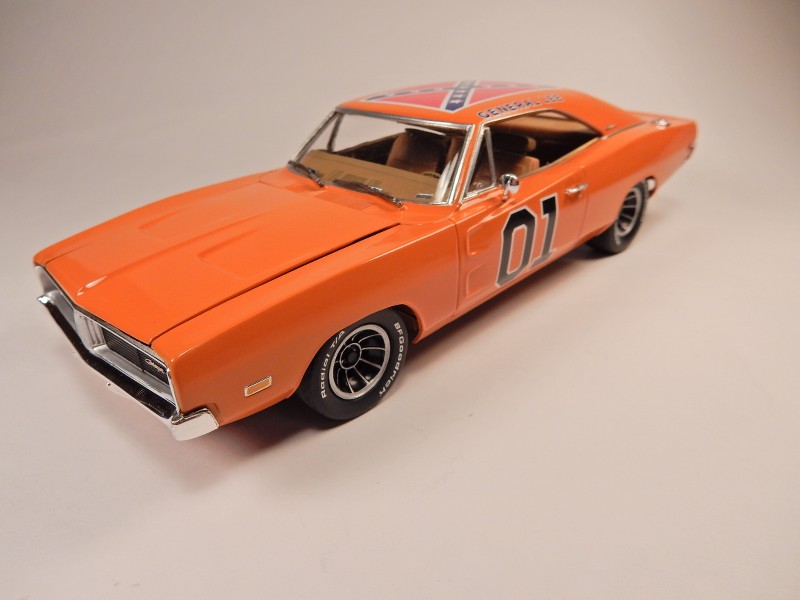
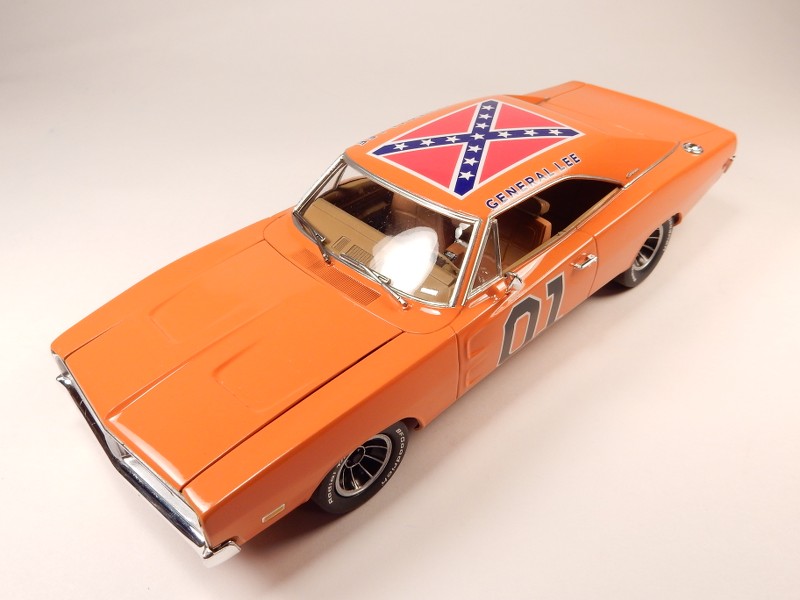
 I built one as a kid and have always wanted to have a second shot of it. Only this time I got to add my own touches to it. I started with the stance. I didn't like the high stance of the Lee at all so I set out lowering a bit all the way around. I also went with wider wheels from the AMT Eckler Corvette kit and used a set of tires(which I turned into Bf G's by way of decals ) from the Revell Challenger T/A kit so I could have a more aggressive look. Secondly, if I had one of these it only makes sense to have opening doors....hence the door handles. Third, I love the looks of the 69 Charger R/T grille.....a true testament to the aggressive looking front ends of the time so I opted to show the R/T grille unobstructed by not installing the grille guard up front. Just couldn't do it guys. Lastly, the GL is NOT an R/T which I simply could not have. If I'm going to build a Charger then it's gonna be an R/T and it's gonna have a 440 and not a 383. You're also not going to find a roll bar or CB radio inside. I love the looks of a factory interior in any car and have always liked the Charger interiors in particular so I couldn't "spoil" any of that.