|
|
Post by wisdonm on Oct 4, 2017 7:40:24 GMT -7
My son's wedding is over. Car show season is over. Racing season and BBQ season are almost over, so it's time to get to work on the evilbay challenge.  These are the parts and decals that I'm starting with. I guess we're building this box stock. Although the "61 Impala didn't come with bucket seats, I had considered adding them, but since I don't usually build this type of car, I don't have any spares that would fit the bill. I bought some Blue Sapphire and Wicker White paint that Mike is using on the body. Trimmed all the parting lines. There were no visible ejector pin marks. Washed all the pieces with Dawn. Now it's time to prime everything. Oh, the instructions called for a decal #13. I didn't see it on the decal sheet and it wasn't sent to me. Any body know what it is?  |
|
|
|
Post by Grandpabeast on Oct 4, 2017 14:03:44 GMT -7
I believe 13 is a chrome emblem, not sure if it even came with one. Everybody check !!!!!
|
|
|
|
Post by sharp on Oct 4, 2017 17:42:39 GMT -7
I checked the decals I have and I don't see a 13. How about using bare metal foil?
|
|
Deleted
Registered: May 1, 2024 16:45:16 GMT -7
Posts: 0
|
Post by Deleted on Oct 10, 2017 23:04:14 GMT -7
Isn't that the SS logo set in that cutout
on the back seat? (Rear speaker grill)
I have 2 of these kits, I guess I could
check it out also!?!
David S.
|
|
|
|
Post by sharp on Oct 11, 2017 5:36:45 GMT -7
As you can see guys AMT has screwed up there is no #13 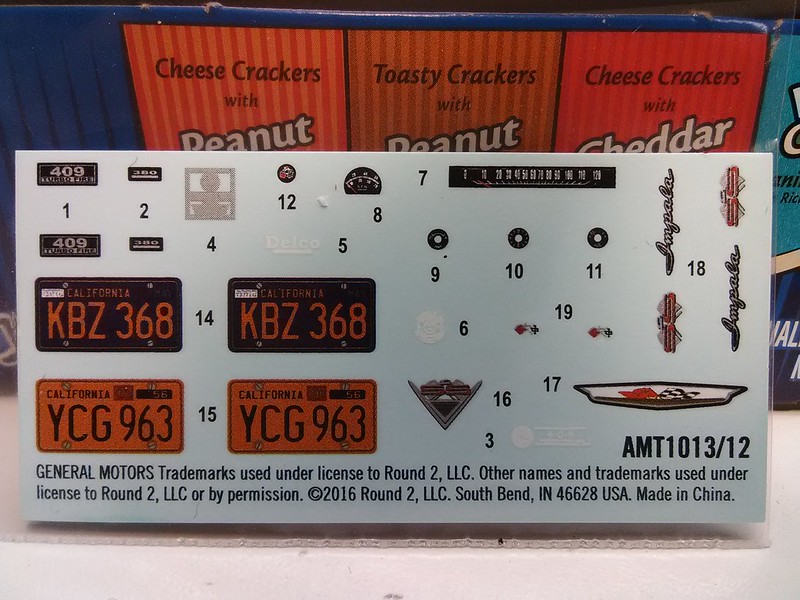 |
|
|
|
Post by wisdonm on Oct 11, 2017 6:02:59 GMT -7
Thanks for the info guys. I'm going to start painting color today.
|
|
Deleted
Registered: May 1, 2024 16:45:16 GMT -7
Posts: 0
|
Post by Deleted on Oct 11, 2017 8:27:05 GMT -7
It is marked as it was on the Lindberg kit version! #13 is now #19 on the AMT decal sheet. Here is a pic of the Lindberg decal sheet.  Sorry about the blurry photo, I still hadn't finished my first cup of Joe at the time when I took it!! David S. |
|
|
|
Post by Grandpabeast on Oct 11, 2017 13:59:44 GMT -7
yea , I think in sharps decal sheet 13 is really 16 that v shaped speaker grill.
|
|
|
|
Post by sharp on Oct 12, 2017 6:24:59 GMT -7
Well guys it can't be 16 that's the decklid emblem and it can't be 19 that's two emblems.. looks like the whole decal sheet is screwed up.
|
|
Deleted
Registered: May 1, 2024 16:45:16 GMT -7
Posts: 0
|
Post by Deleted on Oct 12, 2017 8:28:37 GMT -7
It is 19!! Just look at both decal sheets.
The 2nd decal goes on the right side of
the dashboard near the glove box.
|
|
|
|
Post by sharp on Oct 12, 2017 16:46:30 GMT -7
Thanks for the info Dave,I would have never know that my decal instruction sheet doesn't have a 19 on it. 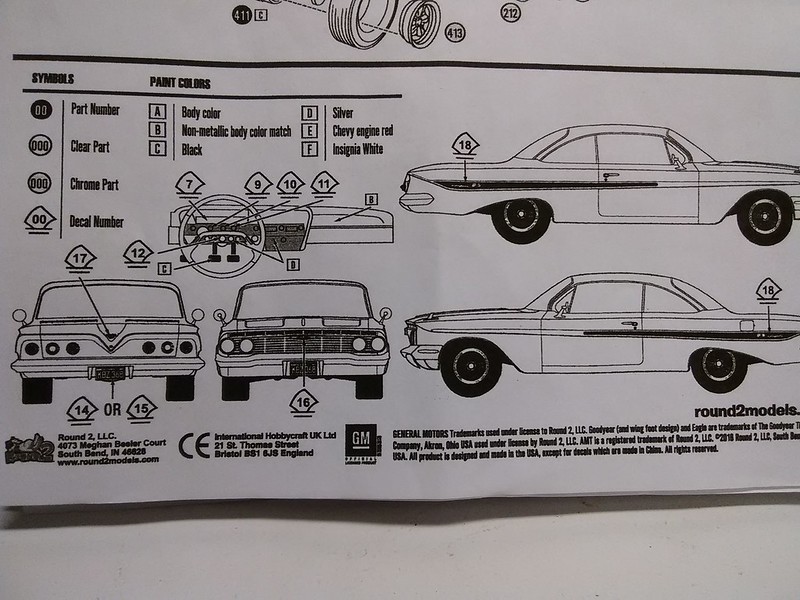 |
|
Deleted
Registered: May 1, 2024 16:45:16 GMT -7
Posts: 0
|
Post by Deleted on Oct 12, 2017 17:14:34 GMT -7
My instructions from the Lindberg kit has
a arrow thingy that points to the dash next
to the glove box. That's where the extra
crossed flag emblem is on the 1:1 car!
|
|
|
|
Post by sharp on Oct 12, 2017 17:32:15 GMT -7
Thanks Dave, I really appreciate the held
I never knew the cross flag emblem went on the dash.
|
|
|
|
Post by Grandpabeast on Oct 13, 2017 23:50:11 GMT -7
Great job guys , mystery solved !
|
|
|
|
Post by wisdonm on Oct 15, 2017 9:02:08 GMT -7
Well you guys solved the decal mystery. Sorry to say I'm having problems with paint pull away from high and low spots. Hoping more coats will cure it.
|
|
|
|
Post by wisdonm on Oct 17, 2017 8:26:20 GMT -7
Here's the paint pulled away.  After two more coats.  |
|
|
|
Post by sharp on Oct 17, 2017 17:19:26 GMT -7
Don, are you using the craft paint and windshield washer fluid ?
try using less washer fluid and 15 to 20 psi of air pressure and
spray a lot of light coats, this works for me.
|
|
|
|
Post by wisdonm on Oct 17, 2017 19:40:03 GMT -7
Yep. Craft paint, windshield fluid, at 15 psi. Thinking I just don't have much experience with craft paint or an air brush.
Received the additional decals from Mike today.
|
|
|
|
Post by sharp on Oct 17, 2017 19:58:35 GMT -7
Yea,the craft paint is a little tricky to use put once you get a hang of it
it's great stuff to use.
|
|
|
|
Post by sharp on Oct 17, 2017 20:12:39 GMT -7
Yep. Craft paint, windshield fluid, at 15 psi. Thinking I just don't have much experience with craft paint or an air brush. Received the additional decals from Mike today. Don,what type of airbrush did you use? |
|
|
|
Post by wisdonm on Nov 15, 2017 8:39:11 GMT -7
I don't know what kind of airbrush I have. There is no marking on it ant even the instructions don't have any brand name on them, just the number 136. It's a dual action gravity feed. I also have a 15 year old single action siphon airbrush from Harbor Freight. I've only painted one car with that one, but I don't use it because I hate cleaning it. This gravity feed is much easier to clean or maybe it's the craft paints. I used embossing powder from Hobby Lobby to flock the carpeting. I used thinned white glue with a couple of drops of the blue paint in it.  I also flocked the sides of the shift console. The top is chrome, although it appears black in the piz.  I tried to install the decal on the console emblem but it disintegrate on me. Sorry. |
|
|
|
Post by Grandpabeast on Nov 15, 2017 12:11:17 GMT -7
looks great
|
|
|
|
Post by mustang1989 on Nov 15, 2017 14:35:44 GMT -7
Hey there wisdonm. What brand of craft paint are you using along with that window cleaner? There are some paints that just don't like window cleaner much. Vallejo paint is one example as it works well with acrylic thinner but when mixed with glass cleaner it behaves badly. Looking forward to more on the interior work pal.  |
|
|
|
Post by sharp on Nov 15, 2017 19:17:57 GMT -7
Looking good Don,I like the flocking!
|
|
|
|
Post by wisdonm on Nov 16, 2017 7:31:55 GMT -7
I used the same brand and colors that Mike used on the body. 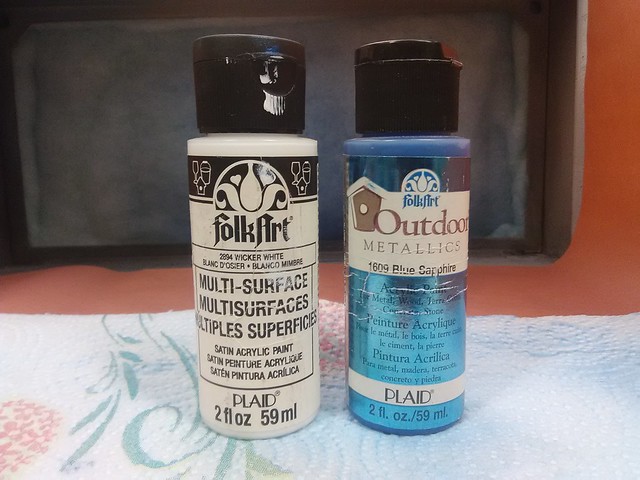 So it took four coat of blue before I was satisfied with the pullback problem. I searched pixs on the web for color combinations and patterns. Although it was a simple pattern, it was hard to tape because of all the contours. It was very hard to get the tape to stick in all the crevices so the paint was always seeping in the valleys. I used four coats of white and then two rounds of touching up bot the blue and white on the seats.   You can see the mysterious decal #13 on the silver part of the back seat. |
|
|
|
Post by Grandpabeast on Nov 16, 2017 15:58:50 GMT -7
Got your box today, everything looks great. I can send the paint back after final assembly. Great job! Getting excited to see the finished car! Now we have to decide on a starting bid !
|
|
|
|
Post by sharp on Nov 16, 2017 18:03:20 GMT -7
Very nice job on the interior Don.
GB, how about a starting bid of 50 bucks?
|
|
|
|
Post by Grandpabeast on Nov 16, 2017 19:08:27 GMT -7
That’s what I was thinking 50.00 with 10.00 shipping to an where in the continental US
|
|
|
|
Post by wisdonm on Nov 17, 2017 6:41:27 GMT -7
I haven't finished a detailed model in about 3 years. Between my fat, arthritic fingers, failing eye-sight, and world class procrastination, detailing has been difficult for me. These are the door panels.  This is the steering wheel and column. There is supposed to be a tach on the column, but I didn't find it until it was pacing things up for shipping. Hopefully Dave can install it. There was also supposed to be a decal for the center of the steering wheel. It disappeared while I was cutting it out. In fact there were five decals that were less than 2mm (0.08") square. Two flew away while cutting out and one disintegrated. Sorry.  Last is the dash. Those two indents on the right are for a grab handle, I think, that wasn't sent to me. Hopefully Dave can add that also.  Thanks for finishing this Dave. |
|
|
|
Post by sharp on Nov 18, 2017 9:50:11 GMT -7
the interior came out nice!
|
|