Deleted
Registered: May 19, 2024 7:45:53 GMT -7
Posts: 0
|
Post by Deleted on Feb 3, 2016 20:48:46 GMT -7
Stacks and fat tires. two-thumbs-up-smiley-emoticon All parts primed and have started painting. Heads have been drilled and plug wire boots installed. Probably have the engine mostly done tonight. It was my birthday recently and I got myself a Paasche internal mix airbrush and a B&D rotary tool. Hurrah for toys!   One odd thing about the kit so far...no battery. It's not mentioned in the intructions, so it's not just missing. There's the usual little shelf in the engine compartment where you'd expect the battery to go, but no battery. Huh? smiley-confused005 |
|
Deleted
Registered: May 19, 2024 7:45:53 GMT -7
Posts: 0
|
Post by Deleted on Feb 4, 2016 1:41:27 GMT -7
Looking promising mate, nice color choice too.
|
|
tubbs
Loyal Member
 Registered: Jul 24, 2013 5:02:43 GMT -7
Posts: 1,017
|
Post by tubbs on Feb 5, 2016 7:43:47 GMT -7
gonna be a great build. really nice kit. on the 1:1 cars, the engine bay was taken up by so much motor, they relocated the battery to the trunk. since most kits don't have an opening trunk, they conveniently left the battery out.
|
|
Deleted
Registered: May 19, 2024 7:45:53 GMT -7
Posts: 0
|
Post by Deleted on Feb 5, 2016 16:47:30 GMT -7
I got some Createx for my next build, yours appears to be nearly the same. I'll be looking forward to seeing how you spray!
|
|
Deleted
Registered: May 19, 2024 7:45:53 GMT -7
Posts: 0
|
Post by Deleted on Feb 6, 2016 0:58:48 GMT -7
on the 1:1 cars, the engine bay was taken up by so much motor, they relocated the battery to the trunk. since most kits don't have an opening trunk, they conveniently left the battery out. It's amazing what you find out here. cant-believe-my-eyes-smiley-emoticon |
|
Deleted
Registered: May 19, 2024 7:45:53 GMT -7
Posts: 0
|
Post by Deleted on Feb 6, 2016 1:04:53 GMT -7
I got some Createx for my next build, yours appears to be nearly the same. I'll be looking forward to seeing how you spray! This is my first time using paint made specifically for an airbrush. The Createx sprays beautifully right out of the bottle. The color is just great...nice and rich. I'm using a Paasche airbrush with the .55mm needle. What you see here is the just the first full coat...there will be a couple more and then a couple layers of clear coat.   Need to attach the plug wires and the engine is done.  |
|
Deleted
Registered: May 19, 2024 7:45:53 GMT -7
Posts: 0
|
Post by Deleted on Feb 6, 2016 6:50:34 GMT -7
I really like that color, I wish i could paint that nicely!
|
|
|
|
Post by gardnerpag44 on Feb 6, 2016 10:47:39 GMT -7
Looking good , nice motor very cool  |
|
Deleted
Registered: May 19, 2024 7:45:53 GMT -7
Posts: 0
|
Post by Deleted on Feb 6, 2016 11:43:23 GMT -7
I really like that color, I wish i could paint that nicely! What problems are you having with painting? The Auto-Air stuff is about as easy as it gets. I forgot to mention that the orange was sprayed over a layer of the Auto-Air white sealer. I don't know if that really matters, but that's what Createx recommends so that's what I did. |
|
Deleted
Registered: May 19, 2024 7:45:53 GMT -7
Posts: 0
|
Post by Deleted on Feb 6, 2016 17:14:04 GMT -7
Its mainly just lack of skill, using the right paints and learning the prep work. Tried using custom mixed auto paint, which turned out terrible. Or just using the regular auto rattle cans i seem to get some orange peel, then when i sand, i end up blowing through the paint in a couple areas, especially on emblems. There is so many more issues i have, but its a learning process. Unless i have someone here looking over my shoulder telling me what Im doing wrong its just gonna be a long road but ill get there eventually.
I havent used the createx paint yet, thats why i was curious how yours was turning out. I haven't heard much about it, but what i have seen, people seem to like it.
Looking forward to the build though, I have a few mustangs myself. Even did one with the snorkel hood scoop....that one ended up in a box in the closet lol
|
|
Deleted
Registered: May 19, 2024 7:45:53 GMT -7
Posts: 0
|
Post by Deleted on Feb 6, 2016 20:55:39 GMT -7
I'm still learning about paint. It's been frustrating at times but I'm certainly better at it than I was. Turns out that the airbrush I was using (Master) wasn't very good, and when I switched to a better one (Paasche) it made a world of difference. It also took a while for me to get a feel for the right combination of paint viscosity, air pressure and needle size. I would guess that orange peeling is a result of spraying the paint too heavily. Trying to cover in one coat or even two is not a good idea. Multiple light coats with plenty of drying time (overnight) between works well for me. It's much easier to spray on more paint than to have to much and have to take it all off.
I have no experience with sanding, but I've used the Novus scratch remover stuff with good results. Again the trick is to do a little bit at a time. And if you start with a bad finish you're probably not going to be able to fix it by sanding or polishing.
What kind of airbrush are you using?
|
|
Deleted
Registered: May 19, 2024 7:45:53 GMT -7
Posts: 0
|
Post by Deleted on Feb 7, 2016 11:38:31 GMT -7
I have an Iwata HP-CS. Its a dual action. There were a ton of good reviews but I think it might not be that great for painting bodies (which is why I bought an airbrush) It came with a .35 needle, which I learned was also part of the problem so purchased the .50 kit. I tried painting the camaro im working on and couldnt get the results i was after, the problem was mostly the paint. I havent tried anything else with it because i havent had anything to paint that isnt in rattle cans.
I think not trying to get complete coverage in one pass is one thing i need to learn.
|
|
Deleted
Registered: May 19, 2024 7:45:53 GMT -7
Posts: 0
|
Post by Deleted on Feb 12, 2016 20:53:11 GMT -7
|
|
Deleted
Registered: May 19, 2024 7:45:53 GMT -7
Posts: 0
|
Post by Deleted on Feb 13, 2016 9:34:10 GMT -7
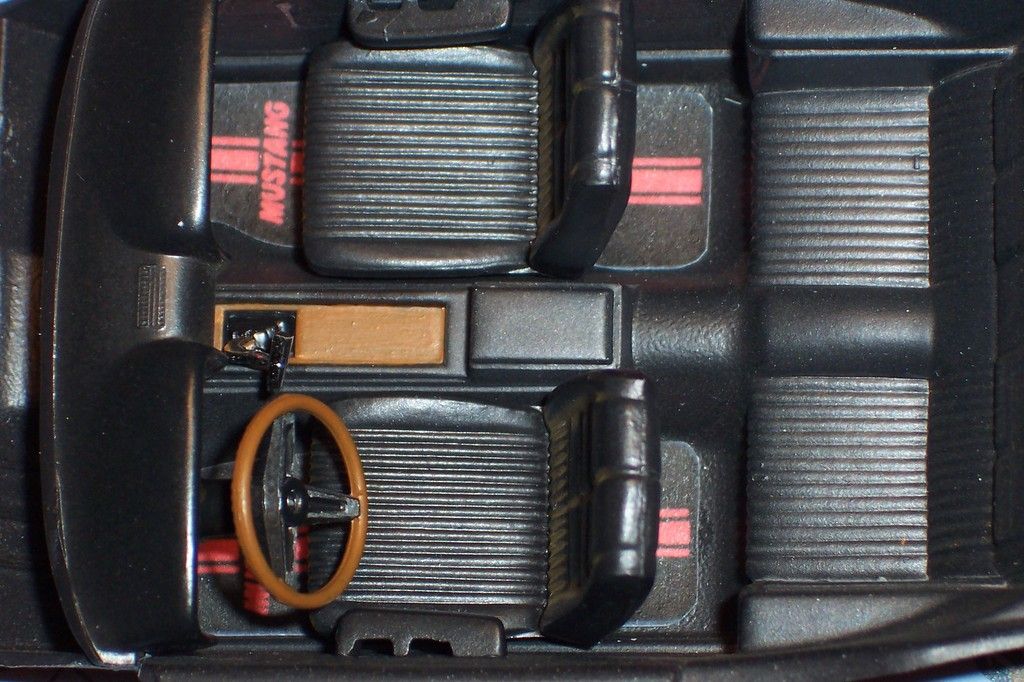
Nice!, Never saw a model with floor mats in it!
|
|
Deleted
Registered: May 19, 2024 7:45:53 GMT -7
Posts: 0
|
Post by Deleted on Feb 13, 2016 16:35:43 GMT -7
As I was putting the floor mats in I thought "Oh...I can just print these myself." thinking-hard-smiley-emoticon
|
|
tubbs
Loyal Member
Registered: Jul 24, 2013 5:02:43 GMT -7
Posts: 1,017
|
Post by tubbs on Feb 15, 2016 9:20:57 GMT -7
very nice progress. looking killer. maybe I missed it, but what color or colors did you do that steering wheel and wood grain. looks nice.
|
|
Deleted
Registered: May 19, 2024 7:45:53 GMT -7
Posts: 0
|
Post by Deleted on Feb 15, 2016 11:07:10 GMT -7
Thanks, Tubbs. For the wood grain I brushed on chestnut brown paint over the black dash paint. I purposely didn't use enough brown to completely cover the black, so some of the black showed through as the "grain."
|
|
Deleted
Registered: May 19, 2024 7:45:53 GMT -7
Posts: 0
|
Post by Deleted on Feb 18, 2016 21:20:12 GMT -7
|
|
Deleted
Registered: May 19, 2024 7:45:53 GMT -7
Posts: 0
|
Post by Deleted on Feb 18, 2016 22:14:37 GMT -7
Ha ha. It ended up in the purple pond anyway. For clear coat I've been spraying Future through the airbrush, but this time I tried Krylon in a can. I'm not sure what happened, I may have sprayed it too heavily. After using an airbrush, a rattle can is like a fire hose. Whatever the reason, it looked like crap. I was not entirely happy with the paint job anyway.  |
|
Deleted
Registered: May 19, 2024 7:45:53 GMT -7
Posts: 0
|
Post by Deleted on Feb 19, 2016 5:19:09 GMT -7
That's a neat idea, I'm going to have to remember that one. I suppose hot water would work too.
Sorry to hear about the body, I was looking forward to the finished product in that color. Don't get to see too many. The purple one will still look awesome though.
|
|
tubbs
Loyal Member
Registered: Jul 24, 2013 5:02:43 GMT -7
Posts: 1,017
|
Post by tubbs on Feb 19, 2016 7:32:34 GMT -7
That's a neat idea, I'm going to have to remember that one. I suppose hot water would work too. Sorry to hear about the body, I was looking forward to the finished product in that color. Don't get to see too many. The purple one will still look awesome though. yep!! sounds good. no more finger nail marks around the edge of the rim anymore. too bad the clear didn't work out. |
|
Deleted
Registered: May 19, 2024 7:45:53 GMT -7
Posts: 0
|
Post by Deleted on Feb 19, 2016 11:42:05 GMT -7
Hot water would probably work too, but it would take much longer. Just a minute in the micro per tire did the trick.
I have enough of the orange paint left to redo the body. Hopefully I'll do a better job this time.
|
|
tubbs
Loyal Member
Registered: Jul 24, 2013 5:02:43 GMT -7
Posts: 1,017
|
Post by tubbs on Feb 19, 2016 13:54:44 GMT -7
not to scare or jinx you at all, but I have been known to change color on a build because I ran out of paint. for some reason or another, my ability to do an even decent paint job anymore has left me. by the way, thanks for the tip on the tires.
|
|
Deleted
Registered: May 19, 2024 7:45:53 GMT -7
Posts: 0
|
Post by Deleted on Feb 26, 2016 13:34:42 GMT -7
Stripping and repainting done. My plan is to let the paint cure, do a very light sanding, then clear coat.   |
|
|
|
Post by CoyoteCrunch on Feb 26, 2016 19:08:10 GMT -7
Very nice paint Sid - looks awesome!
two-thumbs-up-smiley-emoticon
|
|
Deleted
Registered: May 19, 2024 7:45:53 GMT -7
Posts: 0
|
Post by Deleted on Feb 27, 2016 12:19:54 GMT -7
After wet sanding VERY lightly and briefly with grits 6000, 8000 and 12000, avoiding edges. It was hard to get a good pic but hopefully you can see that the finish is actually duller. What you can't see is that it's also smoother. Strange but true.  Now we're talkin'. A couple of coats of Future and it really pops. Not a final finish, but a good start of one. I found that after sanding I had to be extremly careful spraying the clear coat. It seemed to start to run much more quickly, I'm guessing because of the smoothness of the surface. I turned the pressure down to 20psi and opened the airbrush just enough for the stuff to start spraying, and then very light coats.   Because the clear runs so quickly I'm not going to try and use Dale's method of finishing by spraying on a thick coat of clear. I will either do a very light sanding and then polish with Novus, or just go directly to the Novus. With a finish this smooth I'm not sure if it makes sense to sand. Don't know if I'll continue with this today or let it cure for another day. |
|
|
|
Post by stitchdup on Feb 27, 2016 12:26:11 GMT -7
Looks good Sidney, you could say  |
|
|
|
Post by CoyoteCrunch on Feb 27, 2016 13:58:11 GMT -7
That sure did turn out nice!!
two-thumbs-up-smiley-emoticon
I do not think anymore sanding would be needed. Just let that cure out, BMF, then polish.
|
|
Deleted
Registered: May 19, 2024 7:45:53 GMT -7
Posts: 0
|
Post by Deleted on Feb 27, 2016 14:38:14 GMT -7
"May the Schwartz by with you." Gee, I hadn't heard that one before.  No BMF. I gave up on it as being much too frustrating for me. Maybe my hands aren't steady enough or something. For whatever reason, it takes the fun out of the whole thing, and why bother if it's not fun? I decided to try both...I'll wet sand part of the body and then Novus the whole thing, see if the sanding makes it any better. |
|
Deleted
Registered: May 19, 2024 7:45:53 GMT -7
Posts: 0
|
Post by Deleted on Feb 28, 2016 11:31:58 GMT -7
All polished using Novus. Not perfect, but my best paint job to date. Several steps in the right direction. egyptian The question now is whether or not I can detail it without marring the rest of the finish.    That said, I'm not sure I like the Auto Air paint. Createx calls it "semi opaque", and it requires a pretty heavy coat to cover well. They have no full opaque paint in the Auto Air line and I have no idea why. The plain Createx, which is what I'm using on the Gremlin, may be the better way to go. |
|