Deleted
Registered: May 18, 2024 9:04:06 GMT -7
Posts: 0
|
Post by Deleted on Aug 3, 2013 0:12:37 GMT -7
|
|
tool
Senior Member
 Registered: Jun 27, 2013 19:34:48 GMT -7
Posts: 557
|
Post by tool on Aug 3, 2013 8:27:17 GMT -7
lookin good i have to paint mine today for that contest !
|
|
Deleted
Registered: May 18, 2024 9:04:06 GMT -7
Posts: 0
|
Post by Deleted on Aug 3, 2013 9:10:51 GMT -7
Take it easy on your build Tool. I want to have a chance at not being last on this one. Lol
|
|
tool
Senior Member
Registered: Jun 27, 2013 19:34:48 GMT -7
Posts: 557
|
Post by tool on Aug 3, 2013 9:31:07 GMT -7
dont worry i have seen your builds i dont think you will be close to last bro !
|
|
Deleted
Registered: May 18, 2024 9:04:06 GMT -7
Posts: 0
|
Post by Deleted on Aug 10, 2013 17:34:13 GMT -7
|
|
Deleted
Registered: May 18, 2024 9:04:06 GMT -7
Posts: 0
|
Post by Deleted on Aug 17, 2013 18:25:13 GMT -7
The engines in. 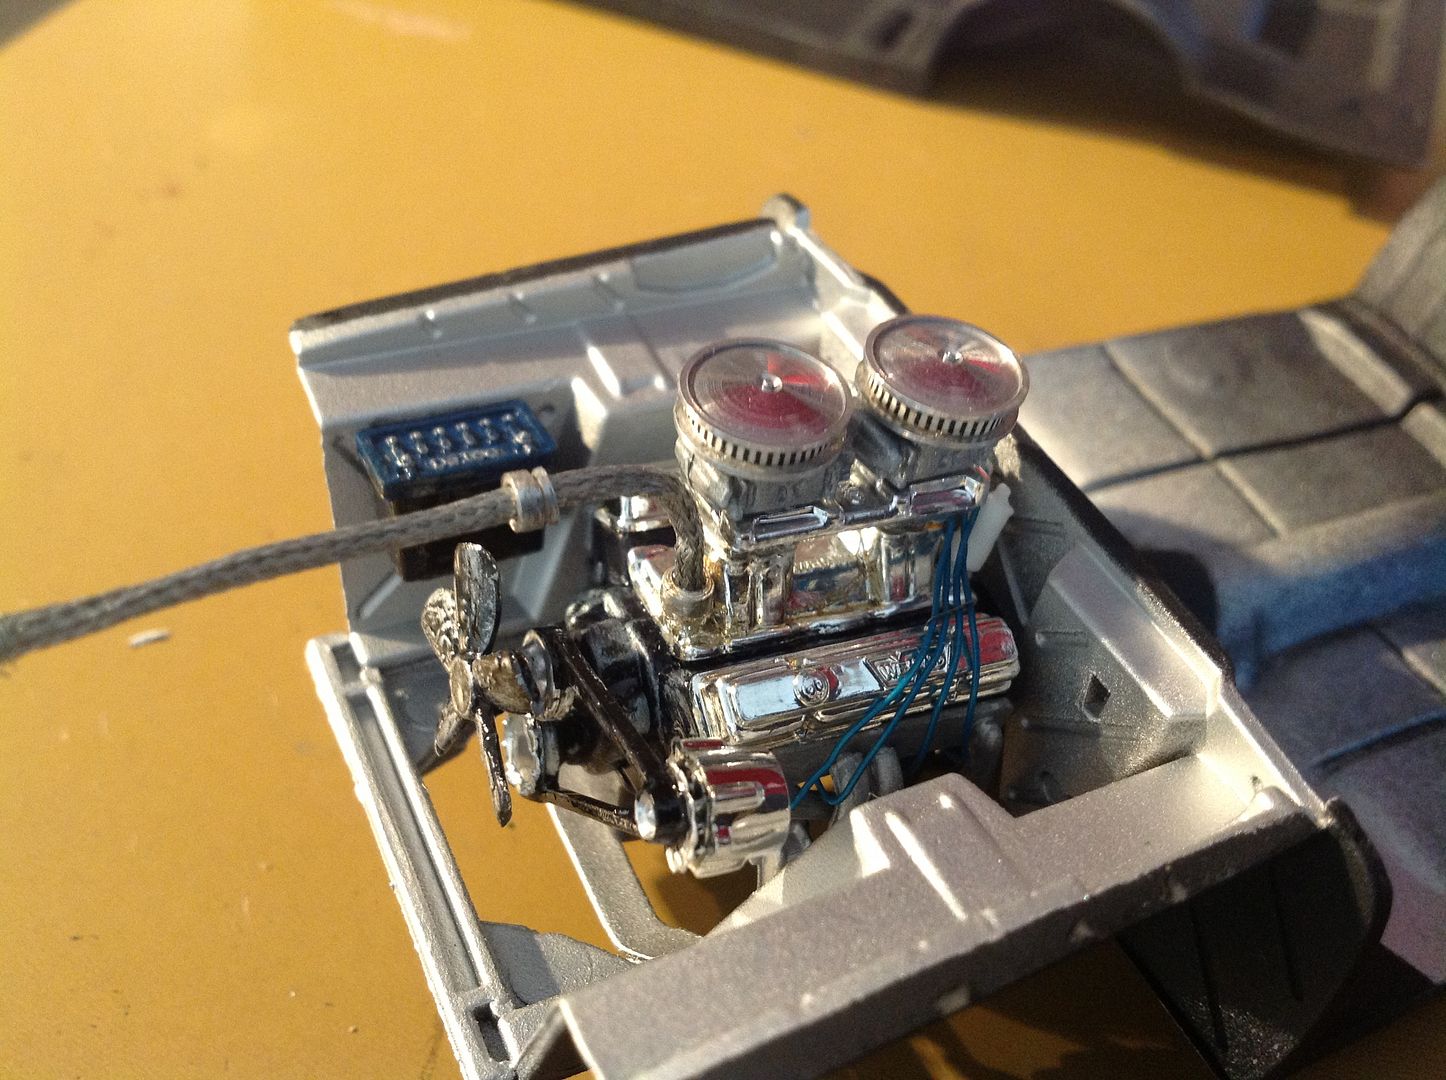 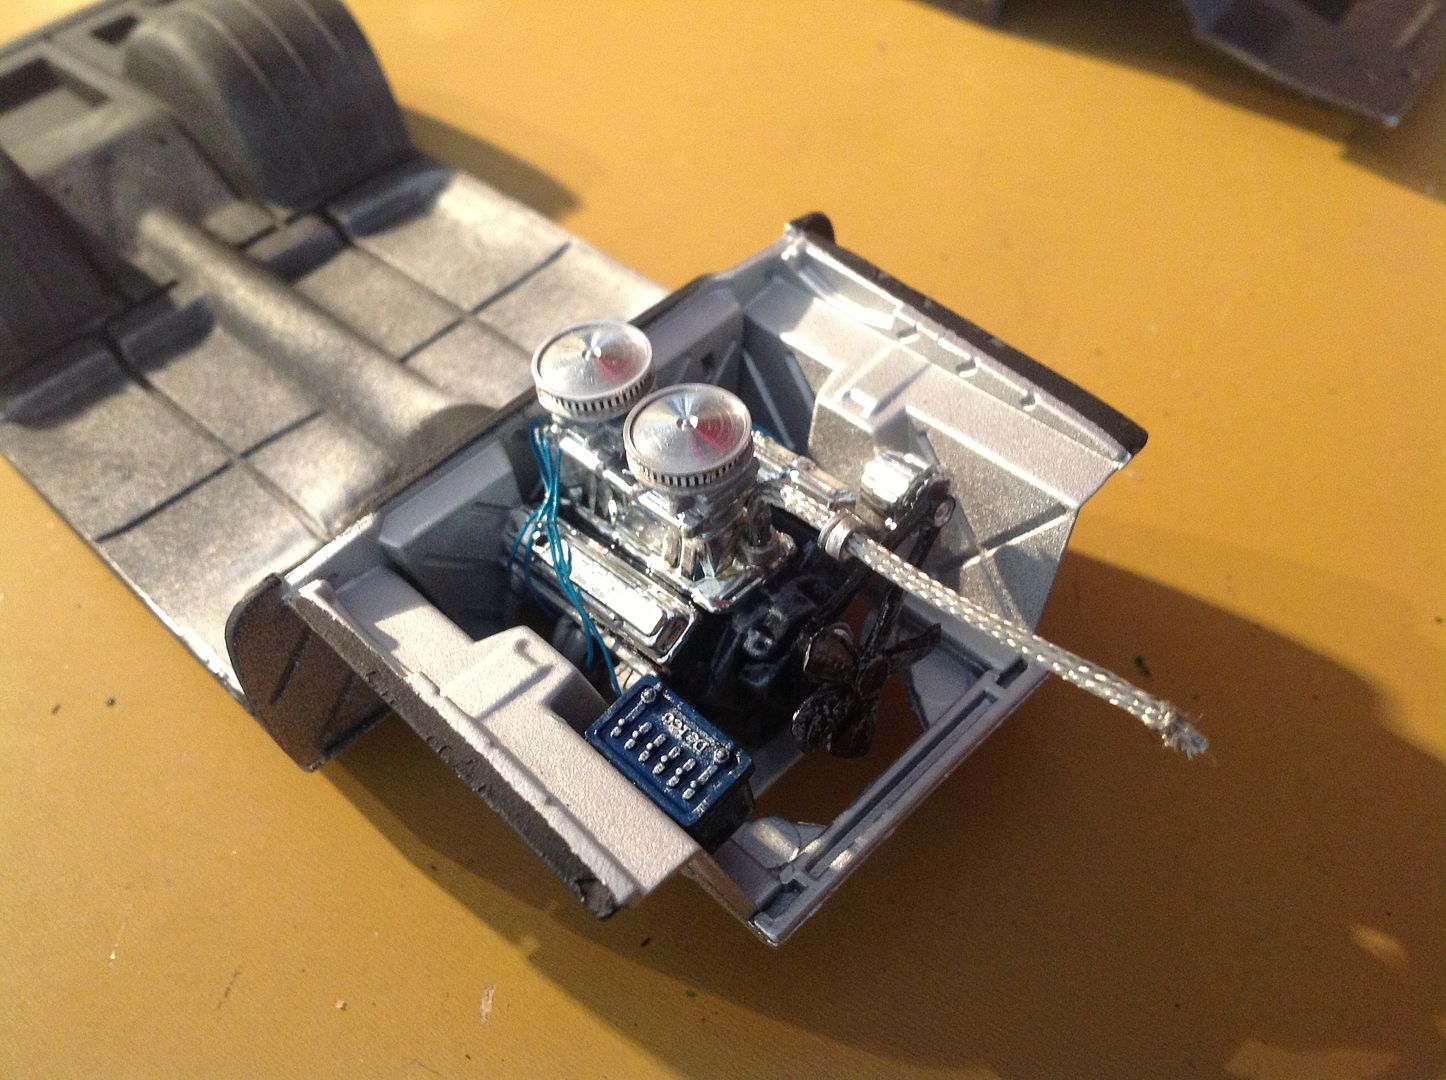 |
|
|
|
Post by Skip-O-Matic on Aug 17, 2013 22:02:11 GMT -7
Looking really good Iceman.
I really like those air cleaners.
|
|
Deleted
Registered: May 18, 2024 9:04:07 GMT -7
Posts: 0
|
Post by Deleted on Aug 18, 2013 8:19:51 GMT -7
Yep, that's the model Iceman  That hoodscoop isn't the same as the kit one, is it? It looks like it sits a little higher. It looks like you fashioned either some carb linkage or hard fuel line from the driver's side shot. Fantastic build, keep it up! |
|
woolfmanjack
New Member
Registered: Aug 17, 2013 6:11:20 GMT -7
Posts: 5 
|
Post by woolfmanjack on Aug 20, 2013 23:30:12 GMT -7
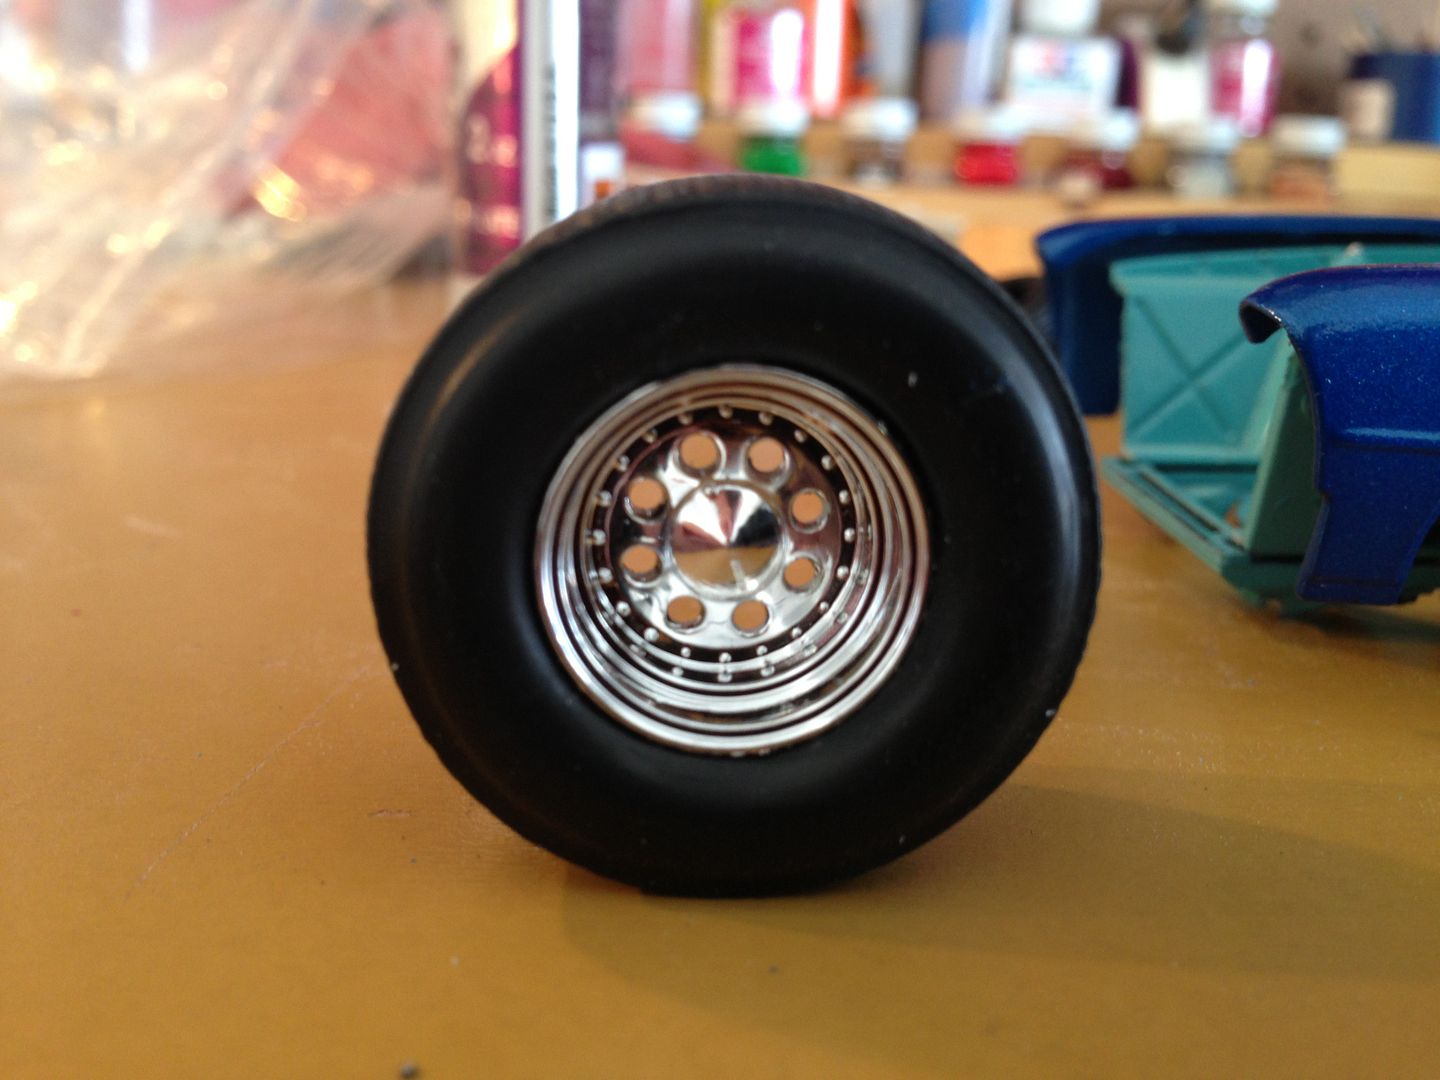
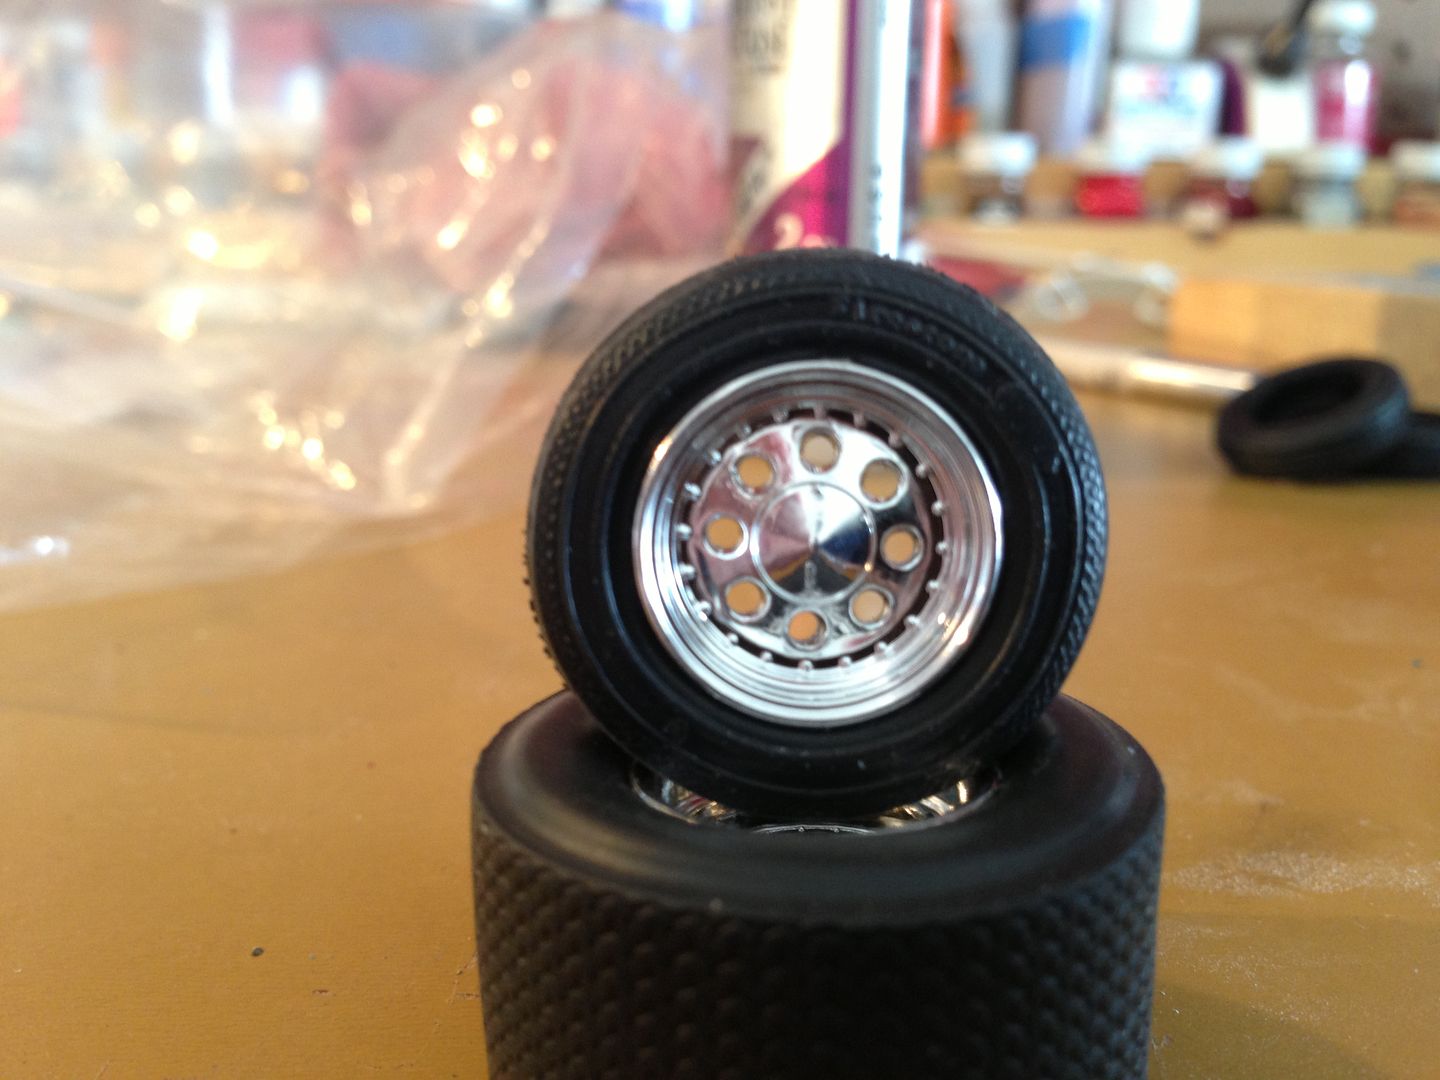
Man that engine really looks cool and i like the drilled out wheels  . |
|
Deleted
Registered: May 18, 2024 9:04:07 GMT -7
Posts: 0
|
Post by Deleted on Aug 21, 2013 1:57:31 GMT -7
That's got me thinking about doing the same with my kit for the wheels. I'm fashioning some nitrous selenoids out of some spare parts tree material to sit on my lower manifold and I have braided steel line from the firewall running to them. Now to fab some hard lines from the selenoids to each runner for the NOS injection. Another detail item I coulda' done without until I saw IceMan's build. Will I ever be done?  BTW, I've been fighting with the warpage of a donor kit wing off Ebay and if this final attempt at filling and sanding doesn't work, I'm through. I'll just have the dual resin 'chute pack I got on the back. Might look cleaner anyway. Mine's Testor's One Coat (yea right) Mystic Green and if I was a better painter with an air kit, I'd try a gold mist coat on top to go with a simple gold striping scheme I worked out. Sorry, too much talk & not enough work. Funny though, I don't remember having M/T street meats in my kit for the rear. I've got slicks that seem a little wide? No matter, I fashioned my own rear axle and I'm going to trim the rear end sides a little to have more clearance between the tires/body  |
|
Deleted
Registered: May 18, 2024 9:04:06 GMT -7
Posts: 0
|
Post by Deleted on Aug 21, 2013 19:21:06 GMT -7
Here it is after the last coat of clear.  |
|
Deleted
Registered: May 18, 2024 9:04:07 GMT -7
Posts: 0
|
Post by Deleted on Aug 22, 2013 6:32:48 GMT -7
Dang: After 2 bodies, 2 dips in the purple pond (both) and 5 coats of "One Coat", yours still looks better. I've been advised I shoot my color too far away (8-10") and the color gets lost along with way. I just afraid of getting runs. I wish I had a better camera to show you mine. I'm about 1 week dried, all the Pactra gold stripes are applied along the side and it's as even as it's gonna get with only one small run on the rear deck above where the bumper line is. The dual 'chute will cover it up. Should I shoot the clear coat misted first, then a couple of wet coats and should I mount the 'chutes first or wait until the body is completely cleared and dried? The shoots are resin and are semi-gloss black. I really want to start the clear asap. BTW, what are you gonna do with the inside? My 1st body was flat black inside to match the interior; the 2nd one has ended up with a couple coats matching the outside mystic green. I'm so close I can taste it!
Can you recommend any method required before I shoot the clear that absolutely must be done like a polishing kit, etc. I'm nervous when I hear about wet sanding or anything that will damage an already painted surface. I'd like something as good as yours but being only my 2nd build, I'll settle for what I can get! Oh, also - I've got a pro mod wing (flat black) which will be dull coated flat black. When can I mount it (after clearcoat) snd should I scuff the paint in the adhesive area like the 'chutes? I bought special CA medium for just such an occasion. I hope mine can come somewhat close to yours in appearance. I used the same color/flake effect of yours on my J. Jim Nova build - it wasn't period correct but it did look pretty close for one coat of primer and some sanding LOL!
|
|
|
|
Post by CustomMuscle on Aug 22, 2013 7:51:14 GMT -7
MIT FOR WET SANDING GET A DETAIL MASTER FINISHING KIT. IT WILL HAVE COMPOUND AND 3-12000 GRIT CLOTH SAND SUPPLIES SO NO WORRIES WET SANDING. I USE DUPLI-COLOR ENGINE CLEAR COTE WORKS GREAT BUT MUST USE IT ABOUT HOUR AFTER PAINT DRIES OR GOTTA WAIT ABOUT 5-6 DAYS FOR IT TO DRY COMPLETELY DOESN'T HARM DECALS, BUT LET THEM DRY OVERNIGHT BEFORE CLEARING. I'VE EVEN USED IT ON TOP OF OTHER BRANDS OF PAINT AND NO PROBS SO FAR. IT WET SANDS NICELY JUST DO SEVERAL COATS.
NOVA'S LOOKING GREAT ICE BABY !!!
|
|
Deleted
Registered: May 18, 2024 9:04:07 GMT -7
Posts: 0
|
Post by Deleted on Aug 22, 2013 10:50:44 GMT -7
MIT FOR WET SANDING GET A DETAIL MASTER FINISHING KIT. IT WILL HAVE COMPOUND AND 3-12000 GRIT CLOTH SAND SUPPLIES SO NO WORRIES WET SANDING. I USE DUPLI-COLOR ENGINE CLEAR COTE WORKS GREAT BUT MUST USE IT ABOUT HOUR AFTER PAINT DRIES OR GOTTA WAIT ABOUT 5-6 DAYS FOR IT TO DRY COMPLETELY DOESN'T HARM DECALS, BUT LET THEM DRY OVERNIGHT BEFORE CLEARING. I'VE EVEN USED IT ON TOP OF OTHER BRANDS OF PAINT AND NO PROBS SO FAR. IT WET SANDS NICELY JUST DO SEVERAL COATS. NOVA'S LOOKING GREAT ICE BABY !!! |
|
Deleted
Registered: May 18, 2024 9:04:06 GMT -7
Posts: 0
|
Post by Deleted on Aug 22, 2013 15:14:03 GMT -7
Well Mitch, every builder has different techniques. i hate sanding, wet or dry. i have purchased the kits of different grit and have not had a satisfying end result. there was no sanding done to this other than after the primer. i have been trying to figure out how to get a paint job like is for a very long time. Ask around. I've been on a quest for a perfect paint job. many people have said it cant be achieved without sanding. I'm going to have to disagree. Let me say what I said on another forum. This has to be the best paint job I have ever laid. And sanding was minimal. Here is a quick rundown of how I achieved this
- prepped body removing flash
- washed
- laid cheap Walmart primer coats. 2x 15 minutes apart since it dries pretty fast
- wet sanded down to 12000 grit
- washed
- sprayed the blue in three separate coats a little thicker every time 15 min apart (noticed orange peel)
- let it sit for a few days then 2 coats of clear 15 min apart (although less, there was some orange peel)
- Let it sit for a few days then one last coat of primer. I found that spraying it at an angle instead of straight on avoided orange peel on that last coat. At least I didn't know that before. Might of worked with the first two clear coats. I don't see any orange peel this time around.
Each additional coat of paint seemed to fill up some of the orange peel. Also, no handling the the model at all. At least I haven't up to this point and when I start to marry it with the rest of the body I plan on wearing cotton or latex gloves.
This is not to say that it will work with every brand or every kit but it worked for me this time around and so far so good on the 51 Fleetline I have. That was a different type of paint too.
For your flat black wing AND the chute I would add until after the clear coat. If you want to add clear to the chute do it separately just like you would with the hood. And yes, do scrape some of the paint off before gluing. Sounds like a great build. Can't wait to see it. PM me if you still want that extra body.
|
|
Deleted
Registered: May 18, 2024 9:04:07 GMT -7
Posts: 0
|
Post by Deleted on Aug 22, 2013 17:34:40 GMT -7
Ice: I was so close... On the 3rd coat of "One Coat" clear (paint sat for 5 days), It was looking awesome and on the last side (driver's), I was at 6-8" away and slightly slowed down the sweep of paint. I immediately noticed a bubbling effect like miniature soap film and although I'd seen something like it during other clear coats, this extended from the rear of the front wheel opening all the way back to halfway through the front door. After drying an hour, I peeled the striping off cleanly and the imperfect finish was clearly seen.
So, where to now? This a totally unexpected situation. Perhaps I shouldn't have shot more than one of the "one coat" clear coat.
|
|
Deleted
Registered: May 18, 2024 9:04:06 GMT -7
Posts: 0
|
Post by Deleted on Aug 22, 2013 18:12:34 GMT -7
Awww man. Lets see some pics. Start a thread with your build. Maybe if we see the results it might be easier for us to tell you what went wrong. And you don't hijack my thread. Hahaha. Just kidding man. We do want to help you out though. |
|
|
|
Post by CustomMuscle on Aug 22, 2013 19:54:18 GMT -7
Could be oil off your skin...possibly...ya what ice said we need pics
oh ice ya already been H J HE HE
|
|
Deleted
Registered: May 18, 2024 9:04:07 GMT -7
Posts: 0
|
Post by Deleted on Aug 23, 2013 14:35:04 GMT -7
O.K. I've got an Native American friend with a pretty good camera setup who saw my model last night and wants to shoot some pics. I already got some light prints on it from handling it last night while replacing the striping, even with those soft cloths you can buy. Man from a distance of 3 ft. it looks pretty darn good for an amatuer.
|
|
Deleted
Registered: May 18, 2024 9:04:06 GMT -7
Posts: 0
|
Post by Deleted on Aug 23, 2013 14:54:20 GMT -7
[quote author=" CustomMuscle" source="/post/3691/thread" timestamp="1377226458"oh ice ya already been H J HE HE[/quote] Na no worries. More pics coming this weekend to get back on track. |
|
Deleted
Registered: May 18, 2024 9:04:07 GMT -7
Posts: 0
|
Post by Deleted on Aug 24, 2013 8:04:40 GMT -7
Mitch the bubbles are caused by over shaking the paint
One shot laquers are really bad for that if your going to shake it up let it sit for a minute before spraying
for some reason testors is the worst for that
I have used laquers made by other companys without this happening
but with testors i find let it sit after a good shake for up to a minute and a half then spray
Ted
|
|
Deleted
Registered: May 18, 2024 9:04:06 GMT -7
Posts: 0
|
Post by Deleted on Aug 24, 2013 10:17:33 GMT -7
Ok lets het back on track here. Mitch, new HELP! section posted where we can continue to help you out. Here's is the finished engine compartment. Looks like my radiator hose is leaking, I know.    |
|
Deleted
Registered: May 18, 2024 9:04:06 GMT -7
Posts: 0
|
Post by Deleted on Aug 24, 2013 22:00:07 GMT -7
|
|
Deleted
Registered: May 18, 2024 9:04:06 GMT -7
Posts: 0
|
Post by Deleted on Aug 25, 2013 15:02:10 GMT -7
And this one is done. Check it out in the finished section. Thanks for following along!
|
|
Deleted
Registered: May 18, 2024 9:04:07 GMT -7
Posts: 0
|
Post by Deleted on Aug 25, 2013 15:51:16 GMT -7
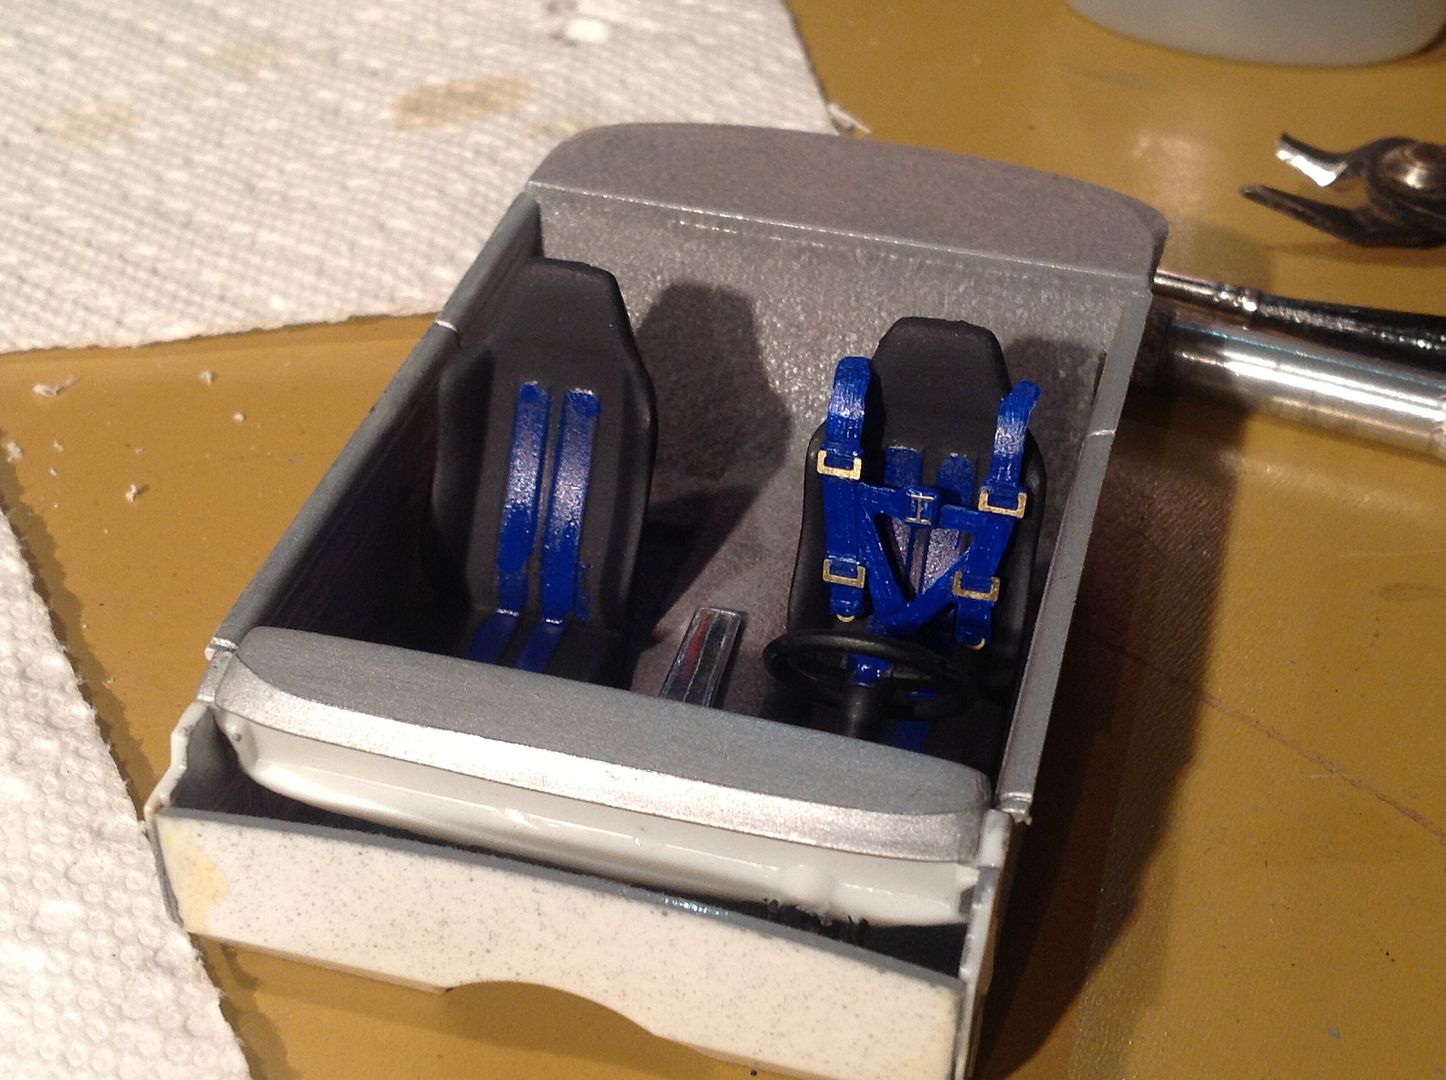
You're gonna laugh when you see my interior (if I ever get it loaded). It's more drag than pro-street. Looks great Ice! I don't have belts on my passenger seat, so I might paint over the decaled driver's ones and install some of the SMBC ones when I get 'em...
|
|
Deleted
Registered: May 18, 2024 9:04:07 GMT -7
Posts: 0
|
Post by Deleted on Aug 27, 2013 15:40:15 GMT -7
Wow Iceman that engine is pristine! The wheels are sharp too! Did you drill those individual holes with a dremel? I'd be so worried about scratching the plastic, almost like I'd need a drill press.
|
|
Deleted
Registered: May 18, 2024 9:04:06 GMT -7
Posts: 0
|
Post by Deleted on Aug 27, 2013 17:35:00 GMT -7
I drilled out with my full size drill and a small drill bit. Lol. I have the same fear so what I do is poke a starting point with my blade as close to the center as possible. I then put the tip of the drill bit in the same place and slower drill away. Learned the hard on some older builds lol.
Thanks for the comments everyone.
|
|
Deleted
Registered: May 18, 2024 9:04:07 GMT -7
Posts: 0
|
Post by Deleted on Aug 29, 2013 8:26:32 GMT -7
Exactly right Ice. That's how I did my throttle bores on my 4bbls. Started with an Xacto, then the smallest Dremel bit, followed by increasing sizes.
|
|


 That hoodscoop isn't the same as the kit one, is it? It looks like it sits a little higher. It looks like you fashioned either some carb linkage or hard fuel line from the driver's side shot. Fantastic build, keep it up!
 .
.