Deleted
Registered: May 18, 2024 9:35:17 GMT -7
Posts: 0
|
Post by Deleted on Jul 13, 2015 18:11:03 GMT -7
I had good luck with one Studebaker...may as well try another. I'll be picking up the paint tonight.  The box looks like Reggie used it for batting practice, but the parts look fine. Time to map out my strategy...  |
|
|
|
Post by CoyoteCrunch on Jul 13, 2015 19:08:22 GMT -7
Another Studebaker - very cool!
Nice Coyote by the way Sid - believe it or not, this very stance of Wile E is tattooed on my right calf!!!
|
|
Deleted
Registered: May 18, 2024 9:35:17 GMT -7
Posts: 0
|
Post by Deleted on Jul 13, 2015 21:02:19 GMT -7
Nice Coyote by the way Sid - believe it or not, this very stance of Wile E is tattooed on my right calf!!! Dude, you're my hero. two-thumbs-up-smiley-emoticon Here's who you should have tattooed on your other two legs....    |
|
Deleted
Registered: May 18, 2024 9:35:17 GMT -7
Posts: 0
|
Post by Deleted on Jul 17, 2015 14:17:32 GMT -7
Going along at a fairly good pace, at least for me. I think my engine needs a shave...   The bits of wire are to keep the holes I drilled clear of paint. The blue stuff is frisket, to keep the paint off of areas that will be glued. I'm trying one of the Detail Master distributors. Looks pretty good, but of course it's way more work than the pre-wired kind. On the other hand, it has some neat PE parts, like hex nuts for the plug holes. The boots I made are too long, but if I made them any shorter they'd be too tiny for me to work with. I've ordered a couple of the MAD pre-wired distributors and will try those on the next kit.  |
|
|
|
Post by CoyoteCrunch on Jul 17, 2015 16:03:08 GMT -7
Wow man - awesome detailing!!! Question, whats frisket?
I have some of these distributors as well, been too nervous to try and build them, gonna have to do it though, like, why did I buy them?
I am anxious to see these "MAD"" distributors you speak of - but anyways, great progress, learning tons!!!
|
|
Deleted
Registered: May 18, 2024 9:35:17 GMT -7
Posts: 0
|
Post by Deleted on Jul 17, 2015 19:27:52 GMT -7
Glad you like it.  Frisket is just masking fluid. It works pretty much like masking tape except you brush it on and let it dry first. The advantage is that you can get it in small and oddly shaped spaces, and in my experience it leaves absolutely no residue after you peel it off. I bought some, but I've read that you can make your own by watering down white glue. It's pretty cheap, and the small bottle I bought will probably last me forever. The other distributor (Parts by Parker?) I've used looks like this...  And here's the MAD distributor...  As you can see those are both pre-wired. The Detail Master one was a bit of a hassle to put together, but it was my first one...I'm pretty sure I could do them more quickly now. I think the Detail Master one has a slight edge in appearance, and it does have other goodies. I should be finished with the engine fairly soon and when I post pics you can judge for yourself. |
|
Deleted
Registered: May 18, 2024 9:35:17 GMT -7
Posts: 0
|
Post by Deleted on Jul 17, 2015 23:48:22 GMT -7
This'll do it for today. Hope to complete the engine tomorrow. I didn't think a black engine would look very good, but it's pretty wicked. I hope you're impressed with my expensive new engine stand.  |
|
|
|
Post by stitchdup on Jul 18, 2015 1:02:10 GMT -7
Thats a nice looking engine, should be a cool build
|
|
nyratrod
Senior Member
 Registered: Oct 29, 2014 10:05:30 GMT -7
Posts: 508
|
Post by nyratrod on Jul 18, 2015 5:32:31 GMT -7
A great idea of putting wire in the sparkplug holes before painting. I always have to clean them out with the drill bit after paint. Thanks for the tip Sid. The engine is turning out super and I'm diggin' the engine stand. Well Done !!!!!
|
|
|
|
Post by CoyoteCrunch on Jul 18, 2015 5:48:04 GMT -7
Sid - that engine stand looks just like something we all had back east as kids!!! Love it
It was either something like that, OR sat on a few stacked tires!! LOL
And for sure, that black engine is Rockin!!!
|
|
Deleted
Registered: May 18, 2024 9:35:17 GMT -7
Posts: 0
|
Post by Deleted on Jul 18, 2015 15:29:44 GMT -7
Thanks, all. smiley-greet016 Finally figured out that the top half of the distributor should be painted. It's the cap, duh. Here it is finished, with the clips that hold the cap on. Not bad. Tonight it gets mounted on the engine, wire looms installed and wires attached. I hope.   |
|
Deleted
Registered: May 18, 2024 9:35:17 GMT -7
Posts: 0
|
Post by Deleted on Jul 19, 2015 13:30:11 GMT -7
|
|
|
|
Post by CoyoteCrunch on Jul 19, 2015 13:32:21 GMT -7
Nice - I gotta give those wire looms a try one of these days - this sucker looks awesome!!!!
|
|
Deleted
Registered: May 18, 2024 9:35:17 GMT -7
Posts: 0
|
Post by Deleted on Jul 19, 2015 14:06:47 GMT -7
Installation requires much cursing, but as an experienced modeler you're probably used to that.  |
|
Deleted
Registered: May 18, 2024 9:35:17 GMT -7
Posts: 0
|
Post by Deleted on Jul 19, 2015 14:27:11 GMT -7
great lookin engine Sidney smileyCA9464IN_zpsd9ee499f
|
|
Deleted
Registered: May 18, 2024 9:35:17 GMT -7
Posts: 0
|
Post by Deleted on Jul 19, 2015 14:36:09 GMT -7
Love the wire looms on these distributors. My favorite! Looks great Sid!
|
|
Deleted
Registered: May 18, 2024 9:35:17 GMT -7
Posts: 0
|
Post by Deleted on Jul 19, 2015 15:12:31 GMT -7
Thanks, all. smiley-greet016
|
|
Deleted
Registered: May 18, 2024 9:35:17 GMT -7
Posts: 0
|
Post by Deleted on Jul 19, 2015 18:13:34 GMT -7
For those who like the wire looms but don't want the hassle of having to wire a Detail Master distributor, Detail Master also sells PE wire loom kits separately. They even have a few different styles. smileyCA9464IN_zpsd9ee499f
|
|
|
|
Post by CoyoteCrunch on Jul 19, 2015 19:15:06 GMT -7
Yep - got me a set or two of these PE sets, gonna try them on the next wired build Do believe
I have seen others use these, and now you, along with them, have inspired me to do this!
two-thumbs-up-smiley-emoticon
|
|
Deleted
Registered: May 18, 2024 9:35:17 GMT -7
Posts: 0
|
Post by Deleted on Jul 19, 2015 22:55:31 GMT -7
Dont' hurt yourself. |
|
Deleted
Registered: May 18, 2024 9:35:17 GMT -7
Posts: 0
|
Post by Deleted on Jul 23, 2015 19:20:01 GMT -7
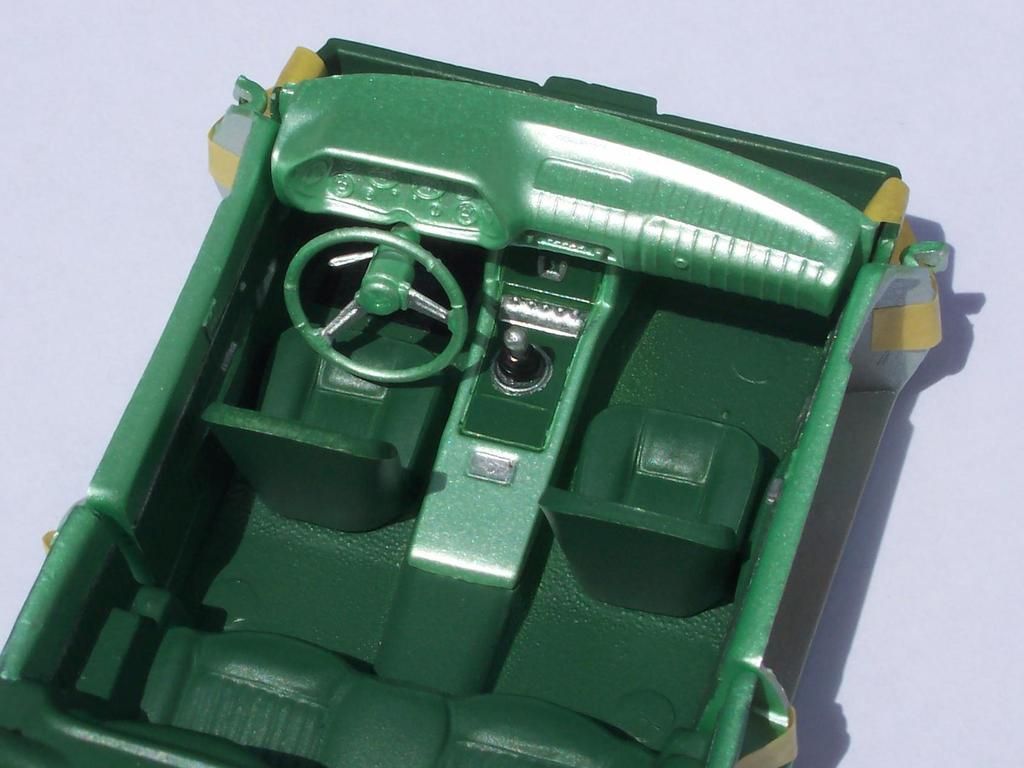
Engine and chassis are done.    These are always the most fiddly parts. It's amazing how many times I had to re-attach some of these pieces, mostly due to my own impatience and clumsiness. I did figure out to get some thicker super glue that the thin stuff I've been using, and that seems much easier to use. What a relief...  Here's the body color...pearl mint green, no clear coat yet. Looks cool!  I'd painted the interior a butter cream color, then decided I hated it. Just doesn't go well with the body color. I'm going to strip it and go with a forest green instead. |
|
Deleted
Registered: May 18, 2024 9:35:17 GMT -7
Posts: 0
|
Post by Deleted on Jul 23, 2015 20:42:18 GMT -7
My first home made decal. egyptian  |
|
|
|
Post by stitchdup on Jul 23, 2015 23:28:10 GMT -7
Moving along nicely Sidney, That green is a nice colour too
|
|
Deleted
Registered: May 18, 2024 9:35:17 GMT -7
Posts: 0
|
Post by Deleted on Jul 24, 2015 4:48:00 GMT -7
great color and excellent fan decal  |
|
|
|
Post by CoyoteCrunch on Jul 24, 2015 5:11:09 GMT -7
Sweet color - love it!!! Nice decal on the shroud as well, looking AWESOME bud!!! two-thumbs-up-smiley-emoticon The anticipation for the finish is almost un-BEAR-able!!! egyptian
|
|
Deleted
Registered: May 18, 2024 9:35:17 GMT -7
Posts: 0
|
Post by Deleted on Jul 24, 2015 11:05:38 GMT -7
I'm hard at work...  |
|
|
|
Post by CoyoteCrunch on Jul 24, 2015 12:07:57 GMT -7
Lancelot Link - Secret Chimp!!!!
|
|
|
|
Post by stitchdup on Jul 24, 2015 12:19:31 GMT -7
I remember those adverts being on telly Sidney, it was at least 30 years ago
|
|
Deleted
Registered: May 18, 2024 9:35:17 GMT -7
Posts: 0
|
Post by Deleted on Jul 24, 2015 13:20:07 GMT -7
If it can't be said with chimps, it's not worth saying.  |
|
Deleted
Registered: May 18, 2024 9:35:17 GMT -7
Posts: 0
|
Post by Deleted on Jul 27, 2015 14:18:00 GMT -7
|
|