Deleted
Registered: May 7, 2024 0:33:34 GMT -7
Posts: 0
|
Post by Deleted on Mar 28, 2022 20:57:17 GMT -7
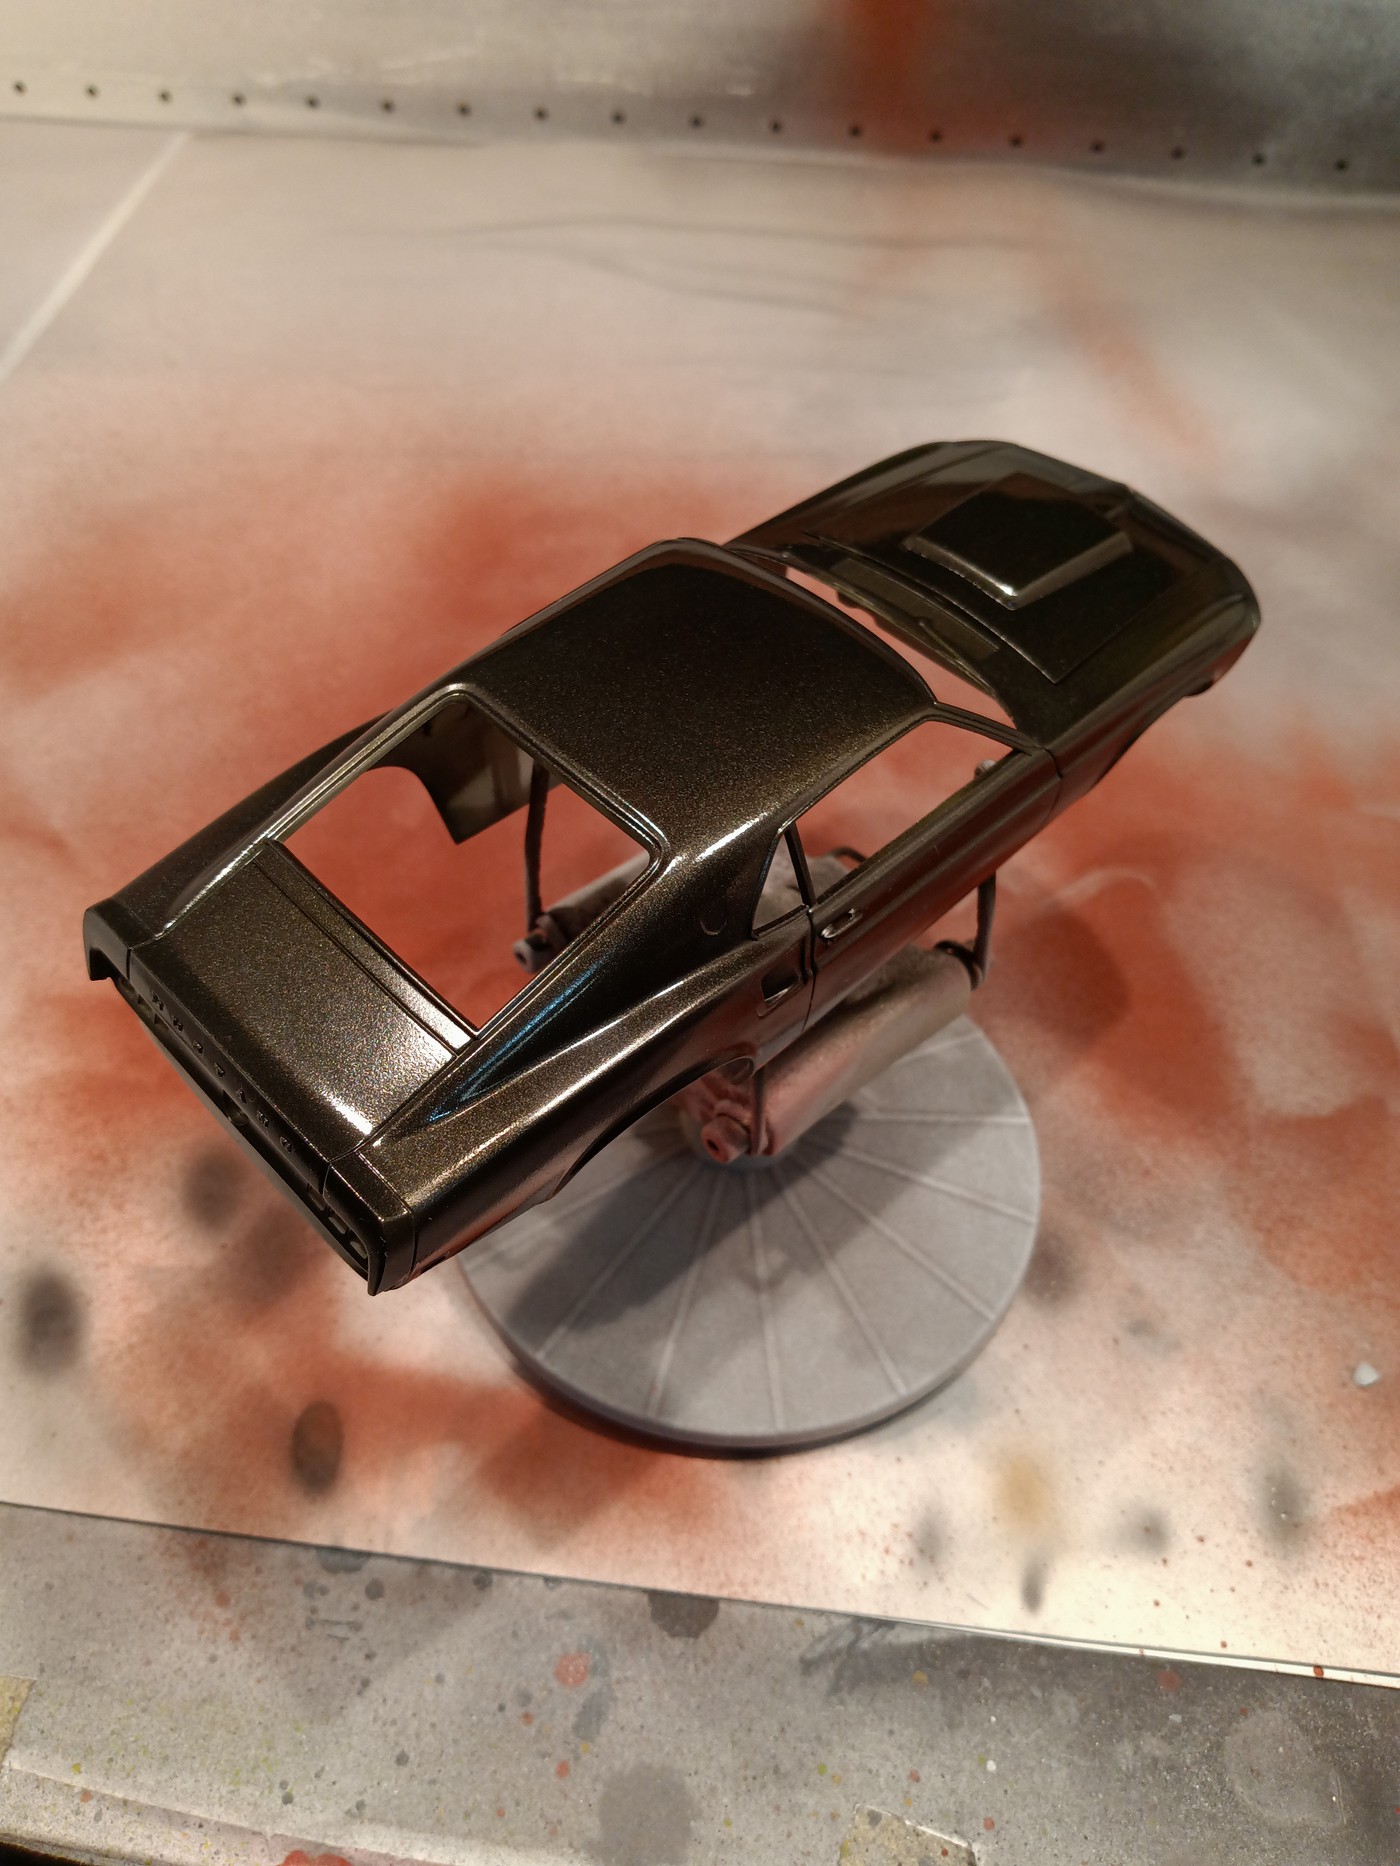
My next project is one that I have been wanting to do for a long time: The 1969 Boss 429 Mustang kitbash in factory "Black Jade" paint. This was one of the 5 colors that this car was offered in. I am using the engine and hood scoop from the Monogram 1/24 scale Boss 429 kit and pairing it with the Revell 1/25 1969 Mustang Mach I kit. I know this has been done before but I am really going to try to make this into something that looks like it came off the showroom floor. I am using the MCW "Black Jade" paint and Fireball Good Year Polyglas F-15 60 tires. So without further ado:
|
|
41chevy
Senior Member
 Registered: Jul 1, 2021 9:46:43 GMT -7
Posts: 705
|
Post by 41chevy on Mar 29, 2022 10:15:06 GMT -7
That will be a cool build. Paul
|
|
malcox477
Loyal Member
Registered: May 21, 2019 16:19:37 GMT -7
Posts: 1,039
|
Post by malcox477 on Mar 30, 2022 3:42:59 GMT -7
i'm not a big Mustang fan guy, but this one and the fox body are my favorites mustangs, looking forward to see this bad boy all build up
|
|
|
|
Post by mustang1989 on Apr 1, 2022 4:23:17 GMT -7
Ok gang...pull up a chair!!! Gonna be watching this one for sure Gil as I know you'll be doing this one proud with all the mods and corrections. If you've never used MCW paints before you're gonna love how it goes on.  |
|
Deleted
Registered: May 7, 2024 0:33:34 GMT -7
Posts: 0
|
Post by Deleted on Apr 2, 2022 11:29:22 GMT -7
|
|
Deleted
Registered: May 7, 2024 0:33:34 GMT -7
Posts: 0
|
Post by Deleted on Apr 2, 2022 11:30:54 GMT -7
Thanks guys, and Joe, I have used these paints a number of times and like them lots. I may not even use clear coat on this and just might buff out the lacquer like the old days.
|
|
malcox477
Loyal Member
Registered: May 21, 2019 16:19:37 GMT -7
Posts: 1,039
|
Post by malcox477 on Apr 4, 2022 20:42:33 GMT -7
Awesome start, can't wait for the next update
|
|
|
|
Post by mustang1989 on Apr 6, 2022 6:51:27 GMT -7
These corrections are all gonna add up into one good looking car when it's all said and done Gil. I'm with you on the MCW paints and polishing for factory finishes. I cleared my color finish on my 67 Mustang build but ......if I only had another Mustang like that......I'd clear the crap out of it and make it that shiny.
|
|
mrmike
Full Member
Registered: Apr 8, 2022 12:03:58 GMT -7
Free wheeling independent
Posts: 247 
|
Post by mrmike on Apr 9, 2022 7:12:08 GMT -7
I'm watching this! I have the exact same procedure planned for my Revell '69 Mustang.
|
|
Deleted
Registered: May 7, 2024 0:33:34 GMT -7
Posts: 0
|
Post by Deleted on Apr 17, 2022 7:57:55 GMT -7
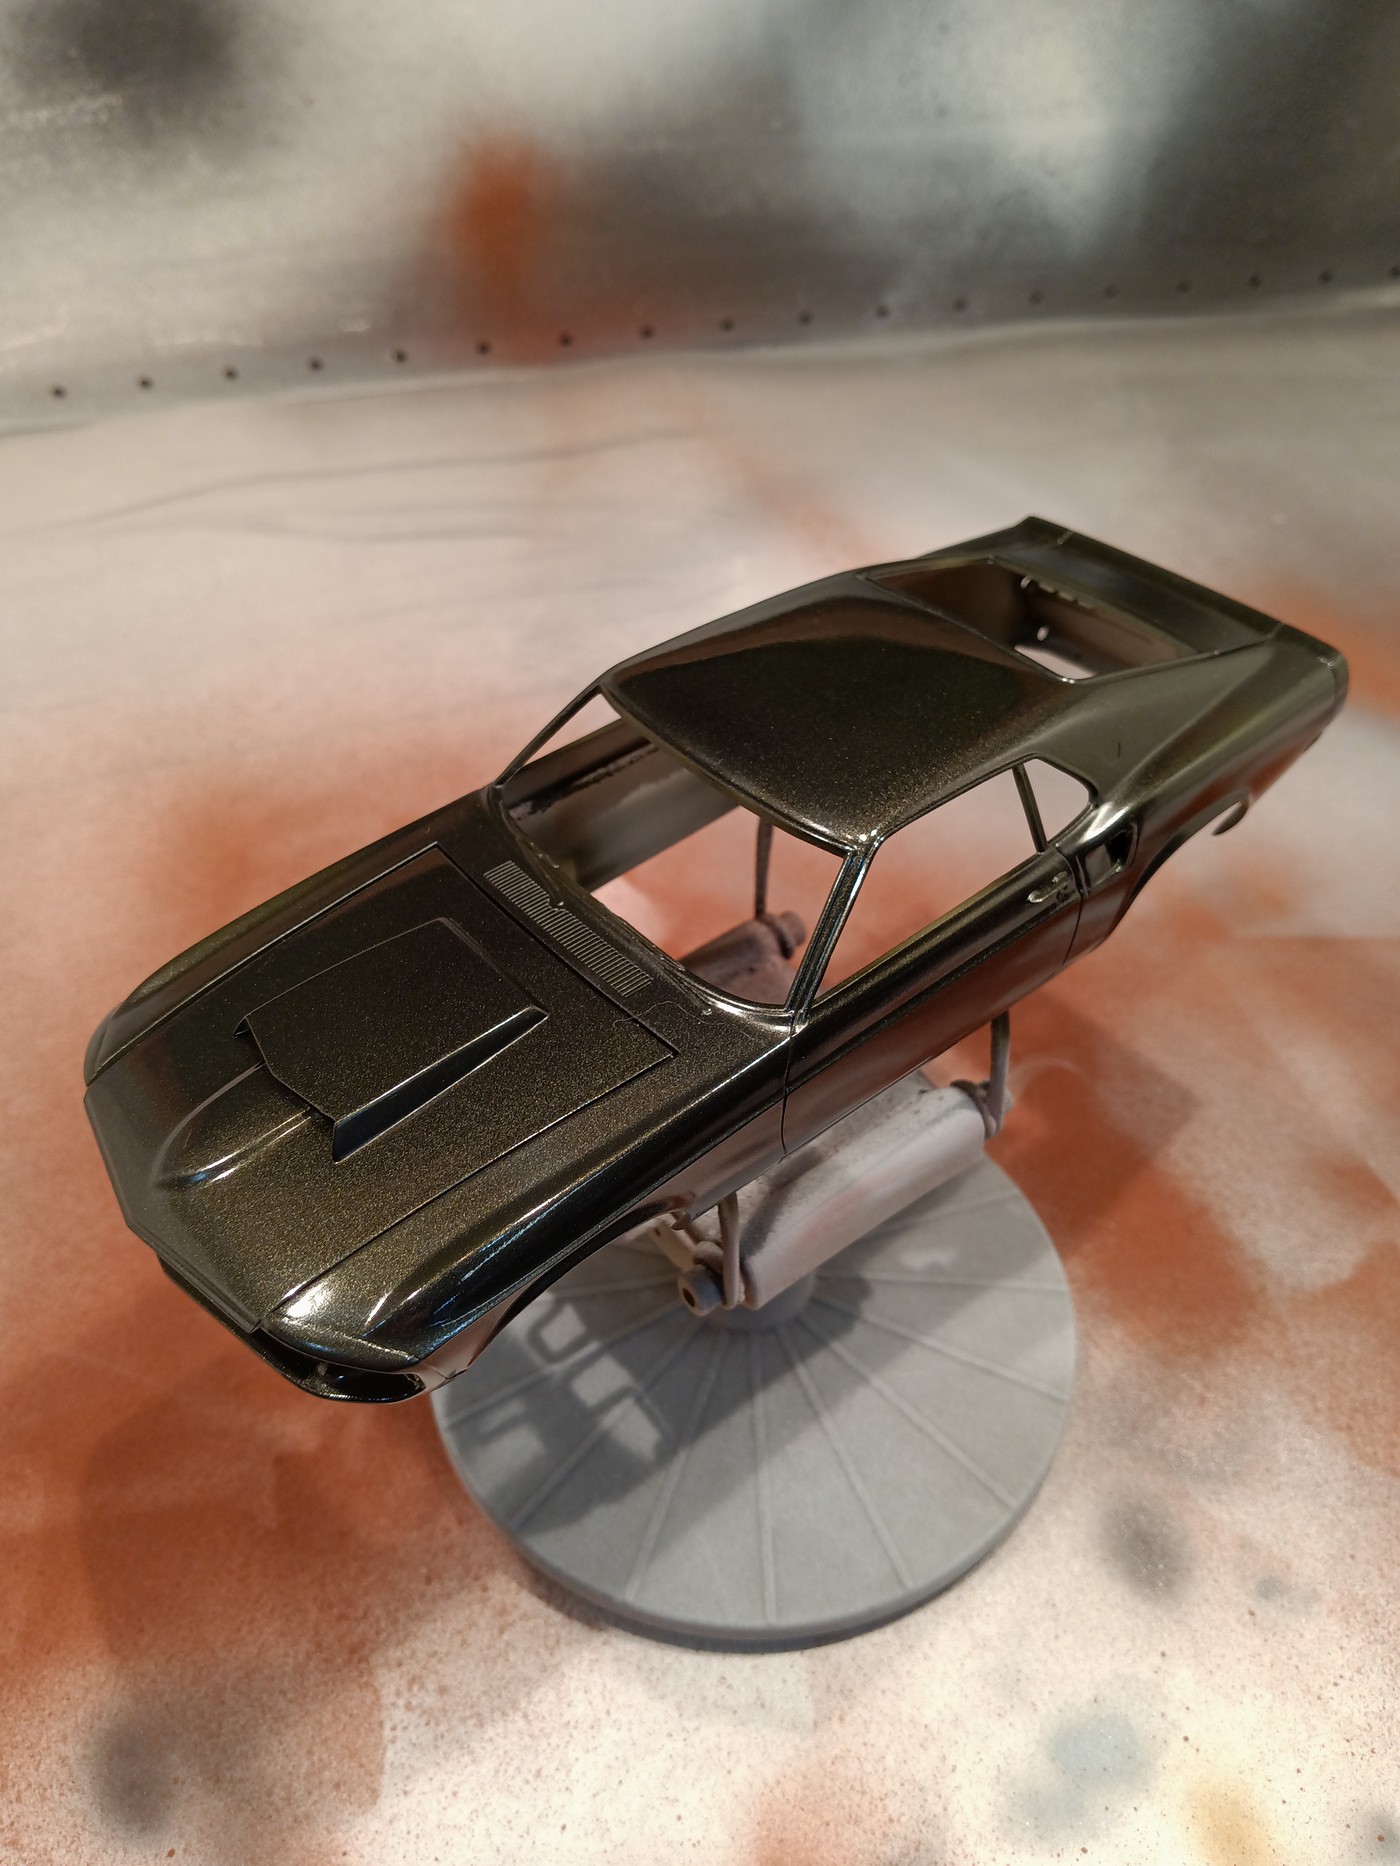
I got this Boss painted and had such a satisfying experience. I recently obtained a can of slow drying lacquer thinner and added it to the MCW paint before spraying and it really sprayed like a dream with no hint of dusting overspray that sometimes happens with this paint. In fact it went on so well that I only need to level it a bit with 6000 grit and a quick polish and wax with no clear to finish. |
|
41chevy
Senior Member
Registered: Jul 1, 2021 9:46:43 GMT -7
Posts: 705
|
Post by 41chevy on Apr 17, 2022 17:49:11 GMT -7
Nice results. Paul
|
|
|
|
Post by sharp on Apr 17, 2022 18:44:52 GMT -7
Paint looks really smooth! Nice job!
|
|
|
|
Post by mustang1989 on Apr 17, 2022 19:12:44 GMT -7
Now THAT turned out great Gil!! What type of lacquer thinner did you use to get away from that dusting/ cobweb effect that this paint has? That finish is just FABULOUS!!!
|
|
|
|
Post by Grandpabeast on May 15, 2022 17:10:56 GMT -7
paint looks like glass
|
|
Deleted
Registered: May 7, 2024 0:33:34 GMT -7
Posts: 0
|
Post by Deleted on May 17, 2022 11:36:33 GMT -7
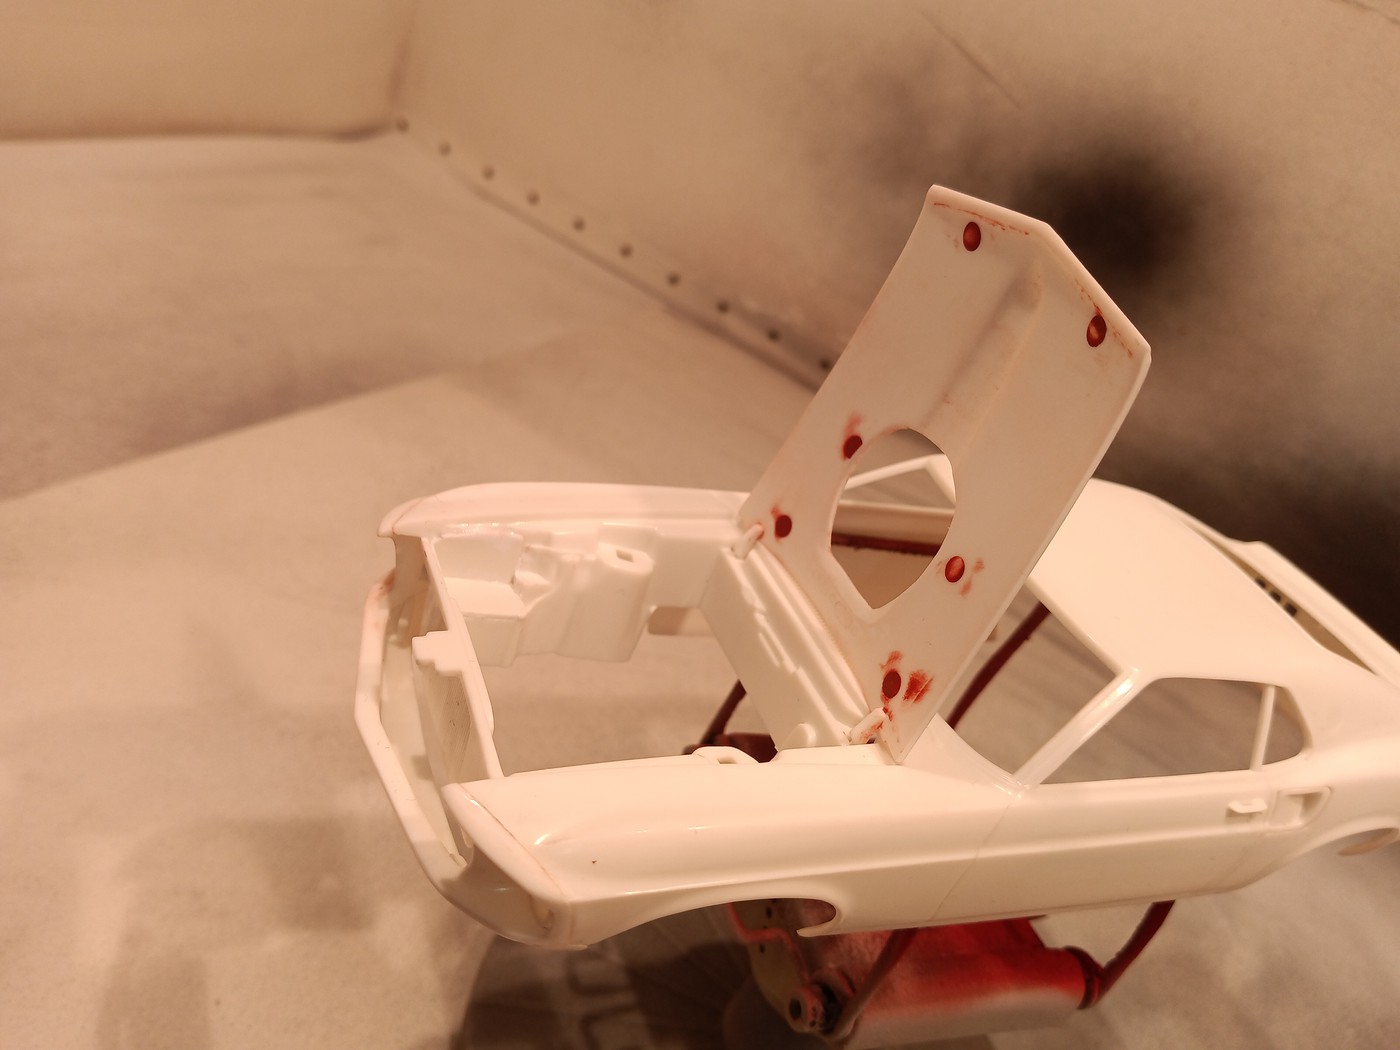
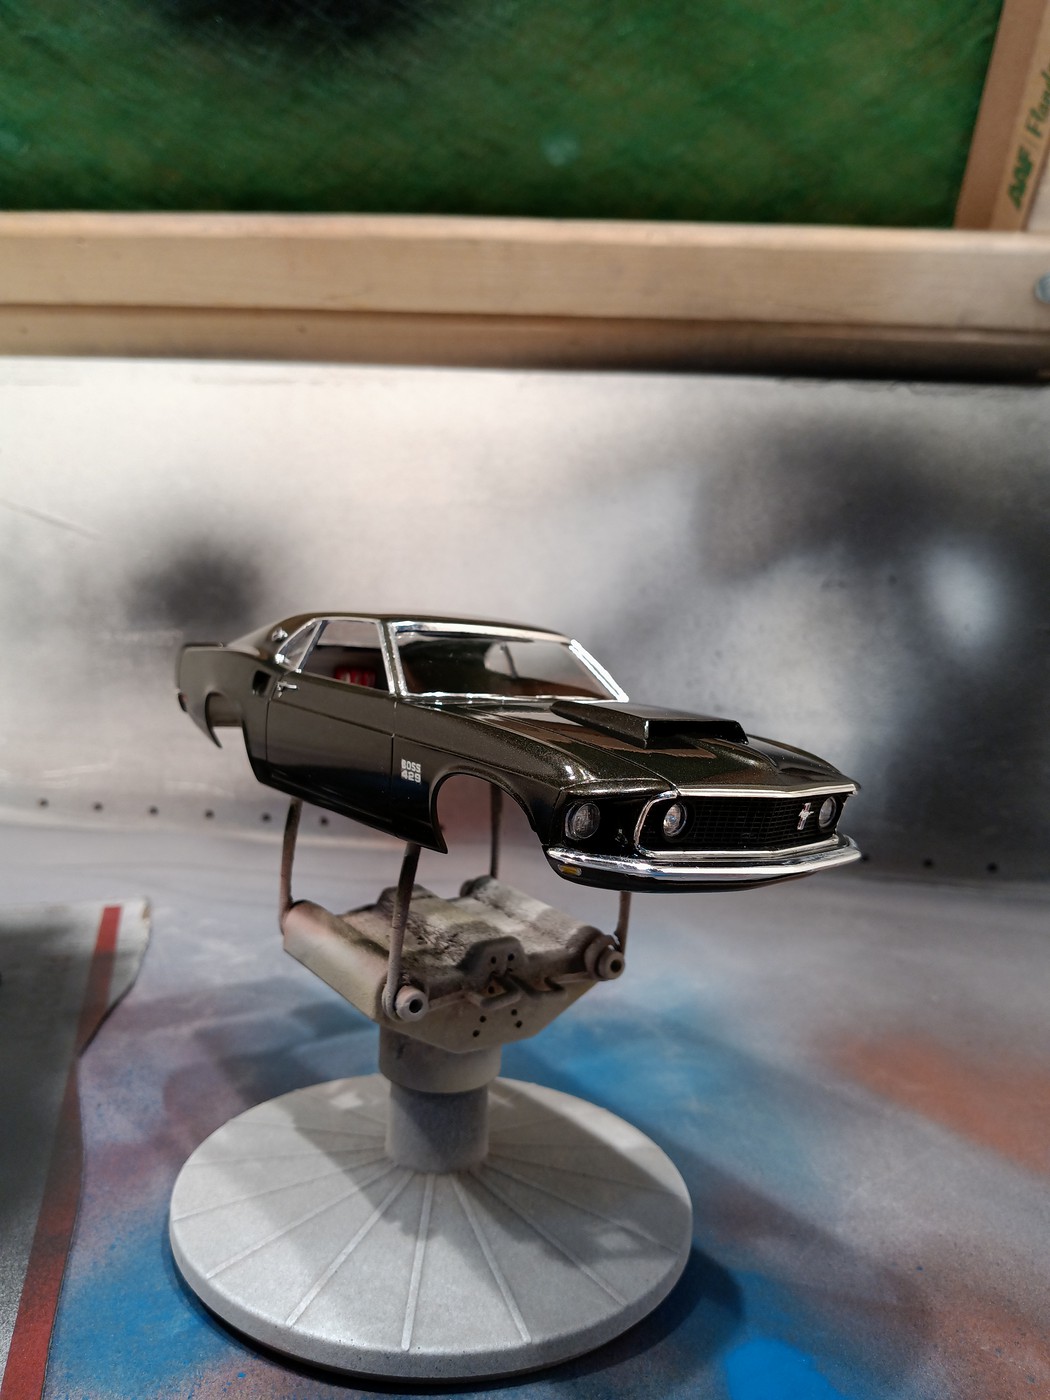
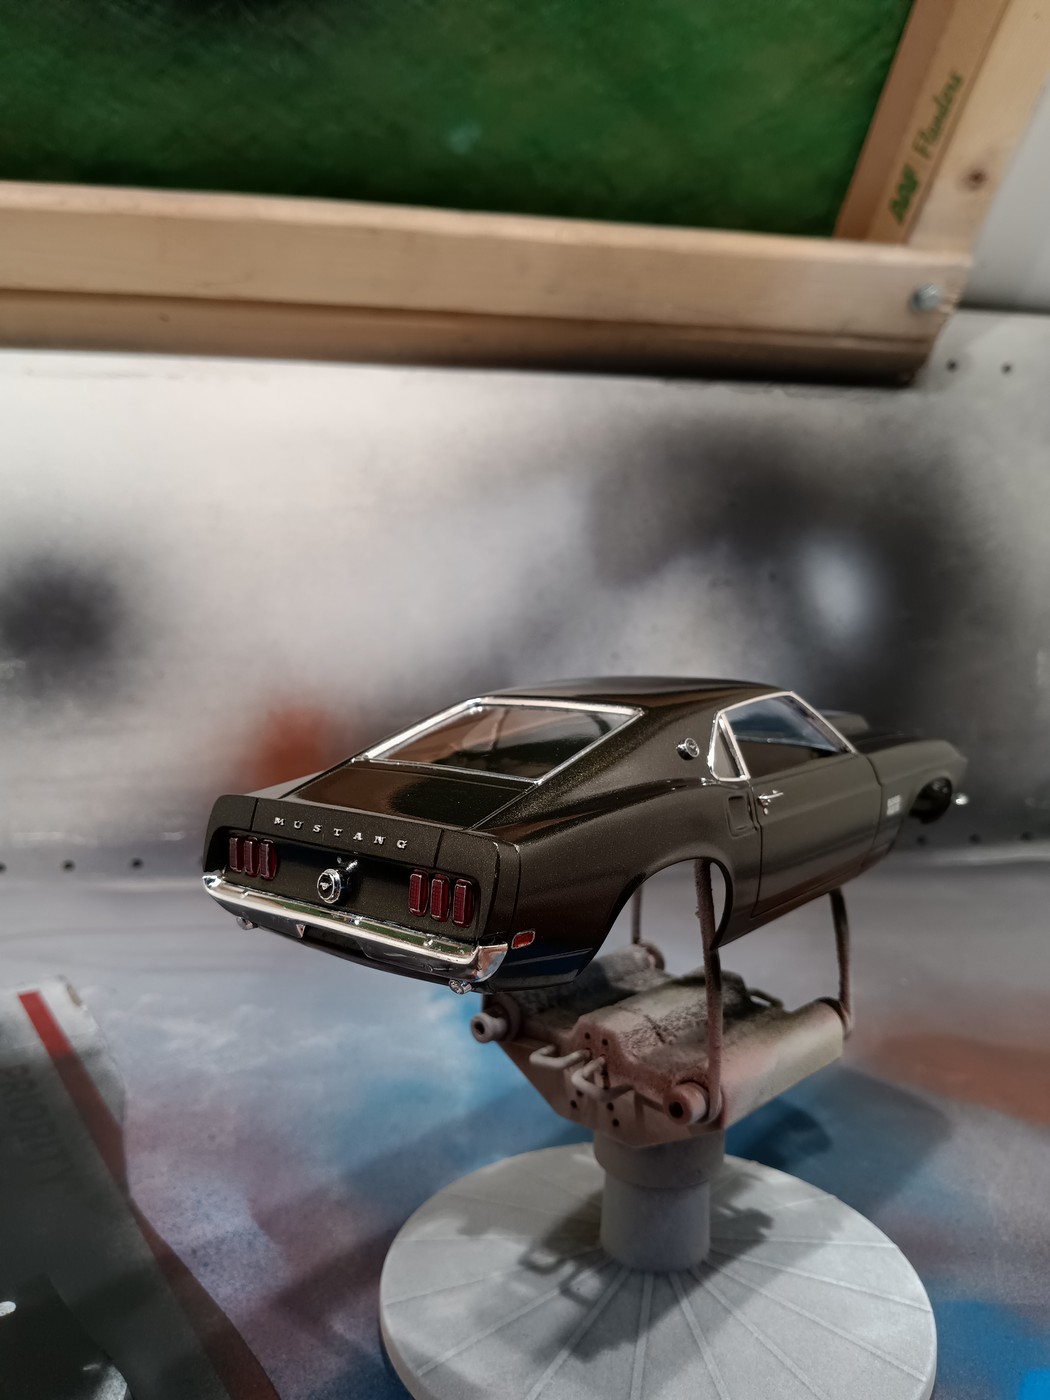
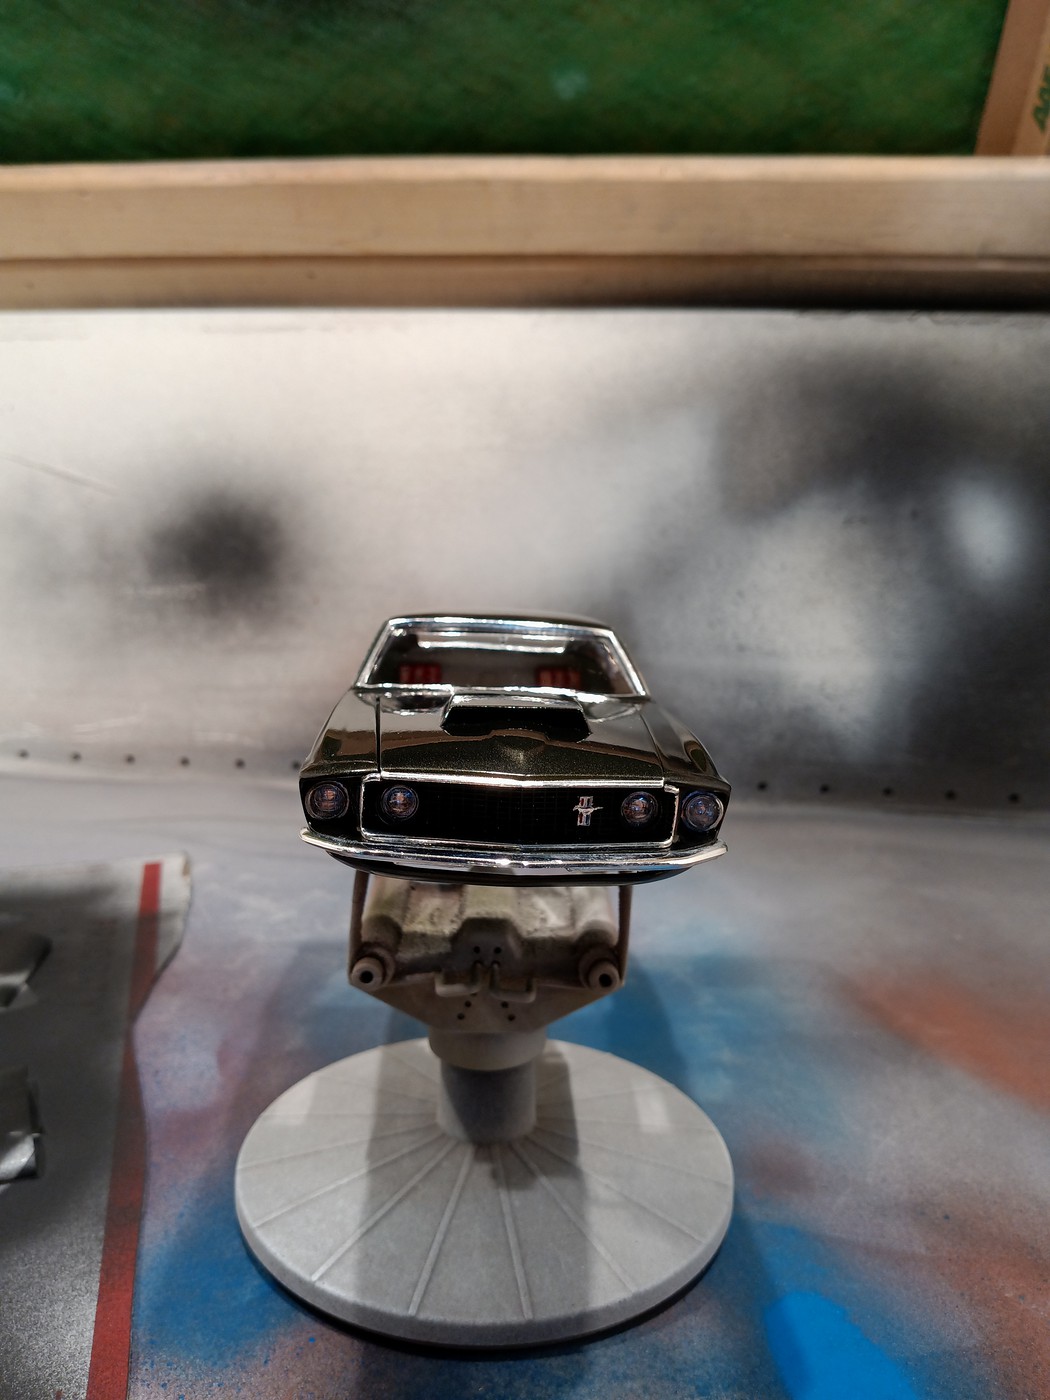
I have mostly completed the body with the exception of the chin spoiler and mirrors which obviously will be added later. It should be noted that I also acquired the new Revell 69' Boss 302 kit to contribute some parts and decals that will help with this project such as the rally wheels (the 1/24 wheels from the 70 were too big), exhaust, interior and some engine comp. decals. etc. I didn't use the front clip as I had already used the maligned example from the Mach I kit. As you can see from the following pics I have mitigated its deficiencies by installing the chrome headlight buckets on the inside of body shell, painted the exposed bezel in the bucket as well as the edge of the clear lenses with molotow ink, and installed them directly atop this bezel. What this does is deepen the bucket and eliminate the overly large chrome bezel which made this front end clunky. Also not previously mentioned was the fact that, as I usually do, I drilled and opened up the molded in door handles then hand painted them and other body scripts with the molotow ink, including the chrome piping on the rear taillights.
|
|
malcox477
Loyal Member
Registered: May 21, 2019 16:19:37 GMT -7
Posts: 1,039
|
Post by malcox477 on May 18, 2022 1:01:39 GMT -7
Looking real good Mike
|
|
41chevy
Senior Member
Registered: Jul 1, 2021 9:46:43 GMT -7
Posts: 705
|
Post by 41chevy on May 18, 2022 8:45:58 GMT -7
Excellent! Can't wait to see it completed. Paul
|
|
|
|
Post by Grandpabeast on May 22, 2022 13:56:58 GMT -7
looking great
|
|
Deleted
Registered: May 7, 2024 0:33:34 GMT -7
Posts: 0
|
Post by Deleted on Jul 1, 2022 13:36:30 GMT -7
Chipping away at this project. I got the engine complete and installed in the chassis. I added plug wires, breather caps and hoses, and scratch built the EGR system which is so visible on these engines. I also modified the exhaust to attach to the manifolds. This is the exhaust from the Boss 302 kit and I have to say that it took way too much cleanup. Additionally, I shortened the drive shaft to fit and added inspection markings to it and the leaf springs. Body color overspray was also applied.
|
|
malcox477
Loyal Member
Registered: May 21, 2019 16:19:37 GMT -7
Posts: 1,039
|
Post by malcox477 on Jul 2, 2022 3:37:08 GMT -7
Chassis looks very good
|
|
|
|
Post by mustang1989 on Jul 3, 2022 5:04:35 GMT -7
I really get a kick out of all the time and effort that you put into each build Gil. You always seem to bring much to the table to learn from and it's truly appreciated.
Engine details, paint and chassis build up are a true testament to your abilities.
|
|
Deleted
Registered: May 7, 2024 0:33:34 GMT -7
Posts: 0
|
Post by Deleted on Jul 3, 2022 16:52:13 GMT -7
Thanks guys. I am just hoping that when everything goes together it will fit like a glove. I adjusted the motor mounts on the engine to get it as low as possible. It looks like, from other builds that I have seen, that the motor fits pretty easily. Crossing fingers.
|
|
|
|
Post by mustang1989 on Jul 16, 2022 6:06:03 GMT -7
Thanks guys. I am just hoping that when everything goes together it will fit like a glove. I adjusted the motor mounts on the engine to get it as low as possible. It looks like, from other builds that I have seen, that the motor fits pretty easily. Crossing fingers. Looking forward to seeing that progress in pictures Gil. |
|
Deleted
Registered: May 7, 2024 0:33:34 GMT -7
Posts: 0
|
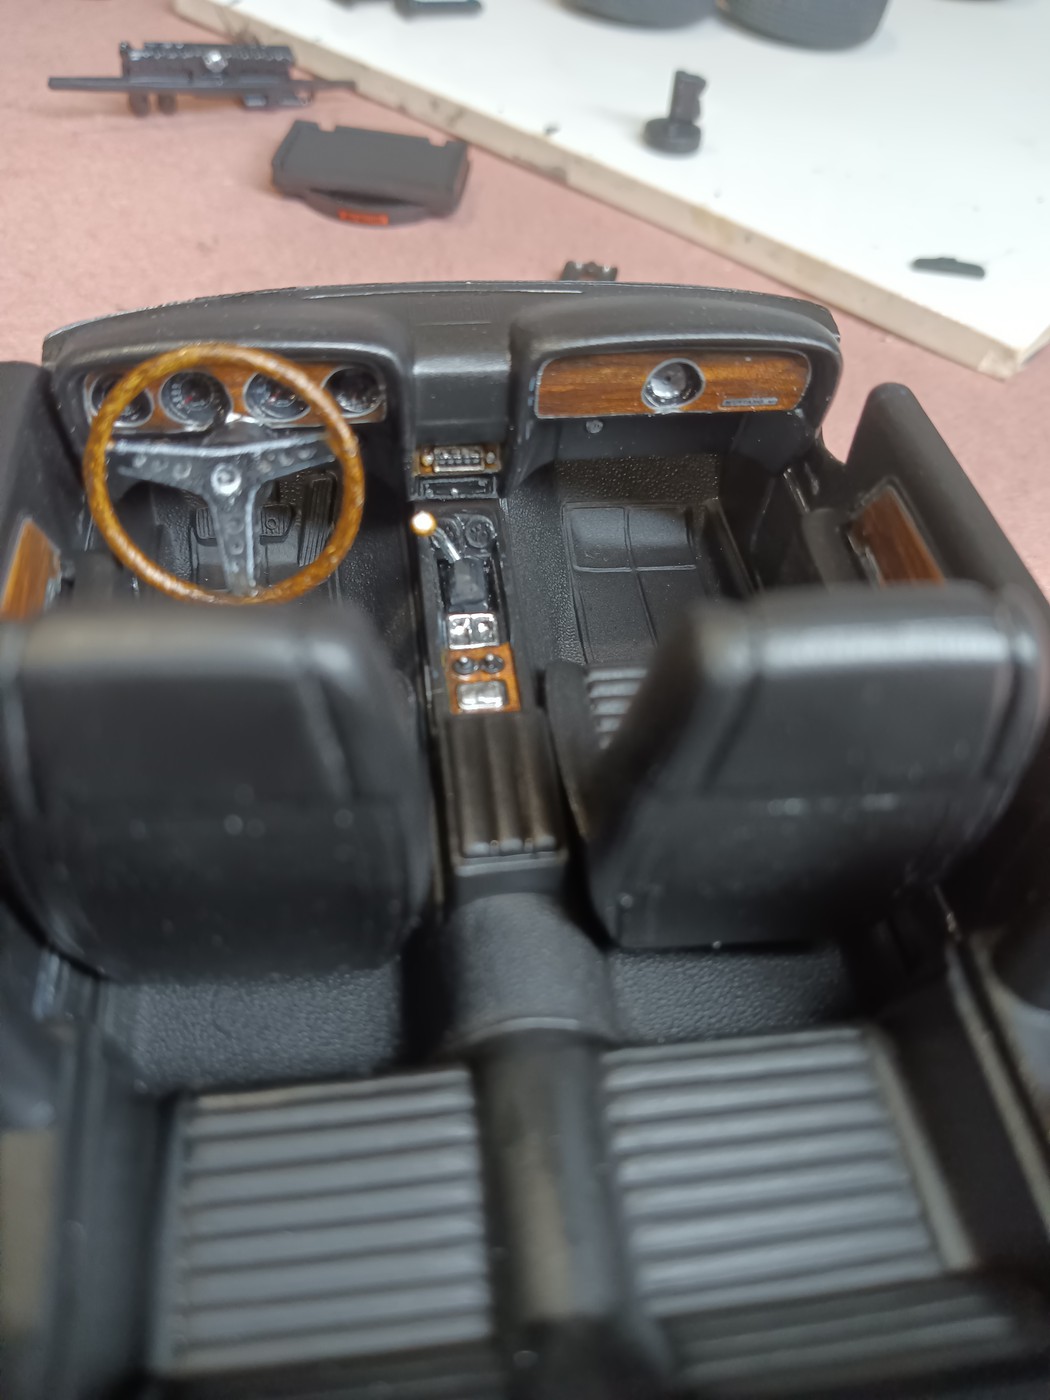
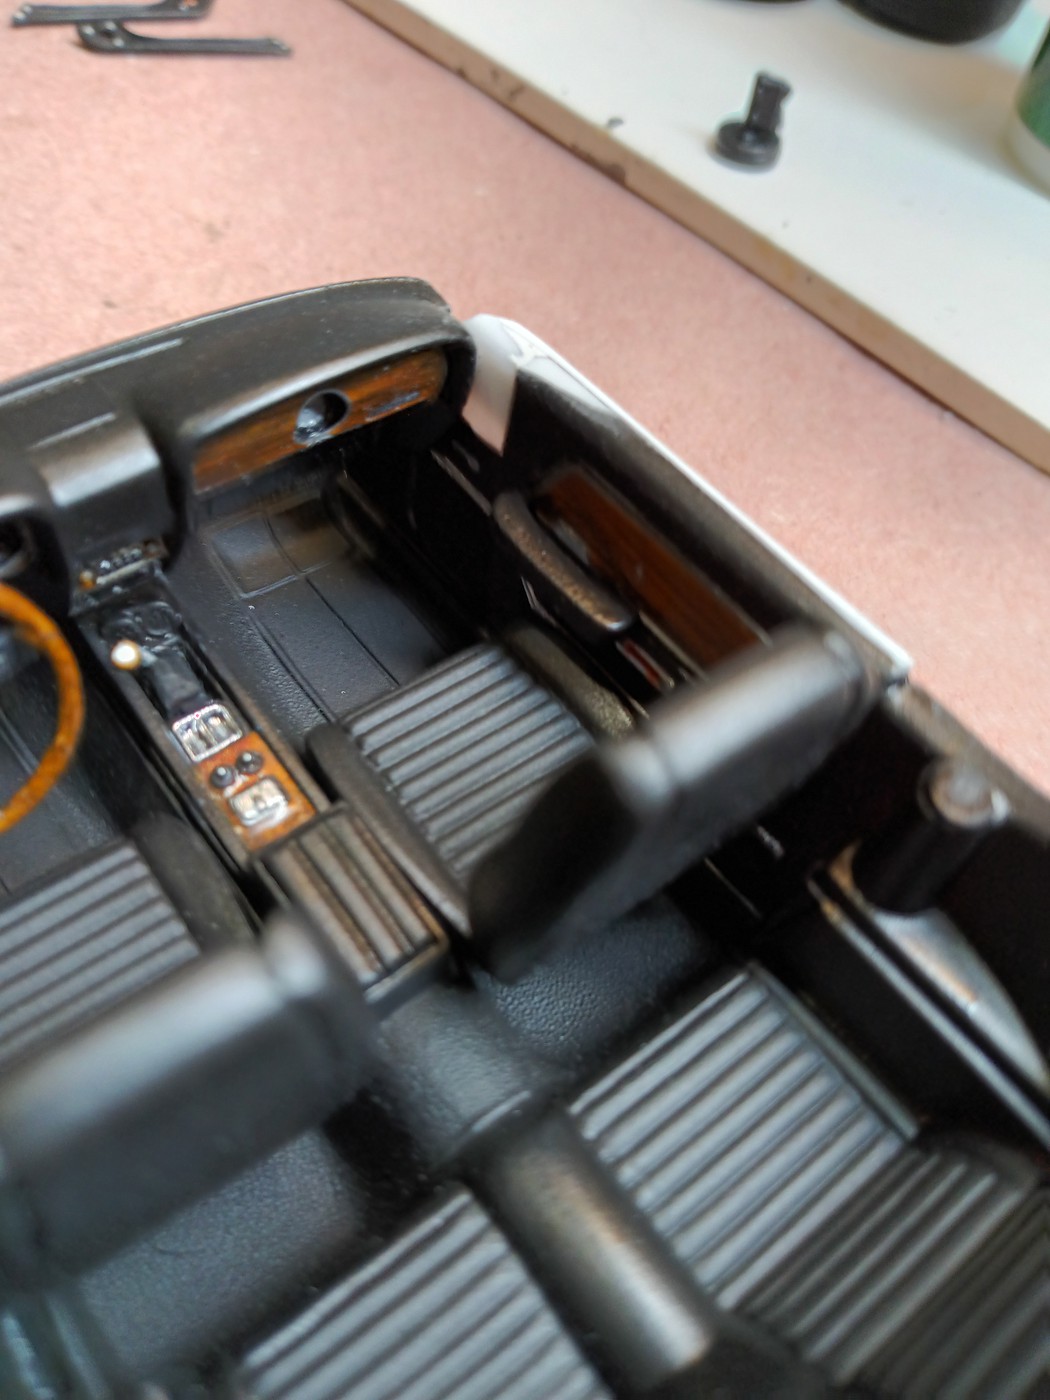
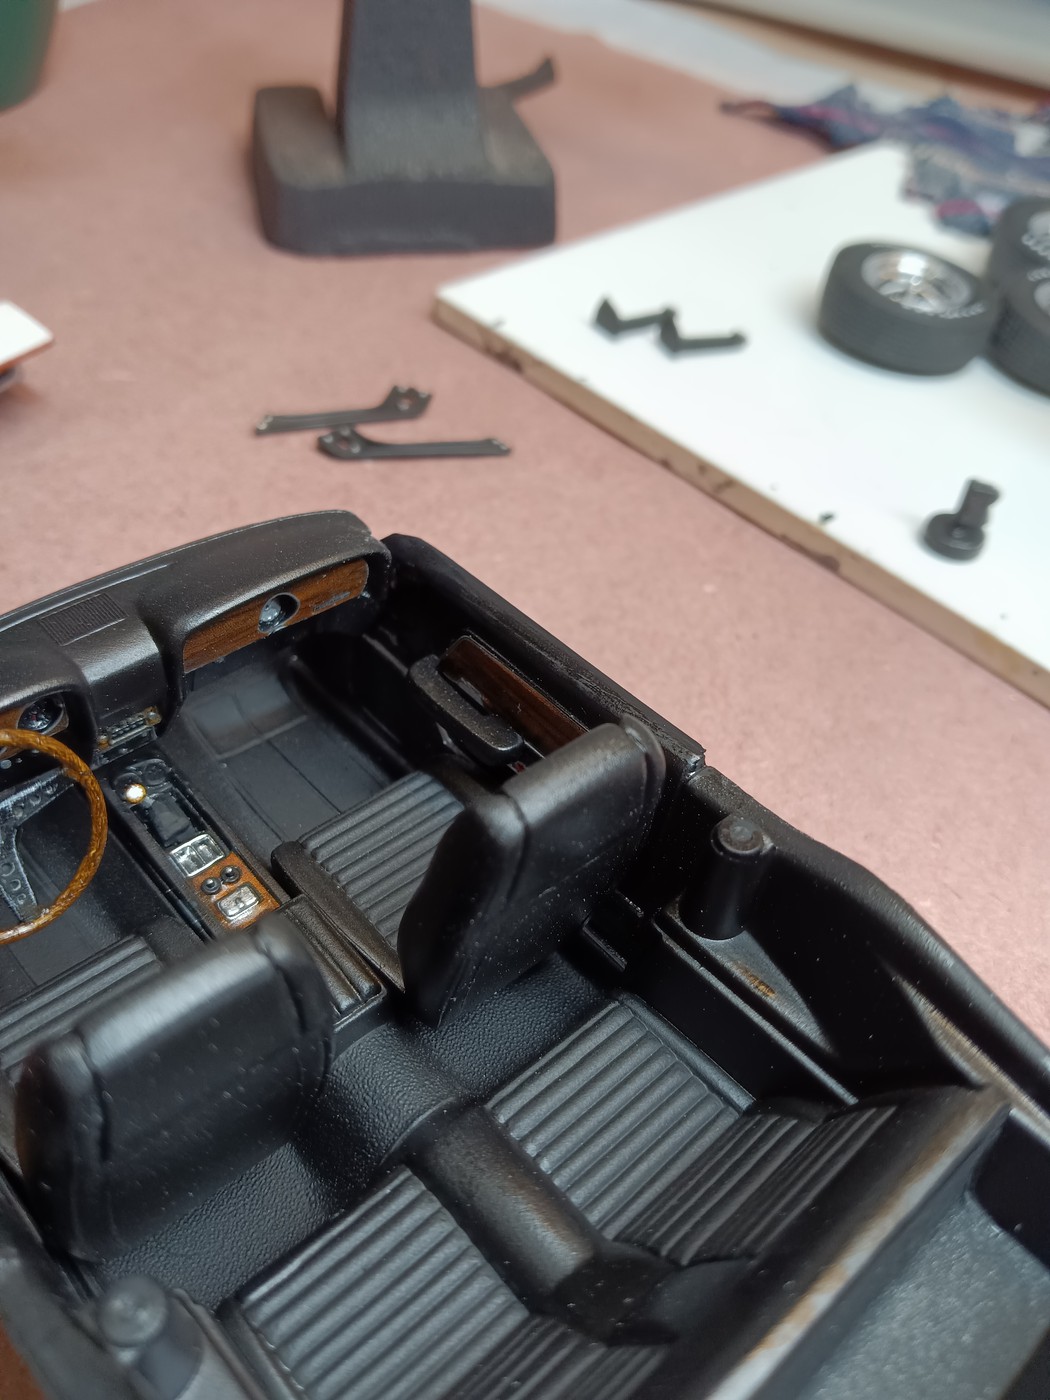
Post by Deleted on Jul 16, 2022 6:21:40 GMT -7
Moving right along, I have completed the interior and used the decals from the Boss 302 kit which were useful in bringing it to life. The wood grain decal surrounding the gauges didn't fit perfectly but I made it work. I also used the door armrests from the 1970 Boss kit. The things I didn't correct is the removal of the bases for the roll cage and the console gauge detail left over from the 69 shelby design, which this kit originated from. Ok, now on to the odd problem I needed to correct. If you notice from the beginning pics there is an inexplicable cuttout on the passenger side door panel near the dash. I hadn't really considered it initially, thinking it was part of the design and would factor into installation, however, when I test fit it I noticed a space remained. I don't know why this cuttout is there, serves no purpose, and isn't present in the interior tub of the Boss 302 kit which is basically the same kit. So I cut a piece from the aforementioned to create a plug for the cuttout. I also shimmed up the side of the tub bc there was a noticeable space between the tub and the body upon test fitting. The repairs and finished results are below: |
|
|
|
Post by mustang1989 on Jul 17, 2022 5:07:28 GMT -7
What a great fix for the passenger side problem area Gil. That interior looks great after all the work that you put into this. Like you, I don't get these certain flaws when considering all of the research that any given modeling company has to make to put these molds out. A true oversight for sure and you did a great job fixing that area. Good progress update bro.
|
|
malcox477
Loyal Member
Registered: May 21, 2019 16:19:37 GMT -7
Posts: 1,039
|
Post by malcox477 on Jul 19, 2022 21:22:11 GMT -7
Awesome work, those are the things a love about this hobby, fix things and make them look good
|
|
|
|
Post by Grandpabeast on Jul 25, 2022 4:51:39 GMT -7
Some amazing work. Attention to detail is eye popping. Great save on that passenger side. Do we know if that problem is with all kits or could that just have been a flux from when it was molded?
|
|
Deleted
Registered: May 7, 2024 0:33:34 GMT -7
Posts: 0
|
Post by Deleted on Jul 25, 2022 5:53:49 GMT -7
Thanks, and I was wondering the same. I have built a version of this kit in the past and don't remember the issue. If anyone has this version of this kit can you check and let us know?
|
|
Deleted
Registered: May 7, 2024 0:33:34 GMT -7
Posts: 0
|
Post by Deleted on Jul 27, 2022 13:33:17 GMT -7
Finished this the other night and it was a long time coming! I am more than happy with the result, and I really think it looks the part, even with the so called "wrong" front end. See more pictures on the new "completed" thread.
|
|
mrmike
Full Member
Registered: Apr 8, 2022 12:03:58 GMT -7
Free wheeling independent
Posts: 247
|
Post by mrmike on Jul 27, 2022 15:00:11 GMT -7
I just checked my kit and it is complete. Must be a short shot.
|
|